

This weblog put up is co-written with James Solar from Snowflake.
Clients depend on information from completely different sources resembling cell functions, clickstream occasions from web sites, historic information, and extra to infer significant patterns to optimize their merchandise, providers, and processes. With a knowledge pipeline, which is a set of duties used to automate the motion and transformation of knowledge between completely different programs, you may scale back the effort and time wanted to achieve insights from the info. Apache Airflow and Snowflake have emerged as highly effective applied sciences for information administration and evaluation.
Amazon Managed Workflows for Apache Airflow (Amazon MWAA) is a managed workflow orchestration service for Apache Airflow that you need to use to arrange and function end-to-end information pipelines within the cloud at scale. The Snowflake Knowledge Cloud gives a single supply of fact for all of your information wants and permits your organizations to retailer, analyze, and share massive quantities of knowledge. The Apache Airflow open-source neighborhood gives over 1,000 pre-built operators (plugins that simplify connections to providers) for Apache Airflow to construct information pipelines.
On this put up, we offer an outline of orchestrating your information pipeline utilizing Snowflake operators in your Amazon MWAA atmosphere. We outline the steps wanted to arrange the combination between Amazon MWAA and Snowflake. The answer gives an end-to-end automated workflow that features information ingestion, transformation, analytics, and consumption.
Overview of resolution
The next diagram illustrates our resolution structure.
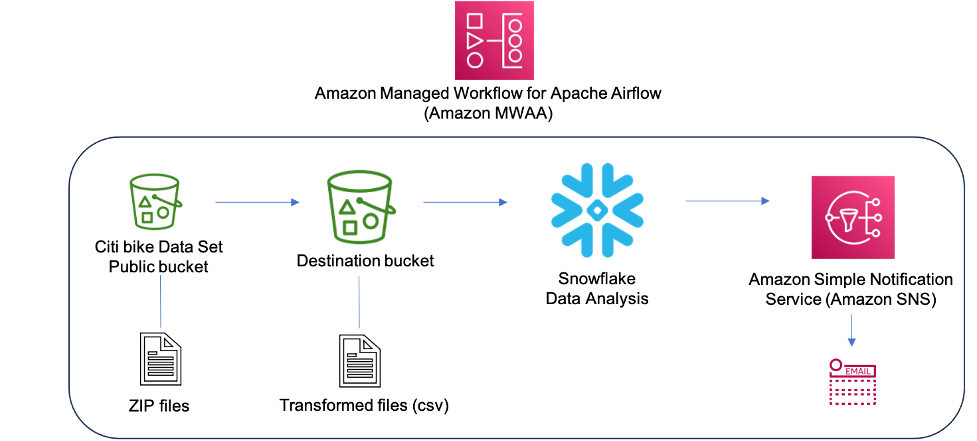
The information used for transformation and evaluation relies on the publicly accessible New York Citi Bike dataset. The information (zipped recordsdata), which incorporates rider demographics and journey information, is copied from the general public Citi Bike Amazon Easy Storage Service (Amazon S3) bucket in your AWS account. Knowledge is decompressed and saved in a special S3 bucket (reworked information may be saved in the identical S3 bucket the place information was ingested, however for simplicity, we’re utilizing two separate S3 buckets). The reworked information is then made accessible to Snowflake for information evaluation. The output of the queried information is revealed to Amazon Easy Notification Service (Amazon SNS) for consumption.
Amazon MWAA makes use of a directed acyclic graph (DAG) to run the workflows. On this put up, we run three DAGs:
The next diagram illustrates this workflow.

See the GitHub repo for the DAGs and different recordsdata associated to the put up.
Be aware that on this put up, we’re utilizing a DAG to create a Snowflake connection, however you can even create the Snowflake connection utilizing the Airflow UI or CLI.
Stipulations
To deploy the answer, it is best to have a fundamental understanding of Snowflake and Amazon MWAA with the next stipulations:
- An AWS account in an AWS Area the place Amazon MWAA is supported.
- A Snowflake account with admin credentials. If you happen to don’t have an account, join a 30-day free trial. Choose the Snowflake enterprise version for the AWS Cloud platform.
- Entry to Amazon MWAA, Secrets and techniques Supervisor, and Amazon SNS.
- On this put up, we’re utilizing two S3 buckets, known as
airflow-blog-bucket-ACCOUNT_IDandcitibike-tripdata-destination-ACCOUNT_ID. Amazon S3 helps international buckets, which signifies that every bucket identify should be distinctive throughout all AWS accounts in all of the Areas inside a partition. If the S3 bucket identify is already taken, select a special S3 bucket identify. Create the S3 buckets in your AWS account. We add content material to the S3 bucket later within the put up. SubstituteACCOUNT_IDwith your individual AWS account ID or some other distinctive identifier. The bucket particulars are as follows:- airflow-blog-bucket-ACCOUNT_ID – The highest-level bucket for Amazon MWAA-related recordsdata.
- airflow-blog-bucket-ACCOUNT_ID/necessities – The bucket used for storing the necessities.txt file wanted to deploy Amazon MWAA.
- airflow-blog-bucket-ACCOUNT_ID/dags – The bucked used for storing the DAG recordsdata to run workflows in Amazon MWAA.
- airflow-blog-bucket-ACCOUNT_ID/dags/mwaa_snowflake_queries – The bucket used for storing the Snowflake SQL queries.
- citibike-tripdata-destination-ACCOUNT_ID – The bucket used for storing the reworked dataset.
When implementing the answer on this put up, exchange references to airflow-blog-bucket-ACCOUNT_ID and citibike-tripdata-destination-ACCOUNT_ID with the names of your individual S3 buckets.
Arrange the Amazon MWAA atmosphere
First, you create an Amazon MWAA atmosphere. Earlier than deploying the atmosphere, add the necessities file to the airflow-blog-bucket-ACCOUNT_ID/necessities S3 bucket. The necessities file relies on Amazon MWAA model 2.6.3. If you happen to’re testing on a special Amazon MWAA model, replace the necessities file accordingly.
Full the next steps to arrange the atmosphere:
- On the Amazon MWAA console, select Create atmosphere.
- Present a reputation of your alternative for the atmosphere.
- Select Airflow model 2.6.3.
- For the S3 bucket, enter the trail of your bucket (
s3:// airflow-blog-bucket-ACCOUNT_ID). - For the DAGs folder, enter the DAGs folder path (
s3:// airflow-blog-bucket-ACCOUNT_ID/dags). - For the necessities file, enter the necessities file path (
s3:// airflow-blog-bucket-ACCOUNT_ID/ necessities/necessities.txt). - Select Subsequent.
- Beneath Networking, select your present VPC or select Create MWAA VPC.
- Beneath Net server entry, select Public community.
- Beneath Safety teams, depart Create new safety group chosen.
- For the Setting class, Encryption, and Monitoring sections, depart all values as default.
- Within the Airflow configuration choices part, select Add customized configuration worth and configure two values:
- Set Configuration possibility to
secrets and techniques.backendand Customized worth toairflow.suppliers.amazon.aws.secrets and techniques.secrets_manager.SecretsManagerBackend. - Set Configuration possibility to
secrets and techniques.backend_kwargsand Customized worth to{"connections_prefix" : "airflow/connections", "variables_prefix" : "airflow/variables"}.
- Set Configuration possibility to
- Within the Permissions part, depart the default settings and select Create a brand new function.
- Select Subsequent.
- When the Amazon MWAA atmosphere us accessible, assign S3 bucket permissions to the AWS Identification and Entry Administration (IAM) execution function (created throughout the Amazon MWAA set up).

This can direct you to the created execution function on the IAM console.
For testing functions, you may select Add permissions and add the managed AmazonS3FullAccess coverage to the person as an alternative of offering restricted entry. For this put up, we offer solely the required entry to the S3 buckets.
- On the drop-down menu, select Create inline coverage.
- For Choose Service, select S3.
- Beneath Entry degree, specify the next:
- Increase Listing degree and choose
ListBucket. - Increase Learn degree and choose
GetObject. - Increase Write degree and choose
PutObject.
- Increase Listing degree and choose
- Beneath Sources, select Add ARN.
- On the Textual content tab, present the next ARNs for S3 bucket entry:
arn:aws:s3:::airflow-blog-bucket-ACCOUNT_ID(use your individual bucket).arn:aws:s3:::citibike-tripdata-destination-ACCOUNT_ID(use your individual bucket).arn:aws:s3:::tripdata(that is the general public S3 bucket the place the Citi Bike dataset is saved; use the ARN as specified right here).
- Beneath Sources, select Add ARN.
- On the Textual content tab, present the next ARNs for S3 bucket entry:
arn:aws:s3:::airflow-blog-bucket-ACCOUNT_ID/*(be sure that to incorporate the asterisk).arn:aws:s3:::citibike-tripdata-destination-ACCOUNT_ID /*.arn:aws:s3:::tripdata/*(that is the general public S3 bucket the place the Citi Bike dataset is saved, use the ARN as specified right here).
- Select Subsequent.
- For Coverage identify, enter
S3ReadWrite. - Select Create coverage.
- Lastly, present Amazon MWAA with permission to entry Secrets and techniques Supervisor secret keys.
This step gives the Amazon MWAA execution function to your Amazon MWAA atmosphere learn entry to the key key in Secrets and techniques Supervisor.
The execution function ought to have the insurance policies MWAA-Execution-Coverage*, S3ReadWrite, and SecretsManagerReadWrite connected to it.

When the Amazon MWAA atmosphere is on the market, you may check in to the Airflow UI from the Amazon MWAA console utilizing hyperlink for Open Airflow UI.

Arrange an SNS subject and subscription
Subsequent, you create an SNS subject and add a subscription to the subject. Full the next steps:
- On the Amazon SNS console, select Subjects from the navigation pane.
- Select Create subject.
- For Matter sort, select Normal.
- For Title, enter
mwaa_snowflake. - Go away the remainder as default.
- After you create the subject, navigate to the Subscriptions tab and select Create subscription.

- For Matter ARN, select
mwaa_snowflake. - Set the protocol to Electronic mail.
- For Endpoint, enter your e mail ID (you’re going to get a notification in your e mail to simply accept the subscription).
By default, solely the subject proprietor can publish and subscribe to the subject, so that you must modify the Amazon MWAA execution function entry coverage to permit Amazon SNS entry.
- On the IAM console, navigate to the execution function you created earlier.
- On the drop-down menu, select Create inline coverage.

- For Choose service, select SNS.
- Beneath Actions, develop Write entry degree and choose Publish.
- Beneath Sources, select Add ARN.
- On the Textual content tab, specify the ARN
arn:aws:sns:<<area>>:<<our_account_ID>>:mwaa_snowflake. - Select Subsequent.
- For Coverage identify, enter
SNSPublishOnly. - Select Create coverage.
Configure a Secrets and techniques Supervisor secret
Subsequent, we arrange Secrets and techniques Supervisor, which is a supported various database for storing Snowflake connection data and credentials.
To create the connection string, the Snowflake host and account identify is required. Log in to your Snowflake account, and underneath the Worksheets menu, select the plus signal and choose SQL worksheet. Utilizing the worksheet, run the next SQL instructions to search out the host and account identify.
Run the next question for the host identify:
Run the next question for the account identify:
Subsequent, we configure the key in Secrets and techniques Supervisor.
- On the Secrets and techniques Supervisor console, select Retailer a brand new secret.
- For Secret sort, select Different sort of secret.
- Beneath Key/Worth pairs, select the Plaintext tab.
- Within the textual content discipline, enter the next code and modify the string to replicate your Snowflake account data:
{"host": "<<snowflake_host_name>>", "account":"<<snowflake_account_name>>","person":"<<snowflake_username>>","password":"<<snowflake_password>>","schema":"mwaa_schema","database":"mwaa_db","function":"accountadmin","warehouse":"dev_wh"}
For instance:
{"host": "xxxxxx.snowflakecomputing.com", "account":"xxxxxx" ,"person":"xxxxx","password":"*****","schema":"mwaa_schema","database":"mwaa_db", "function":"accountadmin","warehouse":"dev_wh"}
The values for the database identify, schema identify, and function needs to be as talked about earlier. The account, host, person, password, and warehouse can differ primarily based in your setup.

Select Subsequent.
- For Secret identify, enter
airflow/connections/snowflake_accountadmin. - Go away all different values as default and select Subsequent.
- Select Retailer.
Be aware of the Area through which the key was created underneath Secret ARN. We later outline it as a variable within the Airflow UI.
Configure Snowflake entry permissions and IAM function
Subsequent, log in to your Snowflake account. Make sure the account you’re utilizing has account administrator entry. Create a SQL worksheet. Beneath the worksheet, create a warehouse named dev_wh.
The next is an instance SQL command:
For Snowflake to learn information from and write information to an S3 bucket referenced in an exterior (S3 bucket) stage, a storage integration is required. Comply with the steps outlined in Choice 1: Configuring a Snowflake Storage Integration to Entry Amazon S3(solely carry out Steps 1 and a couple of, as described on this part).
Configure entry permissions for the S3 bucket
Whereas creating the IAM coverage, a pattern coverage doc code is required (see the next code), which gives Snowflake with the required permissions to load or unload information utilizing a single bucket and folder path. The bucket identify used on this put up is citibike-tripdata-destination-ACCOUNT_ID. It’s best to modify it to replicate your bucket identify.
Create the IAM function
Subsequent, you create the IAM function to grant privileges on the S3 bucket containing your information recordsdata. After creation, file the Position ARN worth positioned on the function abstract web page.

Configure variables
Lastly, configure the variables that can be accessed by the DAGs in Airflow. Log in to the Airflow UI and on the Admin menu, select Variables and the plus signal.

Add 4 variables with the next key/worth pairs:
- Key
aws_role_arnwith worth<<snowflake_aws_role_arn>>(the ARN for function mysnowflakerole famous earlier) - Key
destination_bucketwith worth<<bucket_name>>(for this put up, the bucket utilized in citibike-tripdata-destination-ACCOUNT_ID) - Key
target_sns_arnwith worth<<sns_Arn>>(the SNS subject in your account) - Key
sec_key_regionwith worth<<region_of_secret_deployment>>(the Area the place the key in Secrets and techniques Supervisor was created)
The next screenshot illustrates the place to search out the SNS subject ARN.

The Airflow UI will now have the variables outlined, which can be referred to by the DAGs.

Congratulations, you might have accomplished all of the configuration steps.
Run the DAG
Let’s have a look at the best way to run the DAGs. To recap:
- DAG1 (create_snowflake_connection_blog.py) – Creates the Snowflake connection in Apache Airflow. This connection can be used to authenticate with Snowflake. The Snowflake connection string is saved in Secrets and techniques Supervisor, which is referenced within the DAG file.
- DAG2 (create-snowflake_initial-setup_blog.py) – Creates the database, schema, storage integration, and stage in Snowflake.
- DAG3 (run_mwaa_datapipeline_blog.py) – Runs the info pipeline, which can unzip recordsdata from the supply public S3 bucket and duplicate them to the vacation spot S3 bucket. The subsequent process will create a desk in Snowflake to retailer the info. Then the info from the vacation spot S3 bucket can be copied into the desk utilizing a Snowflake stage. After the info is efficiently copied, a view can be created in Snowflake, on high of which the SQL queries can be run.
To run the DAGs, full the next steps:
- Add the DAGs to the S3 bucket
airflow-blog-bucket-ACCOUNT_ID/dags. - Add the SQL question recordsdata to the S3 bucket
airflow-blog-bucket-ACCOUNT_ID/dags/mwaa_snowflake_queries. - Log in to the Apache Airflow UI.
- Find DAG1 (
create_snowflake_connection_blog), un-pause it, and select the play icon to run it.
You’ll be able to view the run state of the DAG utilizing the Grid or Graph view within the Airflow UI.

After DAG1 runs, the Snowflake connection snowflake_conn_accountadmin is created on the Admin, Connections menu.
- Find and run DAG2 (
create-snowflake_initial-setup_blog).

After DAG2 runs, the next objects are created in Snowflake:
- The database
mwaa_db - The schema
mwaa_schema - The storage integration
mwaa_citibike_storage_int - The stage
mwaa_citibike_stg
Earlier than operating the ultimate DAG, the belief relationship for the IAM person must be up to date.
- Log in to your Snowflake account utilizing your admin account credentials.
- Open your SQL worksheet created earlier and run the next command:
mwaa_citibike_storage_int is the identify of the combination created by the DAG2 within the earlier step.
From the output, file the property worth of the next two properties:
- STORAGE_AWS_IAM_USER_ARN – The IAM person created to your Snowflake account.
- STORAGE_AWS_EXTERNAL_ID – The exterior ID that’s wanted to determine a belief relationship.
Now we grant the Snowflake IAM person permissions to entry bucket objects.
- On the IAM console, select Roles within the navigation pane.
- Select the function
mysnowflakerole. - On the Belief relationships tab, select Edit belief relationship.
- Modify the coverage doc with the
DESC STORAGE INTEGRATIONoutput values you recorded. For instance:
The AWS function ARN and ExternalId can be completely different to your atmosphere primarily based on the output of the DESC STORAGE INTEGRATION question

- Find and run the ultimate DAG (
run_mwaa_datapipeline_blog).
On the finish of the DAG run, the info is prepared for querying. On this instance, the question (discovering the highest begin and vacation spot stations) is run as a part of the DAG and the output may be considered from the Airflow XCOMs UI.

Within the DAG run, the output can also be revealed to Amazon SNS and primarily based on the subscription, an e mail notification is shipped out with the question output.

One other technique to visualise the outcomes is immediately from the Snowflake console utilizing the Snowflake worksheet. The next is an instance question:

There are alternative ways to visualise the output primarily based in your use case.
As we noticed, DAG1 and DAG2 have to be run just one time to arrange the Amazon MWAA connection and Snowflake objects. DAG3 may be scheduled to run each week or month. With this resolution, the person inspecting the info doesn’t need to log in to both Amazon MWAA or Snowflake. You’ll be able to have an automatic workflow triggered on a schedule that can ingest the newest information from the Citi Bike dataset and supply the highest begin and vacation spot stations for the given dataset.
Clear up
To keep away from incurring future expenses, delete the AWS sources (IAM customers and roles, Secrets and techniques Supervisor secrets and techniques, Amazon MWAA atmosphere, SNS subjects and subscription, S3 buckets) and Snowflake sources (database, stage, storage integration, view, tables) created as a part of this put up.
Conclusion
On this put up, we demonstrated the best way to arrange an Amazon MWAA connection for authenticating to Snowflake in addition to to AWS utilizing AWS person credentials. We used a DAG to automate creating the Snowflake objects resembling database, tables, and stage utilizing SQL queries. We additionally orchestrated the info pipeline utilizing Amazon MWAA, which ran duties associated to information transformation in addition to Snowflake queries. We used Secrets and techniques Supervisor to retailer Snowflake connection data and credentials and Amazon SNS to publish the info output for finish consumption.
With this resolution, you might have an automatic end-to-end orchestration of your information pipeline encompassing ingesting, transformation, evaluation, and information consumption.
To study extra, seek advice from the next sources:
Concerning the authors
 Payal Singh is a Associate Options Architect at Amazon Net Providers, centered on the Serverless platform. She is chargeable for serving to companion and clients modernize and migrate their functions to AWS.
 James Solar is a Senior Associate Options Architect at Snowflake. He actively collaborates with strategic cloud companions like AWS, supporting product and repair integrations, in addition to the event of joint options. He has held senior technical positions at tech corporations resembling EMC, AWS, and MapR Applied sciences. With over 20 years of expertise in storage and information analytics, he additionally holds a PhD from Stanford College.
 Bosco Albuquerque is a Sr. Associate Options Architect at AWS and has over 20 years of expertise working with database and analytics merchandise from enterprise database distributors and cloud suppliers. He has helped expertise corporations design and implement information analytics options and merchandise.
 Manuj Arora is a Sr. Options Architect for Strategic Accounts in AWS. He focuses on Migration and Modernization capabilities and choices in AWS. Manuj has labored as a Associate Success Options Architect in AWS over the past 3 years and labored with companions like Snowflake to construct resolution blueprints which are leveraged by the purchasers. Outdoors of labor, he enjoys touring, enjoying tennis and exploring new locations with household and mates.