

What’s Retrieval-Augmented Era?
Massive Language Fashions are usually not up-to-date, and so they additionally lack domain-specific information, as they’re skilled for generalized duties and can’t be used to ask questions on your individual knowledge.
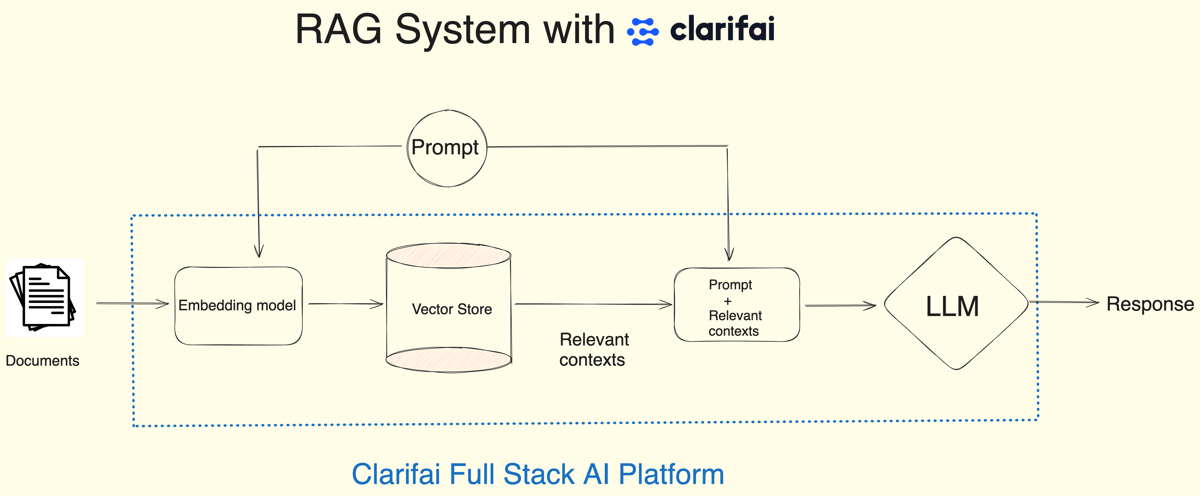
That is the place Retrieval-Augmented Era (RAG) is available in: an structure that gives probably the most related and contextually essential knowledge to the LLMs when answering questions.
The three key elements for constructing a RAG system are:
- Embedding Fashions, which embed the info into vectors.
- Vector Database to retailer and retrieve these embeddings, and
- A Massive Language Mannequin, which takes the context from the vector database to reply.
Clarifai supplies all three in a single platform, seamlessly permitting you to construct RAG purposes.
Learn how to construct a Retrieval-Augmented Era system
As a part of our “AI in 5” collection, the place we educate you how one can create superb issues in simply 5 minutes, on this weblog, we’ll see how one can construct a RAG system in simply 4 strains of code utilizing Clarifai’s Python SDK.
Step 1: Set up Clarifai and set your Private Entry Token as an atmosphere variable
First, set up the Clarifai Python SDK with a pip command.
Now, it’s worthwhile to set your Clarifai Private Entry Token (PAT) as an atmosphere variable to entry the LLMs and vector retailer. To create a brand new Private Entry Token, Enroll for Clarifai or if you have already got an account, log in to the portal and go to the safety possibility within the settings. Create a brand new private entry token by offering a token description and choosing the scopes. Copy the Token and set it as an environmental variable.
After you have put in the Clarifai Python SDK and set your Private Entry Token as an atmosphere variable, you may see that each one you want are simply these 4 strains of code to construct a RAG system. Let us take a look at them!
Step 2: Arrange the RAG system by passing your Clarifai consumer ID
First, import the RAG class from Clarifai Python SDK. Now, arrange your RAG system by passing your Clarifai consumer ID.
You need to use the setup technique and move the consumer ID. Since you might be already signed as much as the platform, you will discover your consumer ID beneath the account possibility within the settings right here.
Now, when you move the consumer ID the setup technique will create:
- A Clarifai app with “Textual content” as the bottom workflow. If you’re not conscious of apps, they’re the essential constructing blocks for creating initiatives on the Clarifai platform. Your knowledge, annotations, fashions, predictions, and searches are contained inside purposes. Apps act as your vector database. When you add the info to the Clarifai utility, it’s going to embed the info and index the embeddings based mostly in your base workflow. You’ll be able to then use these embeddings to question for similarity.
- Subsequent, it’s going to create a RAG prompter workflow. Workflows in Clarifai can help you mix a number of fashions and operators permitting you to construct highly effective multi-modal techniques for varied use circumstances. Inside the above created app, it’s going to create this workflow. Let’s have a look at the RAG prompter workflow and what it does.
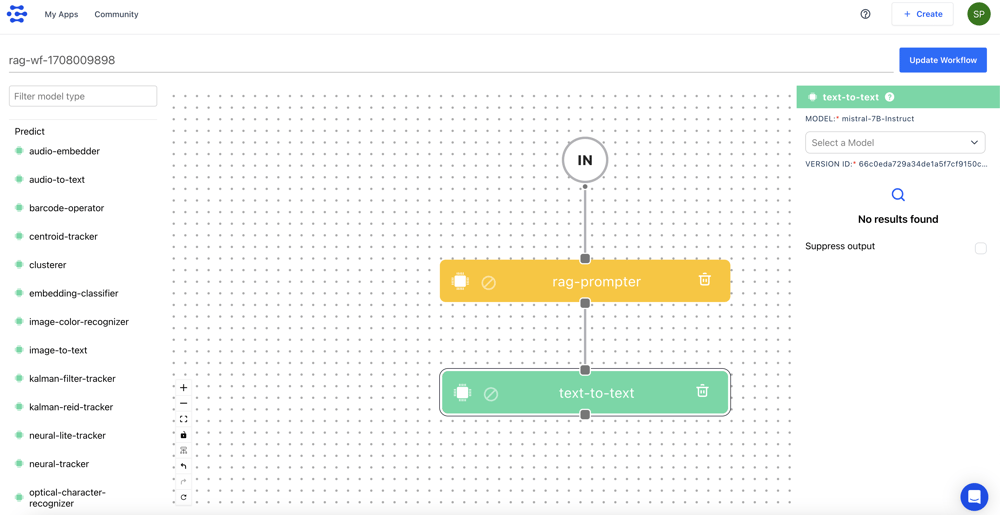
Now we have the enter, RAG prompter mannequin kind, and text-to-text mannequin varieties. Let’s perceive the movement. Each time a consumer sends an enter immediate, the RAG prompter will use that immediate to search out the related context from the Clarifai vector retailer.
Now, we’ll move the context together with the immediate to the text-to-text mannequin kind to reply it. By default, this workflow makes use of the Mistral-7B-Instruct mannequin. Lastly, the LLM makes use of the context and the consumer question to reply. In order that’s the RAG prompter workflow.
You needn’t fear about all this stuff because the setup technique will deal with these duties for you. All it’s worthwhile to do is specify your app ID.
There are different parameters obtainable within the setup technique:
app_url: If you have already got a Clarifai app that comprises your knowledge, you may move the URL of that app as a substitute of making an app from scratch utilizing the consumer ID.
llm_url: As now we have seen, by default the immediate workflow takes the Mistral 7b instruct mannequin, however there are various open-source and third-party LLMs within the Clarifai neighborhood. You’ll be able to move your most popular LLM URL.
base_workflow: As talked about, the info will likely be embedded in your Clarifai app based mostly on the bottom workflow. By default, it is going to be the textual content workflow, however there are different workflows obtainable as properly. You’ll be able to specify your most popular workflow.
Step 3: Add your Paperwork
Subsequent, add your paperwork to embed and retailer them within the Clarifai vector database. You’ll be able to move a file path to your doc, a folder path to the paperwork, or a public URL to the doc.
On this instance, I’m passing the trail to a PDF file, which is a latest survey paper on multimodal LLMs. When you add the doc, it is going to be loaded and parsed into chunks based mostly on the chunk_size and chunk_overlap parameters. By default, the chunk_size is ready to 1024, and the chunk_overlap is ready to 200. Nonetheless, you may modify these parameters.
As soon as the doc is parsed into chunks, it’s going to ingest the chunks into the Clarifai app.
Step 4: Chat together with your Paperwork
Lastly, chat together with your knowledge utilizing the chat technique. Right here, I’m asking it to summarize the PDF file and analysis on multimodal giant language fashions.
Conclusion
That’s how straightforward it’s to construct a RAG system with the Python SDK in 4 strains of code. Simply to summarize, to arrange the RAG system, all it’s worthwhile to do is move your consumer ID, or when you have your individual Clarifai app, move that app URL. You may also move your most popular LLM and workflow.
Subsequent, add the paperwork, and there may be an choice to specify the chunk_size and chunk_overlap parameters to assist parse and chunk the paperwork.
Lastly, chat together with your paperwork. You could find the hyperlink to the Colab Pocket book right here to implement this.
For those who’d desire to look at this tutorial you will discover the YouTube video right here.

OnePlus Bullets Z2 Bluetooth Wireless in Ear Earphones with Mic, Bombastic Bass - 12.4 Mm Drivers, 10 Mins Charge - 20 Hrs Music, 30 Hrs Battery Life (Magico Black)
₹1,799.00 (as of February 27, 2024 21:13 GMT +00:00 - More infoProduct prices and availability are accurate as of the date/time indicated and are subject to change. Any price and availability information displayed on [relevant Amazon Site(s), as applicable] at the time of purchase will apply to the purchase of this product.)
CP PLUS 3 MP Full HD Smart Wi-fi CCTV Camera | 360° Pan & Tilt | View & Talk | Motion Alert | Night Vision | SD Card (Up to 128 GB) | Alexa & OK Google | 2-Way Talk | IR Distance 10Mtr | CP-E35A
₹1,299.00 (as of February 27, 2024 21:13 GMT +00:00 - More infoProduct prices and availability are accurate as of the date/time indicated and are subject to change. Any price and availability information displayed on [relevant Amazon Site(s), as applicable] at the time of purchase will apply to the purchase of this product.)
iQOO Neo9 Pro 5G (Conqueror Black, 8GB RAM, 256GB Storage) | Snapdragon 8 Gen 2 Processor | Supercomputing Chip Q1 | Flagship Level Sony IMX920 Camera
₹36,999.00 (as of February 27, 2024 21:13 GMT +00:00 - More infoProduct prices and availability are accurate as of the date/time indicated and are subject to change. Any price and availability information displayed on [relevant Amazon Site(s), as applicable] at the time of purchase will apply to the purchase of this product.)
Redmi 13C (Starshine Green, 4GB RAM, 128GB Storage) | Powered by 4G MediaTek Helio G85 | 90Hz Display | 50MP AI Triple Camera
₹7,999.00 (as of February 27, 2024 21:13 GMT +00:00 - More infoProduct prices and availability are accurate as of the date/time indicated and are subject to change. Any price and availability information displayed on [relevant Amazon Site(s), as applicable] at the time of purchase will apply to the purchase of this product.)
iQOO Z7s 5G by vivo (Norway Blue, 6GB RAM, 128GB Storage) | Ultra Bright AMOLED Display | Snapdragon 695 5G 6nm Processor | 64 MP OIS Ultra Stable Camera | 44WFlashCharge
₹13,999.00 (as of February 27, 2024 21:13 GMT +00:00 - More infoProduct prices and availability are accurate as of the date/time indicated and are subject to change. Any price and availability information displayed on [relevant Amazon Site(s), as applicable] at the time of purchase will apply to the purchase of this product.)
Ambrane Unbreakable 60W / 3A Fast Charging 1.5m Braided Micro USB Cable for Smartphones, Tablets, Laptops & other Micro USB devices, 480Mbps Data Sync, Quick Charge 3.0 (RCM15, Black)
₹149.00 (as of February 27, 2024 21:13 GMT +00:00 - More infoProduct prices and availability are accurate as of the date/time indicated and are subject to change. Any price and availability information displayed on [relevant Amazon Site(s), as applicable] at the time of purchase will apply to the purchase of this product.)
Portronics Toad 23 Wireless Optical Mouse with 2.4GHz, USB Nano Dongle, Optical Orientation, Click Wheel, Adjustable DPI(Black)
₹299.00 (as of February 27, 2024 21:13 GMT +00:00 - More infoProduct prices and availability are accurate as of the date/time indicated and are subject to change. Any price and availability information displayed on [relevant Amazon Site(s), as applicable] at the time of purchase will apply to the purchase of this product.)
STRIFF Adjustable Laptop Tabletop Stand Patented Riser Ventilated Portable Foldable Compatible with MacBook Notebook Tablet Tray Desk Table Book with Free Phone Stand (Black)
₹299.00 (as of February 27, 2024 21:13 GMT +00:00 - More infoProduct prices and availability are accurate as of the date/time indicated and are subject to change. Any price and availability information displayed on [relevant Amazon Site(s), as applicable] at the time of purchase will apply to the purchase of this product.)
Oakter Mini UPS for 12V WiFi Router Broadband Modem | Backup Upto 4 Hours | WiFi Router UPS Power Backup During Power Cuts | UPS Broadband Modem | Current Surge & Deep Discharge Protection
₹1,299.00 (as of February 27, 2024 21:13 GMT +00:00 - More infoProduct prices and availability are accurate as of the date/time indicated and are subject to change. Any price and availability information displayed on [relevant Amazon Site(s), as applicable] at the time of purchase will apply to the purchase of this product.)
Duracell USB Type C, 3A Braided Sync & Fast Charging Cable, 3.9 Ft (1.2M),QC 2.0/3.0 Ultra Fast Charging,Compatible with Samsung,One Plus & all C type devices,Seamless Data Transmission,Series 3-Black
₹379.00 (as of February 27, 2024 21:13 GMT +00:00 - More infoProduct prices and availability are accurate as of the date/time indicated and are subject to change. Any price and availability information displayed on [relevant Amazon Site(s), as applicable] at the time of purchase will apply to the purchase of this product.)
SanDisk 1TB Extreme Portable SSD - Up to 1050MB/s, USB-C, USB 3.2 Gen 2, IP65 Water and Dust Resistance, Updated Firmware - External Solid State Drive - SDSSDE61-1T00-G25
$99.00 (as of February 26, 2024 21:13 GMT +00:00 - More infoProduct prices and availability are accurate as of the date/time indicated and are subject to change. Any price and availability information displayed on [relevant Amazon Site(s), as applicable] at the time of purchase will apply to the purchase of this product.)
AMD Ryzen 7 7800X3D 8-Core, 16-Thread Desktop Processor
$368.64 (as of February 26, 2024 21:13 GMT +00:00 - More infoProduct prices and availability are accurate as of the date/time indicated and are subject to change. Any price and availability information displayed on [relevant Amazon Site(s), as applicable] at the time of purchase will apply to the purchase of this product.)
Gotega External DVD Drive, USB 3.0 Portable +/-RW , DVD Player for CD ROM Burner Compatible with Laptop Desktop PC Windows Linux OS Apple Mac Black
$19.99 (as of February 26, 2024 21:13 GMT +00:00 - More infoProduct prices and availability are accurate as of the date/time indicated and are subject to change. Any price and availability information displayed on [relevant Amazon Site(s), as applicable] at the time of purchase will apply to the purchase of this product.)
Toshiba Canvio Basics 1TB Portable External Hard Drive USB 3.0, Black - HDTB510XK3AA
$54.99 (as of February 26, 2024 21:13 GMT +00:00 - More infoProduct prices and availability are accurate as of the date/time indicated and are subject to change. Any price and availability information displayed on [relevant Amazon Site(s), as applicable] at the time of purchase will apply to the purchase of this product.)