
Introduction
With current AI developments resembling LangChain, ChatGPT builder, and the prominence of Hugging Face, creating AI and LLM apps has grow to be extra accessible. Nevertheless, many are uncertain how one can leverage these instruments successfully.
On this article, I’ll information you in constructing an AI storyteller utility that generates tales from random pictures. Using open-source LLM fashions and customized prompts with an industry-standard method, we’ll discover the step-by-step course of.
Earlier than we start, let’s set up expectations for this informative journey.
Studying Goal
- Create your personal OpenAI and Hugging Face account and generate API keys.
- Leverage the facility of open-source LLM fashions utilizing API’s.
- Safeguard your undertaking secrets and techniques.
- Decompose complicated initiatives into manageable duties and create undertaking workflow.
- Give customized directions to LLMs utilizing the Lang-Chain module.
- Create a easy net interface for demonstration functions.
- Respect the extent of element that goes into the event of LLM initiatives within the {industry}
Prerequistes
Earlier than transferring forward listed below are just a few pre-requires that’s have to be fulfilled:
- Python – Set up Python >=3.8, chances are you’ll face points in just a few steps.
- Mini Conda – Non-compulsory, solely choose for those who desire to work in an remoted surroundings
- VS Code – Light-weight IDE with a number of language assist.
So, assuming you’ve got met all of the pre-requirements, let’s get began by understanding the undertaking workflow of our AI Storyteller utility.
This text was printed as part of the Knowledge Science Blogathon.
AI Storyteller Utility Workflow
Like all software program firm, let’s begin with the event of a undertaking define.
Right here is the desk of issues we have to do together with the method & supplier
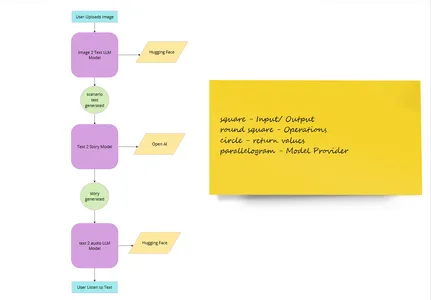
| Part Identify | Strategy | Supplier |
| Picture Add | Picture add net interface | Python Lib |
| Convert picture to textual content | LLM Fashions (img2text) | Hugging Face |
| Generate a narrative from textual content | ChatGPT | Open AI |
| Convert the story to audio | LLM Mannequin (text2speech) | Hugging Face |
| Person listens to audio | Audio interface | Python Lib |
| Demonstration | Net Interface | Python Lib |
If you’re nonetheless unclear here’s a high-level user-flow picture 👇
So having outlined the workflow, let’s begin by organizing undertaking recordsdata.
Set-up Workforce
Go to command immediate in working listing and enter this command one after the other:
mkdir ai-project
cd ai-project
code
When you run the final command it should open the VS code and create a workspace for you. We will probably be working on this workspace.
Alternatively, you’ll be able to create the ai-project folder and open it inside vs code. The selection is yours 😅.
Now contained in the .env file create 2 fixed variables as:
HUGGINGFACEHUB_API_TOKEN = YOUR HUGGINGFACE API KEY
OPENAI_API_KEY = YOUR OPEN AI API KEY
Now let’s fill within the values.
GET OpenAI API Key
Open AI permits builders to make use of API keys for interacting with their merchandise, so let’s now seize one for ourselves.
- Go to the open-ai official web site and click on Login / Signup.
- Subsequent, fill in your credentials and log in/join. If you happen to signed up, simply redo this step.
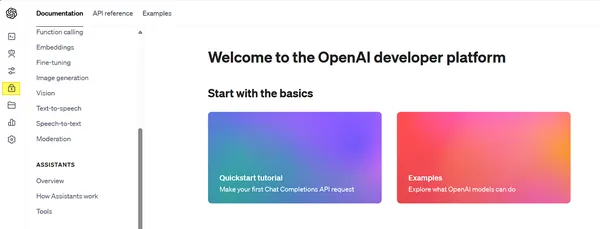
- As soon as you might be logged in, you may be greeted with 2 choices – ChatGPT or API, choose API
- On the following web page navigate to the lock 🔒 image (may differ on the time of studying) and click on it sidebar (seek advice from open-ai.png).
- A brand new web page will seem on the sidebar (RHS). Now click on on Create a brand new secret key.
- Identify your key and hit create a secret key.
- Necessary! – Observe down this textual content/ worth, and preserve it protected. As soon as the popup closes you received’t be capable to see it once more.
- Now go to the .env file and paste it beside OPEN_AI_API_KEY. Don’t put any quotes (“”).
Now let’s repair the opposite one!
GET Hugging Face API Key
Hugging Face is an AI neighborhood that gives open-source fashions, datasets, duties, and even computing areas for a developer’s use case. The one catch is, that you have to use their API to make use of the fashions. Right here is how one can get one (seek advice from ref.png for reference):
- Head over to the hugging face web site and create an account/login.
- Now head to the highest left avatar (🧑🦲) and click on settings in dropdown
- Contained in the settings web page click on on Entry Tokens after which New Token.
- Fill within the token data like title and permission. Preserve the title descriptive and permission to learn.
- Click on on Generate a token and voila you’ve got it. Ensure that to repeat it.
- Open .env file and paste the copied id beside HUGGINGFACEHUB_API_TOKEN. Observe the rules as above.

So why can we require this? It is because as a developer, it’s pure to by chance reveal secret data on our system. If another person will get maintain of this information it may be disastrous, so it’s an ordinary apply to separate the env recordsdata and later entry them in one other script.
As of now, we’re completed with the workspace setup, however there may be one non-obligatory step.
Create Surroundings
This step is non-obligatory, so chances are you’ll skip it but it surely’s most well-liked to not!
Typically one must isolate their improvement area to concentrate on modules and recordsdata wanted for the undertaking. That is completed by making a digital surroundings.
You should use Mini-Conda to create the v-env on account of its ease of use. So, open up a command immediate and kind the next instructions one after the opposite:
conda create ai-storyteller
conda activate ai-storyteller
1st command creates a brand new digital surroundings, whereas 2nd prompts that. This method even helps later on the undertaking deployment stage. Now let’s head to the primary undertaking improvement.
AI Storyteller Utility – Backend
As talked about beforehand, we are going to work out every element individually after which merge all of them.
Dependencies & Necessities
Within the vs-code or current-working-directory, create a brand new python file predominant.py. This can function the entry level for the undertaking. Now let’s import all of the required libraries:
from dotenv import find_dotenv, load_dotenv
from transformers import pipeline
from langchain import PromptTemplate, LLMChain, OpenAI
import requests
import os
import streamlit as st
Don’t get into library particulars, we will probably be studying them, as we use go alongside.
load_dotenv(find_dotenv())
HUGGINGFACE_API_TOKEN = os.getenv("HUGGINGFACEHUB_API_TOKEN")
Right here:
- In line 1, we first discover the .env file after which load its content material. This technique is used to load the OpenAI key however discourages its existence. Name an excellent apply 😅
- In line 2, we load the Hugging face hub api token, saved in .env file utilizing os.getenv() to make use of in a while.
- NOTE: Each the variables are fixed, so we stored it capital.
Having loaded all the necessities and dependencies, let’s transfer to constructing out the first element. Picture to textual content generator.
Picture To Textual content Generator Mannequin
#img-to-text

def img2text(path):
    img_to_text = pipeline(
    "image-to-text", mannequin="Salesforce/blip-image-captioning-base")
    textual content = img_to_text(path)[0]['generated_text']
    return textual content
Now let’s dissect the code:
- In line 3 we outline the img2text perform which takes the picture path.
- In line 4 we instantiate the mannequin object as img_to_text utilizing the pipeline constructor from hugging face which takes in job (img_to_text) and mannequin title.
- in line 6 it sends the picture path to the mannequin through an api name returns the generated textual content (key: worth) and will get saved within the textual content variable.
- Lastly, we returned the textual content.
So easy, proper?
Subsequent, let’s move on the textual content to the story generator.
Textual content to Story Generator Mannequin
For text-to-story technology, we’re going to use ChatGPT however you might be free to make use of some other mannequin you want.
Moreover, we are going to use Lang-chain to supply a customized immediate template to mannequin to make it protected for each age to make use of. This may be achieved as:
def story_generator(state of affairs):
    template = """
    You're an professional youngsters story teller;
    You'll be able to generate quick tales primarily based on a easy narrative
    Your story ought to be greater than 50 phrases.

    CONTEXT: {state of affairs}
    STORY:
    """
    immediate = PromptTemplate(template=template, input_variables = ["scenario"])
    story_llm = LLMChain(llm = OpenAI(
        model_name="gpt-3.5-turbo", temperature = 1), immediate=immediate, verbose=True)

    story = story_llm.predict(state of affairs=state of affairs)
    return story
Code Clarification
Let’s perceive the code:
- In line 1 we outline the story generator perform which takes the state of affairs as an argument. Discover right here the state of affairs refers back to the story generated by the mannequin earlier
- From traces 2 to 9 we outline our customized directions beneath the variable template with context because the state of affairs. That is the customized instruction talked about earlier within the part.
- Subsequent, in line 10 we generate a immediate utilizing the cuddling face PromptTemplate class. It takes within the template (complete textual content) and the customized context (right here state of affairs)
- In line 11 we create an occasion of the chat-gpt-3.5-turbo mannequin utilizing LLMChain wrapper from lang-chain. The mannequin requires a mannequin title, temperature (randomness in response), immediate (our customized immediate), and verbose (to show logs).
- Now we name the mannequin utilizing the predict technique and move the state of affairs in line 14. This returns a narrative primarily based on the context, saved within the story variable
- Ultimately, we return the story to move it to the final mannequin.
For individuals who are curious in regards to the Lang-Chain lessons used:
- Immediate Template is used to create a immediate primarily based on the template / the context offered. On this case, it specifies there may be further context -scenario.
- LLM-Chain is used to symbolize a sequence of LLM fashions. In our case, it represents the OpenAI language mannequin with GPT 3.5 Turbo mannequin. In easy phrases, you’ll be able to chain a number of LLMs collectively.
To study extra about Lang-chain and its options refer right here.
Now we have to convert the generated output to audio. Let’s take a look.
Textual content To Audio Mannequin
However this time quite than loading the mannequin, we are going to use hugging-face inference API, to fetch the consequence. This protects the storage and compute prices. Right here is the code:
#text-to-speech (Hugging Face)
def text2speech(msg):
    API_URL = "https://api-inference.huggingface.co/fashions/espnet/kan-bayashi_ljspeech_vits"
    headers = {"Authorization": f"Bearer {HUGGINGFACE_API_TOKEN}"}
    payloads = {
         "inputs" : msg
    }
    response = requests.submit(API_URL, headers=headers, json=payloads)

    with open('audio.flac','wb') as f:
        f.write(response.content material)
Code Clarification
Right here is the reason of the above code:
- In line 1 we outline a perform text2speech whose job is to soak up the msg (the story generated from the earlier mannequin) and return the audio file.
- Line 2 consists of API_URL, which holds the api end-point to name.
- Subsequent, we offer the authorization and bearer token within the header. This will probably be offered as a header (authorization information) once we name the mannequin.
- In line 5 we outline a payload dictionary (JSON format) that incorporates the message (msg) we have to convert
- In subsequent line posts request to mannequin is distributed together with header and JSON information. The returned response is saved within the response variable.
Observe: The format for mannequin inferencing can differ over the mannequin, so please seek advice from the tip of the part.
- Lastly, we save the audio recordsdata’ content material (response.content material) within the native system by writing the required response audio.flac. That is completed for content material security and non-obligatory.
Non-compulsory
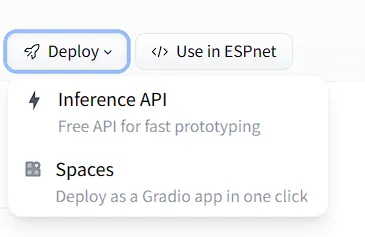
In case you propose to decide on a special text-to-audio mannequin, you may get the inference particulars by visiting the fashions web page clicking on the drop-down arrow beside deploy, and choosing the inference-API possibility.
Congrats the backend half is now full, let’s check the working!
Test Backend Working
Now it’s an excellent time to check the mannequin. For this, we are going to move within the picture and name all of the mannequin capabilities. Copy – paste the code beneath:
state of affairs = img2text("img.jpeg") #text2image
story = story_generator(state of affairs) # create a narrative
text2speech(story) # convert generated textual content to audio
Right here img.jpeg is the picture file and is current in the identical listing as predominant.py.
Now go to your terminal and run predominant.py as:
python predominant.pyIf every thing goes nicely you will note an audio file in the identical listing as:

If you happen to don’t discover the audio.flac file, please guarantee you’ve got added your api keys, have ample tokens, and have all the required libraries put in together with FFmpeg.
Now that we’ve completed creating the backend, which works, it’s time to create the frontend web site. Let’s transfer.
AI Storyteller Utility – Frontend
To make our entrance finish we are going to use streamlit library which supplies easy-to-use reusable parts for constructing webpages from Python scripts, having a devoted cli too, and internet hosting. The whole lot wanted to host a small undertaking.
To get began, go to Streamlit and create an account – It’s free!
Now go to your terminal and set up the streamlit cli utilizing:
pip set up streamlitAs soon as completed, you might be good to go.
Now copy-paste the next code:
def predominant():
    st.set_page_config(page_title = "AI story Teller", page_icon ="🤖")

    st.header("We flip pictures to story!")
    upload_file = st.file_uploader("Select a picture...", sort="jpg")  #uploads picture

    if upload_file isn't None:
        print(upload_file)
        binary_data = upload_file.getvalue()

        # save picture
        with open (upload_file.title, 'wb') as f:
            f.write(binary_data)
        st.picture(upload_file, caption = "Picture Uploaded", use_column_width = True) # show picture

        state of affairs = img2text(upload_file.title) #text2image
        story = story_generator(state of affairs) # create a narrative
        text2speech(story) # convert generated textual content to audio

        # show state of affairs and story
        with st.expander("state of affairs"):
            st.write(state of affairs)
        with st.expander("story"):
            st.write(story)

        # show the audio - folks can pay attention
        st.audio("audio.flac")

# the primary
if __name__ == "__main__":
    predominant()
Code Clarification
- st.set_page_config: Units the web page configuration. Right here set the title and icon
- st.header: Units the web page header element.
- st.file_uploader: Add an add element to the webpage together with the offered textual content. Right here used to take pictures from the consumer.
- st.picture: Shows the picture. As guessed reveals consumer uploaded picture.
- st.expander: Add an expander (broaden to see) element to the webpage. Right here we use it to retailer the state of affairs (picture caption) and story (caption to story). As soon as the consumer clicks on the expander, he/she will be able to see the generated textual content. Additionally, it supplies good ui-experience.
- st.write: Used for a number of functions, right here to put in writing expander texts.
- st.audio: Provides an audio element to the webpage – consumer can use this to take heed to generated audio
Here’s what our perform does in a nutshell:
Our predominant perform creates a webpage that enables the consumer to add the picture, move that to the mannequin, convert the picture to the caption, generate a narrative primarily based on it, and convert that story to audio that the consumer can take heed to. Other than that one may view the generated caption and story and the audio file is saved within the native / hosted system.
Now to run your utility, head over to the terminal and run:
streamlit run app.pyIf every thing profitable, you’re going to get beneath response:

Now head over to the Native URL and you may check the app.
Here’s a video which showcases how one can use the app:
Congrats on constructing your LLM- utility powered by Hugging Face, OpenAI, and Lang chain. Now let’s summarize what you’ve got realized on this article.
Conclusion
That’s all, we’ve learnt how one can construct frontend and backend of an AI Storyteller utility!
We began by laying down the inspiration of the undertaking, then leveraged the facility of hugging face to make use of Open Supply LLM Fashions for the duty in hand, mixed open AI with lang-chain to provide customized context and later wrapped the whole utility into an interactive net app utilizing streamlit. We additionally utilized safety ideas information alongside the undertaking.
Key Takeaways
- Safe the consumer data utilizing. env and cargo the identical utilizing the Python dotenv package deal.
- Break down initiatives into workable parts and set the surroundings accordingly.
- Mix a number of fashions as a superscript to get your work completed.
- Use Lang chain to supply customized directions to the mannequin to cut back hallucination and safeguarding response utilizing PromptTemplate.
- Use the Lang-Chain LLMChain class to mix, a number of fashions.
- Inference to hugging-face fashions and retailer the consequence utilizing the inference API.
- Construct webpages utilizing Streamlit’s declarative syntax.
I hope you loved constructing this AI storyteller utility. Now put that into apply, I can’t wait to see what you all provide you with. Thanks for sticking to the tip. Listed below are just a few sources to get you began.
Sources
The media proven on this article isn’t owned by Analytics Vidhya and is used on the Writer’s discretion.
Associated

Fire-Boltt Lumos Stainless Steel Luxury Smart Watch with 1.91” Large Display, Bluetooth Calling, Voice Assistant, 100+ Sports Modes
₹1,499.00 (as of December 24, 2023 22:14 GMT +00:00 - More infoProduct prices and availability are accurate as of the date/time indicated and are subject to change. Any price and availability information displayed on [relevant Amazon Site(s), as applicable] at the time of purchase will apply to the purchase of this product.)
Redmi 13C (Starshine Green, 8GB RAM, 256GB Storage) | Powered by 4G MediaTek Helio G85 | 90Hz Display | 50MP AI Triple Camera
₹11,499.00 (as of December 24, 2023 22:14 GMT +00:00 - More infoProduct prices and availability are accurate as of the date/time indicated and are subject to change. Any price and availability information displayed on [relevant Amazon Site(s), as applicable] at the time of purchase will apply to the purchase of this product.)
realme narzo 60X 5G(Nebula Purple 4GB, 128GB Storage) Up to 2TB External Memory | 50 MP AI Primary Camera | Segments only 33W Supervooc Charge
₹12,999.00 (as of December 24, 2023 22:14 GMT +00:00 - More infoProduct prices and availability are accurate as of the date/time indicated and are subject to change. Any price and availability information displayed on [relevant Amazon Site(s), as applicable] at the time of purchase will apply to the purchase of this product.)
Xiaomi Redmi 13C (Stardust Black, 4GB RAM, 128GB Storage) | Powered by 4G Mediatek Helio G85 | 90Hz Display | 50MP AI Triple Camera
₹8,999.00 (as of December 24, 2023 22:14 GMT +00:00 - More infoProduct prices and availability are accurate as of the date/time indicated and are subject to change. Any price and availability information displayed on [relevant Amazon Site(s), as applicable] at the time of purchase will apply to the purchase of this product.)
Portronics Conch Tune C in Ear Type C Wired Earphones with Mic,10mm Driver, 1.2m Nylon Braided Anti Tangle Wire, in line Controls, Metal Alloy Body, Wide Compatibility(Grey)
₹349.00 (as of December 24, 2023 22:14 GMT +00:00 - More infoProduct prices and availability are accurate as of the date/time indicated and are subject to change. Any price and availability information displayed on [relevant Amazon Site(s), as applicable] at the time of purchase will apply to the purchase of this product.)
Ambrane Unbreakable 60W / 3A Fast Charging 1.5m Braided Micro USB Cable for Smartphones, Tablets, Laptops & other Micro USB devices, 480Mbps Data Sync, Quick Charge 3.0 (RCM15, Black)
₹149.00 (as of December 24, 2023 21:44 GMT +00:00 - More infoProduct prices and availability are accurate as of the date/time indicated and are subject to change. Any price and availability information displayed on [relevant Amazon Site(s), as applicable] at the time of purchase will apply to the purchase of this product.)
Ambrane Unbreakable 60W / 3A Fast Charging 1.5m Braided Type C Cable for Smartphones, Tablets, Laptops & other Type C devices, PD Technology, 480Mbps Data Sync, Quick Charge 3.0 (RCT15A, Black)
₹179.00 (as of December 24, 2023 21:44 GMT +00:00 - More infoProduct prices and availability are accurate as of the date/time indicated and are subject to change. Any price and availability information displayed on [relevant Amazon Site(s), as applicable] at the time of purchase will apply to the purchase of this product.)
Portronics Mport 31C USB C Hub (4-in-1), Type C Multiport Adapter with 1 x USB 3.0 & 3 x USB 2.0 Ports, up to 5 Gbps High Speed Data Transfer for Laptop, MacBook, PC (Grey)
₹315.00 (as of December 24, 2023 21:44 GMT +00:00 - More infoProduct prices and availability are accurate as of the date/time indicated and are subject to change. Any price and availability information displayed on [relevant Amazon Site(s), as applicable] at the time of purchase will apply to the purchase of this product.)
HP Wired Mouse 100 with 1600 DPI Optical Sensor, USB Plug-and -Play,ambidextrous Design, Built-in Scrolling and 3 Handy Buttons. 3-Years Warranty (6VY96AA)
₹279.00 (as of December 24, 2023 21:44 GMT +00:00 - More infoProduct prices and availability are accurate as of the date/time indicated and are subject to change. Any price and availability information displayed on [relevant Amazon Site(s), as applicable] at the time of purchase will apply to the purchase of this product.)
SanDisk Cruzer Blade 64GB USB 2.0 Flash Drive
₹399.00 (as of December 24, 2023 21:44 GMT +00:00 - More infoProduct prices and availability are accurate as of the date/time indicated and are subject to change. Any price and availability information displayed on [relevant Amazon Site(s), as applicable] at the time of purchase will apply to the purchase of this product.)
Seagate Portable 4TB External Hard Drive HDD – USB 3.0 for PC, Mac, Xbox, & PlayStation - 1-Year Rescue Service (STGX4000400)
$99.99 (as of December 24, 2023 21:44 GMT +00:00 - More infoProduct prices and availability are accurate as of the date/time indicated and are subject to change. Any price and availability information displayed on [relevant Amazon Site(s), as applicable] at the time of purchase will apply to the purchase of this product.)
SAMSUNG SSD T7 Portable External Solid State Drive 1TB, Up to USB 3.2 Gen 2, Reliable Storage for Gaming, Students, Professionals, MU-PC1T0R/AM, Red
$84.59 (as of December 24, 2023 21:44 GMT +00:00 - More infoProduct prices and availability are accurate as of the date/time indicated and are subject to change. Any price and availability information displayed on [relevant Amazon Site(s), as applicable] at the time of purchase will apply to the purchase of this product.)
Thermal Grizzly Kryonaut, High Performance Thermal Paste for Cooling All Processors, Graphics Cards and Heat Sinks in Computers and Consoles -1.0 Gram
$8.99 (as of December 24, 2023 21:44 GMT +00:00 - More infoProduct prices and availability are accurate as of the date/time indicated and are subject to change. Any price and availability information displayed on [relevant Amazon Site(s), as applicable] at the time of purchase will apply to the purchase of this product.)
Seagate BarraCuda 2TB Internal Hard Drive HDD – 3.5 Inch SATA 6Gb/s 7200 RPM 256MB Cache – Frustration Free Packaging (ST2000DM008/ST2000DMZ08)
$59.99 (as of December 24, 2023 21:44 GMT +00:00 - More infoProduct prices and availability are accurate as of the date/time indicated and are subject to change. Any price and availability information displayed on [relevant Amazon Site(s), as applicable] at the time of purchase will apply to the purchase of this product.)