

Introduction
In immediately’s digital age, WhatsApp has emerged as greater than only a messaging app; it is a pivotal communication device for companies worldwide. With over two billion energetic customers, WhatsApp’s large attain and recognition make it an indispensable platform for companies aiming to attach with their viewers successfully.
Understanding this, our goal on this weblog is to supply a complete information on leveraging WhatsApp for sending messages through it is API. This observe, a necessary a part of fashionable enterprise communication methods, includes reaching quite a few prospects with essential updates, promotional content material, or different related data. We’ll learn to ship messages utilizing Whatsapp API in python. We’ll then delve into the intricacies of WhatsApp’s options, significantly specializing in its Enterprise API, which gives superior capabilities for dealing with messaging effectively.
Furthermore, we’ll discover the mixing of those messaging capabilities with workflow automation. In a enterprise panorama the place effectivity and pace are paramount, automating repetitive duties like message sending can considerably improve productiveness. Instruments like Nanonets Workflows play a vital position on this. They allow companies to streamline their operations, decreasing handbook effort and focusing extra on strategic duties.
Whatsapp Enterprise Platform
The WhatsApp Enterprise Platform is designed for medium to giant companies, offering a option to interact with prospects on a big scale. It allows fast initiation of conversations, sending notifications about care or purchases, providing customized providers, and supporting prospects of their most popular communication channel.
This platform is constructed round three key APIs:
- Cloud API: That is hosted by Meta and gives a simple, maintenance-friendly means for companies to attach with prospects.
- On-Premises API: Companies have to host this themselves.
- Enterprise Administration API: This API is important for managing your WhatsApp Enterprise Account and message templates.
To speak with WhatsApp customers, companies have to make use of both the Cloud API or the On-Premises API. The Cloud API is mostly most popular attributable to its simplicity and decrease upkeep necessities. Nonetheless, irrespective of which API you select, the Enterprise Administration API is a should for managing your account and templates.
Introduction to Whatsapp Cloud API
WhatsApp’s Cloud API, a part of Meta’s Blueprint, permits companies to speak with prospects on a big scale with out the necessity for internet hosting their very own servers. This service is a cloud-hosted model of the WhatsApp Enterprise Platform, providing simple scaling and implementation.
Overview
The WhatsApp Enterprise API is designed for medium and huge companies to interact in automated and handbook communications with prospects. It helps integration with numerous backend methods like CRM and advertising and marketing platforms. Companies can select between On-Premises and Cloud API choices, with the latter usually beneficial attributable to its simplicity.
Default throughput is 80 messages per second (mps), upgradable to 1,000 mps.
Utilizing the API
To ship a message, a API name in python seems to be like this:
import requests

url="https://graph.fb.com/v18.0/FROM_PHONE_NUMBER_ID/messages"

headers = {
    'Authorization': 'ACCESS_TOKEN'
}

information = {
    'messaging_product': 'whatsapp',
    'to': '1650XXXXXXX',
    'textual content': {'physique': 'hello'}
}

response = requests.publish(url, headers=headers, json=information)

print(response.textual content)
Getting Began
To start out with Cloud API:
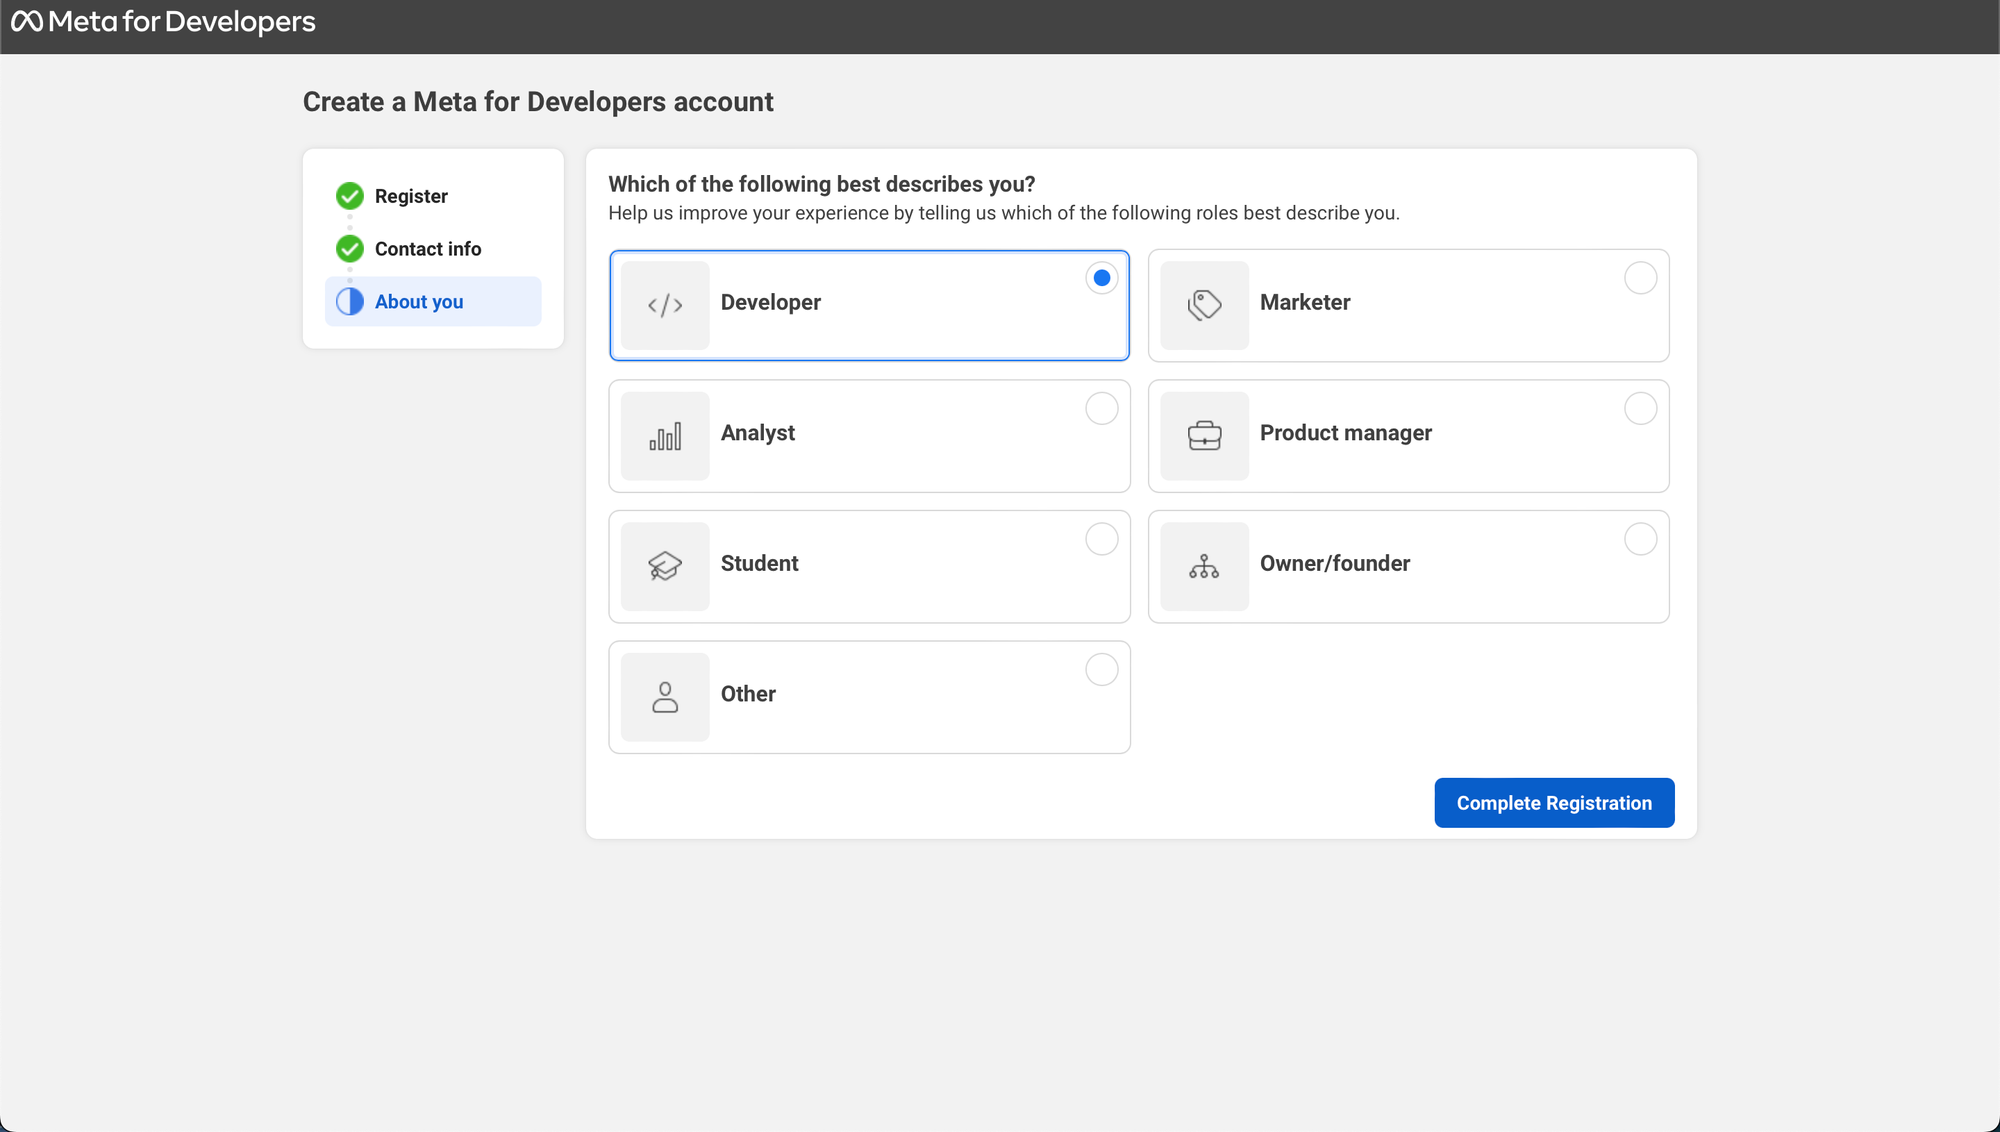
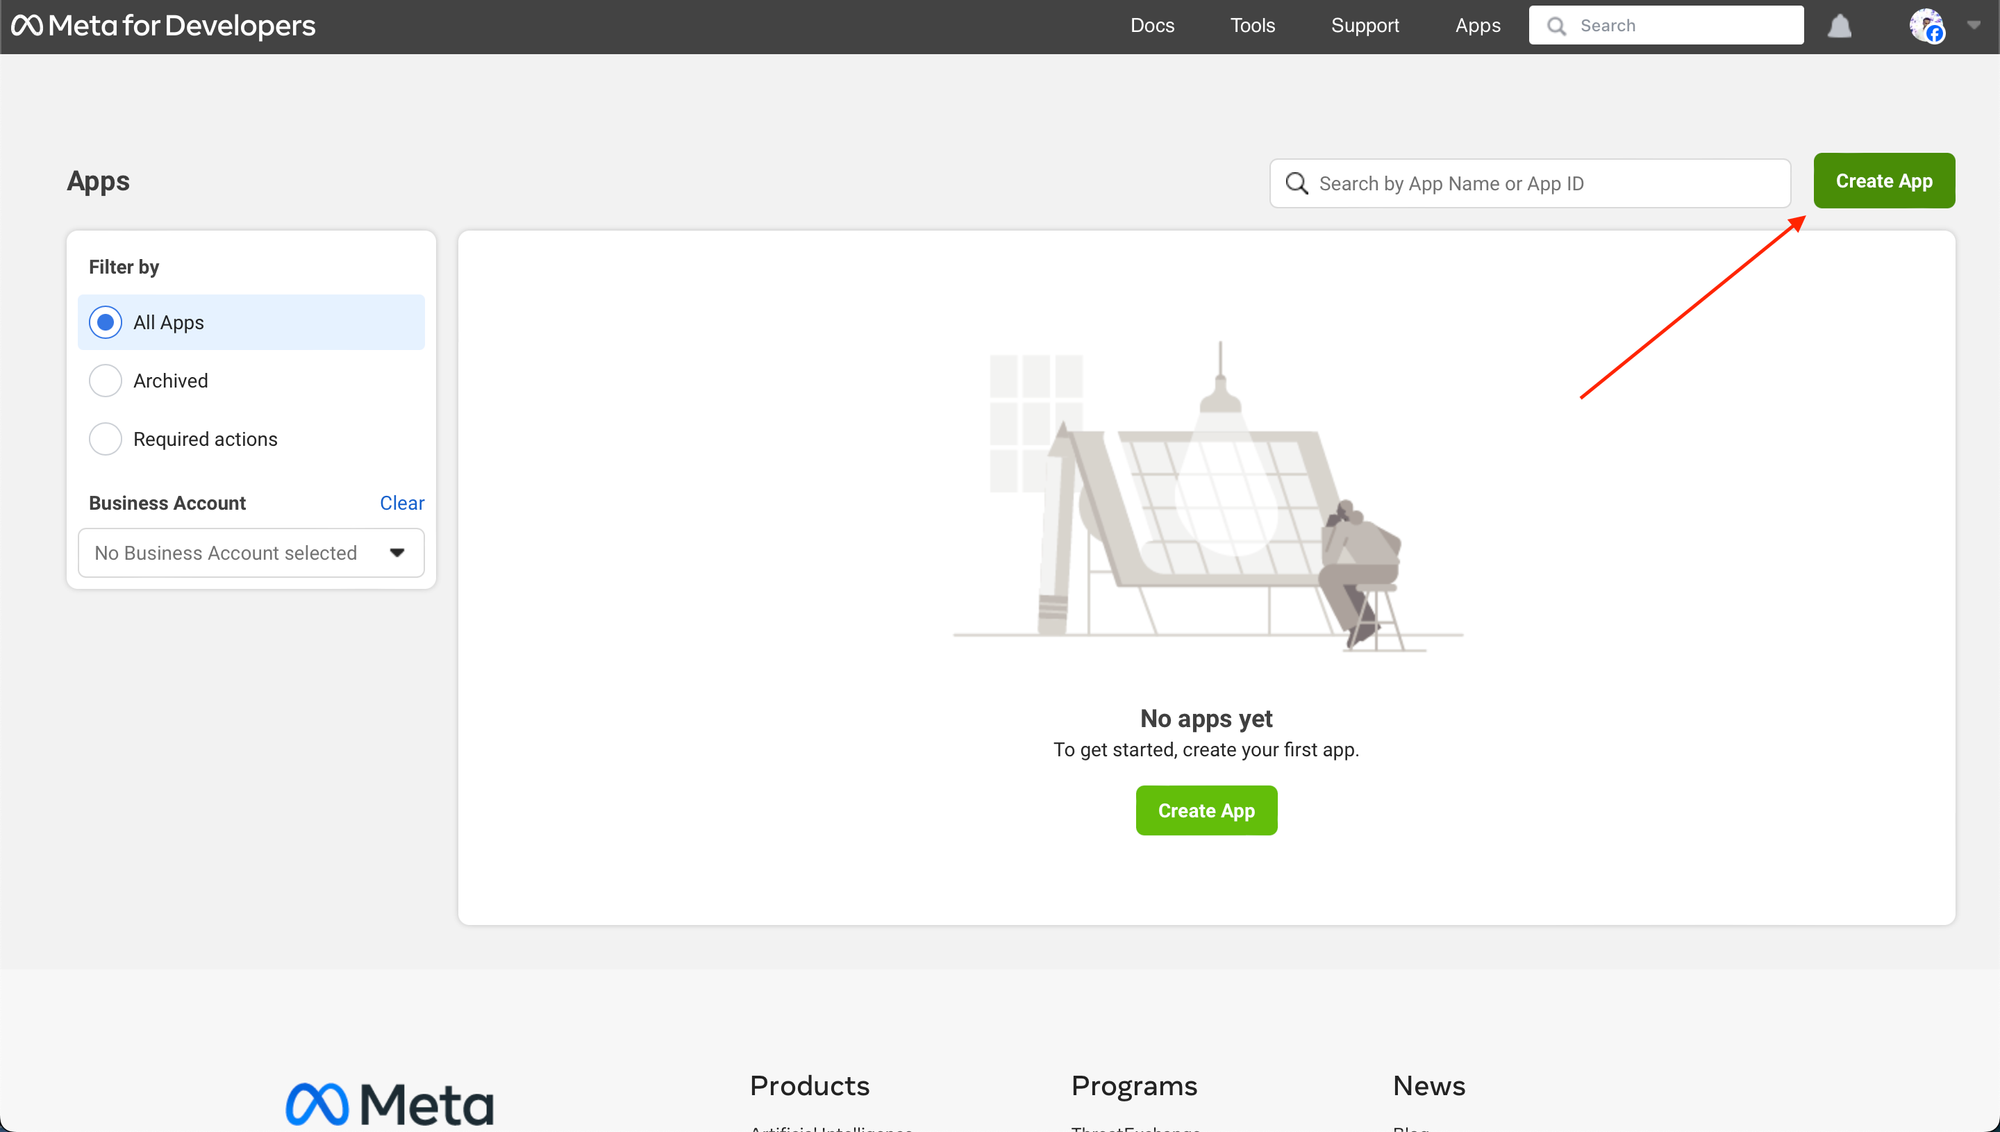
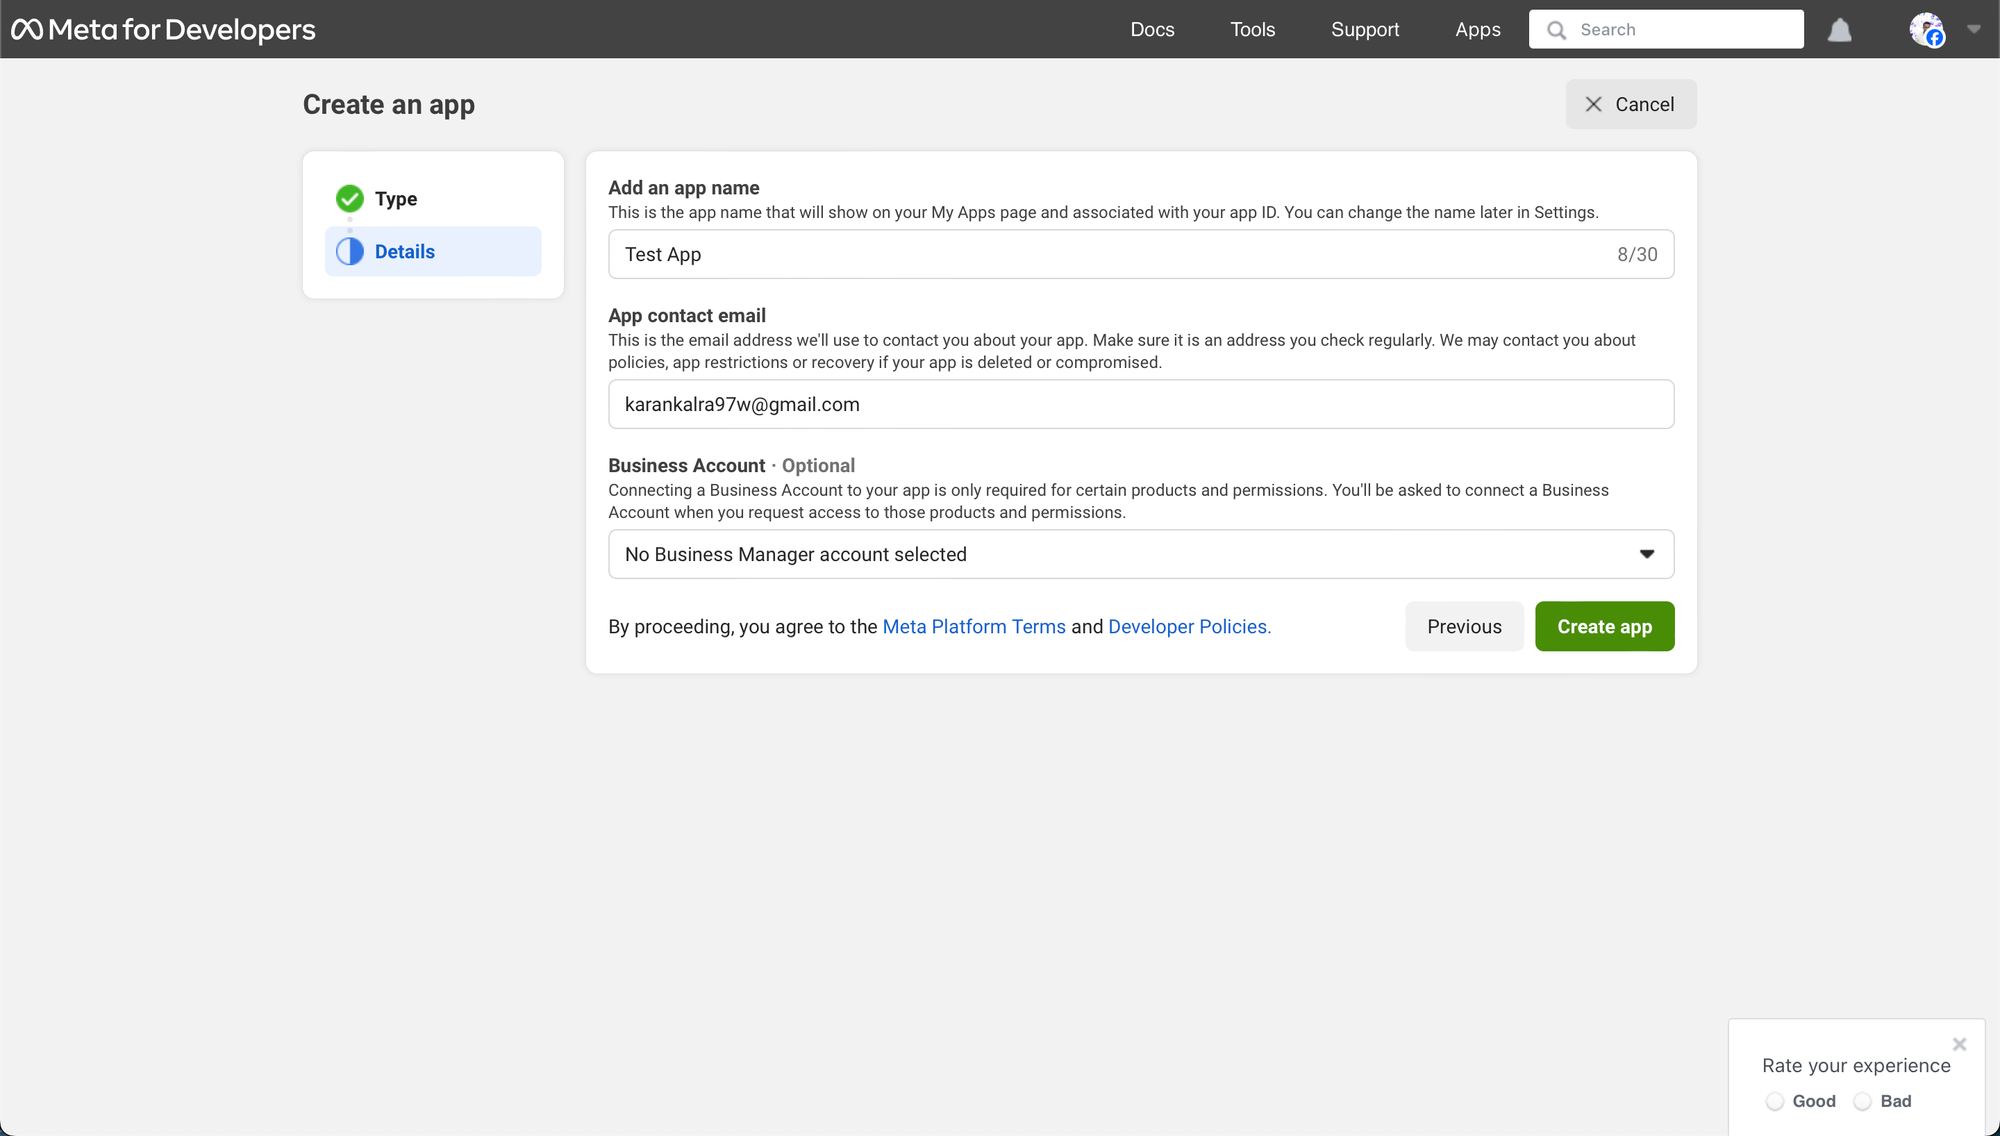
- Select “Different” within the use case part.
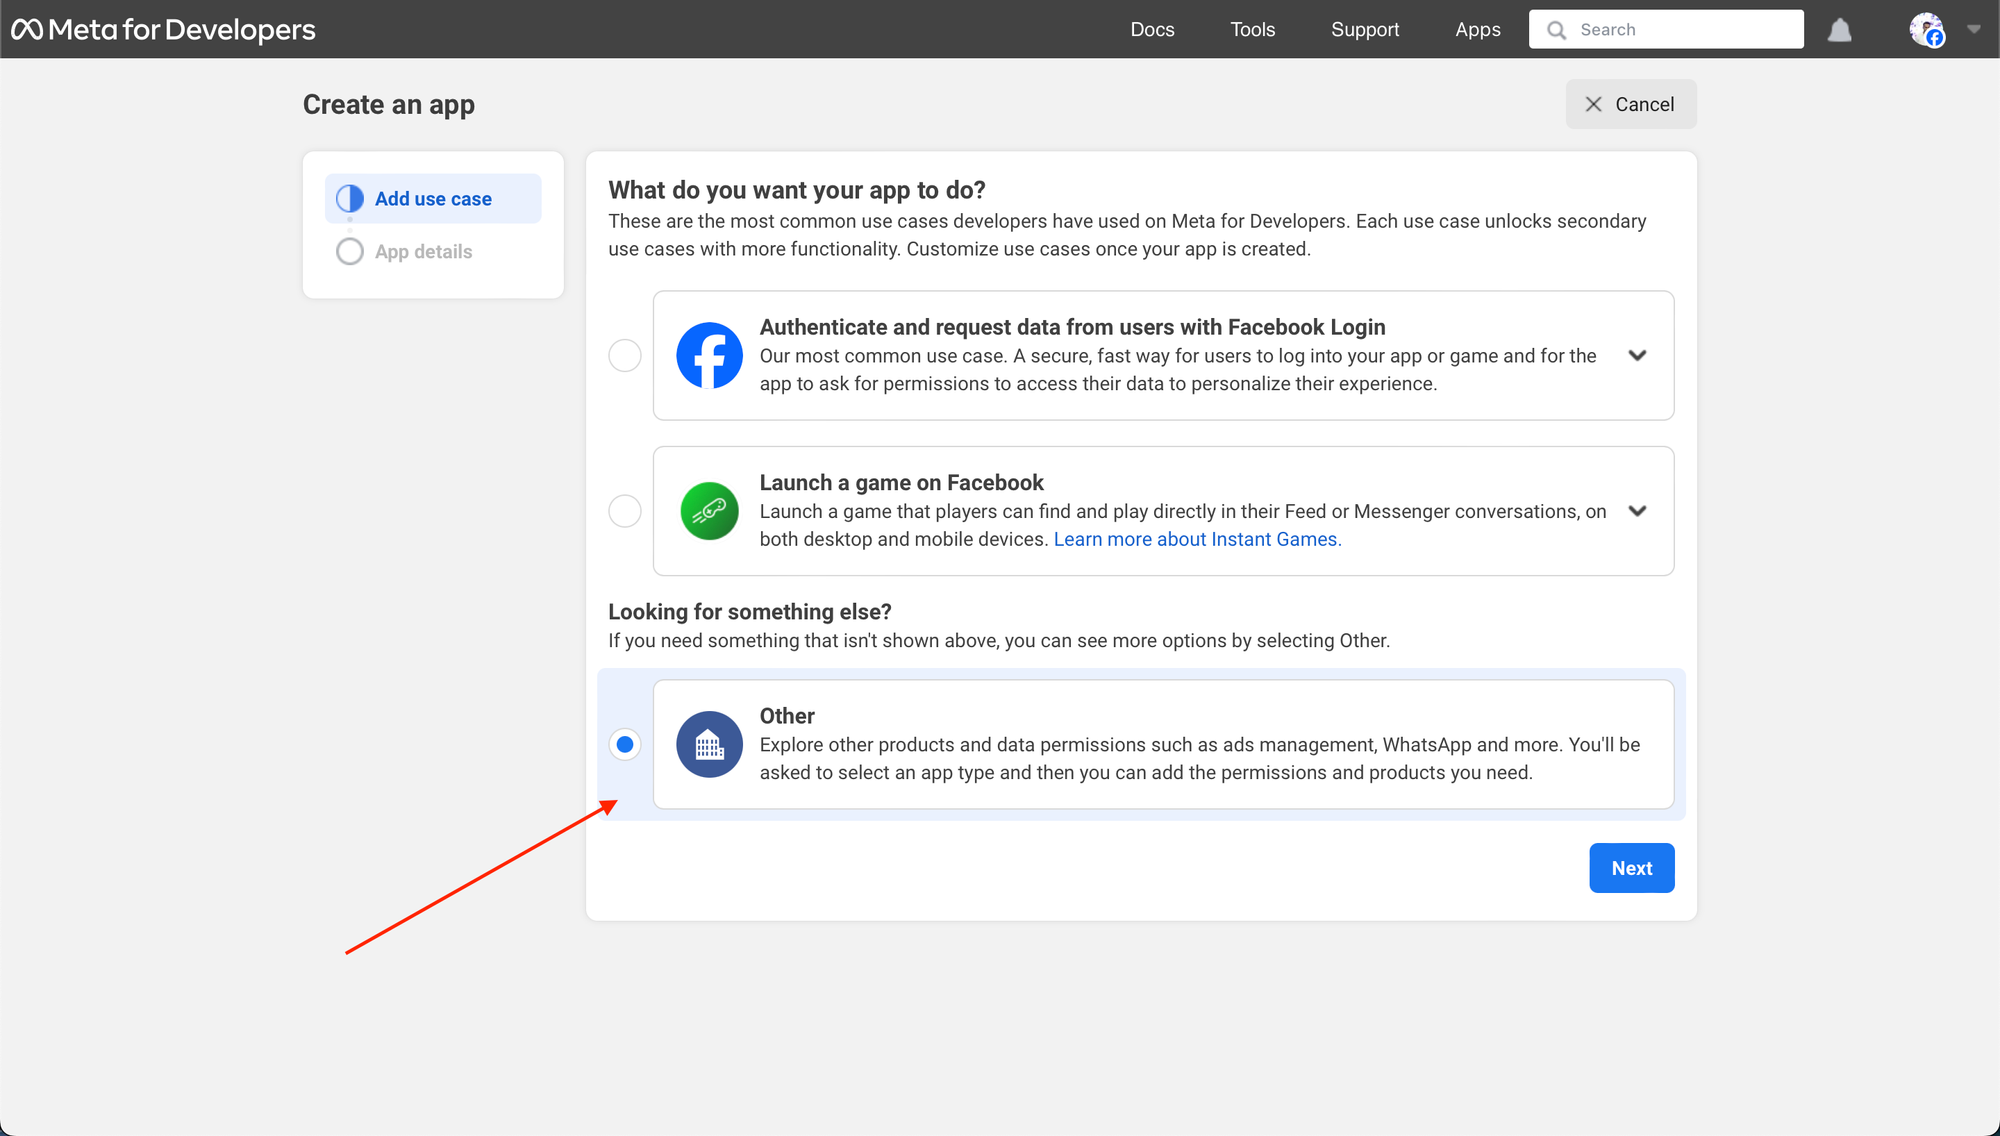
- Select “Enterprise” as App Kind.
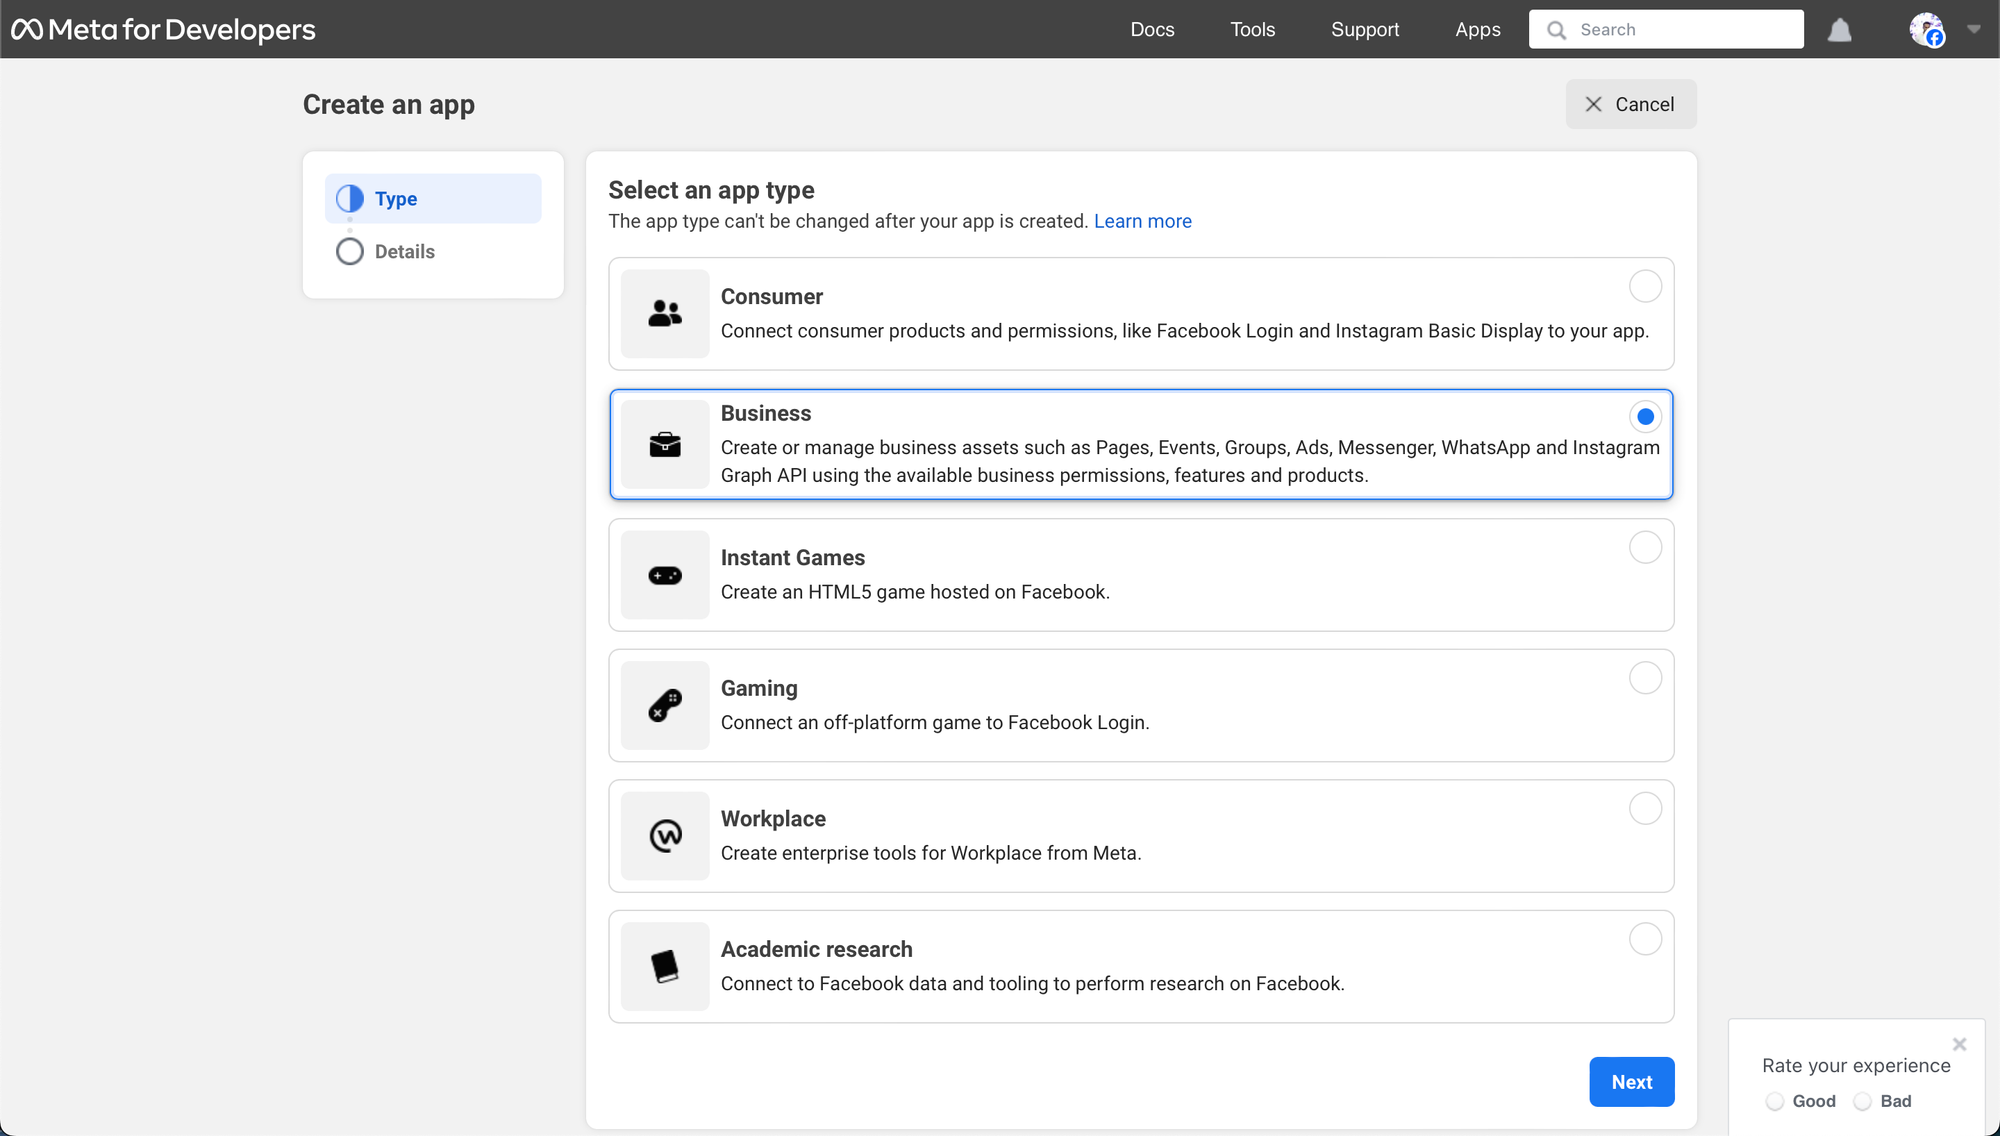
- Add app particulars and click on on “Create App”.
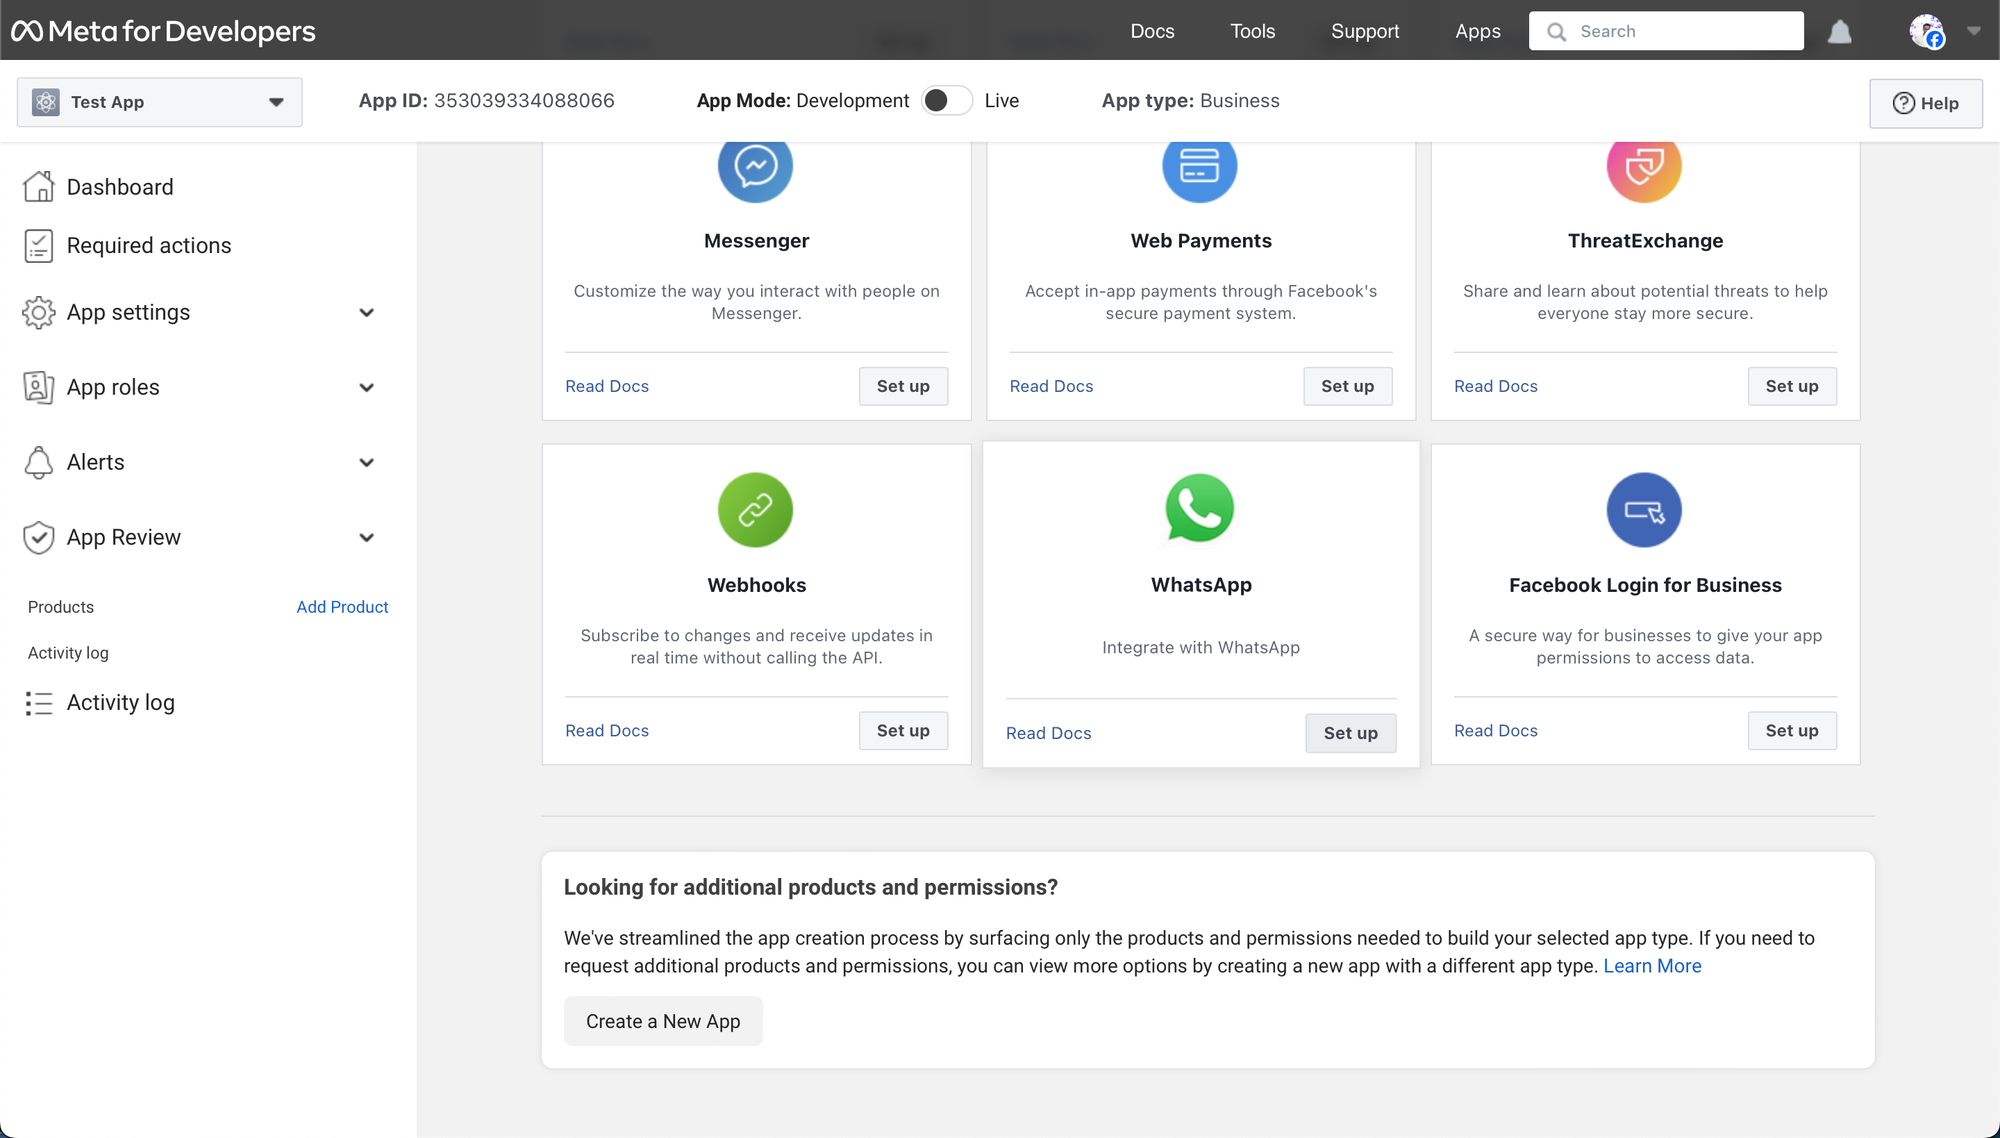
- Scroll down and Click on “Arrange” on the Whatsapp card.
- Ought to you may have a Meta Enterprise Account (MBA), you may be requested to hyperlink it throughout this course of. If not, you may be guided to create one.

- As soon as your MBA is linked, you may be guided to a dashboard like under. You may start testing now.
All this has finally allowed your app to –
- Arrange a Meta Enterprise Account, in the event you do not have already got one.
- Mechanically generate a take a look at WhatsApp Enterprise Account, which is free for sending messages however comes with utilization limitations.
- Create a take a look at enterprise cellphone quantity linked to your WhatsApp Enterprise Account, enabling you to ship free messages to as much as 5 completely different cellphone numbers.
- Generate a sequence of pre-approved messaging templates.
To ship take a look at messages, it is advisable add a sound WhatsApp quantity.
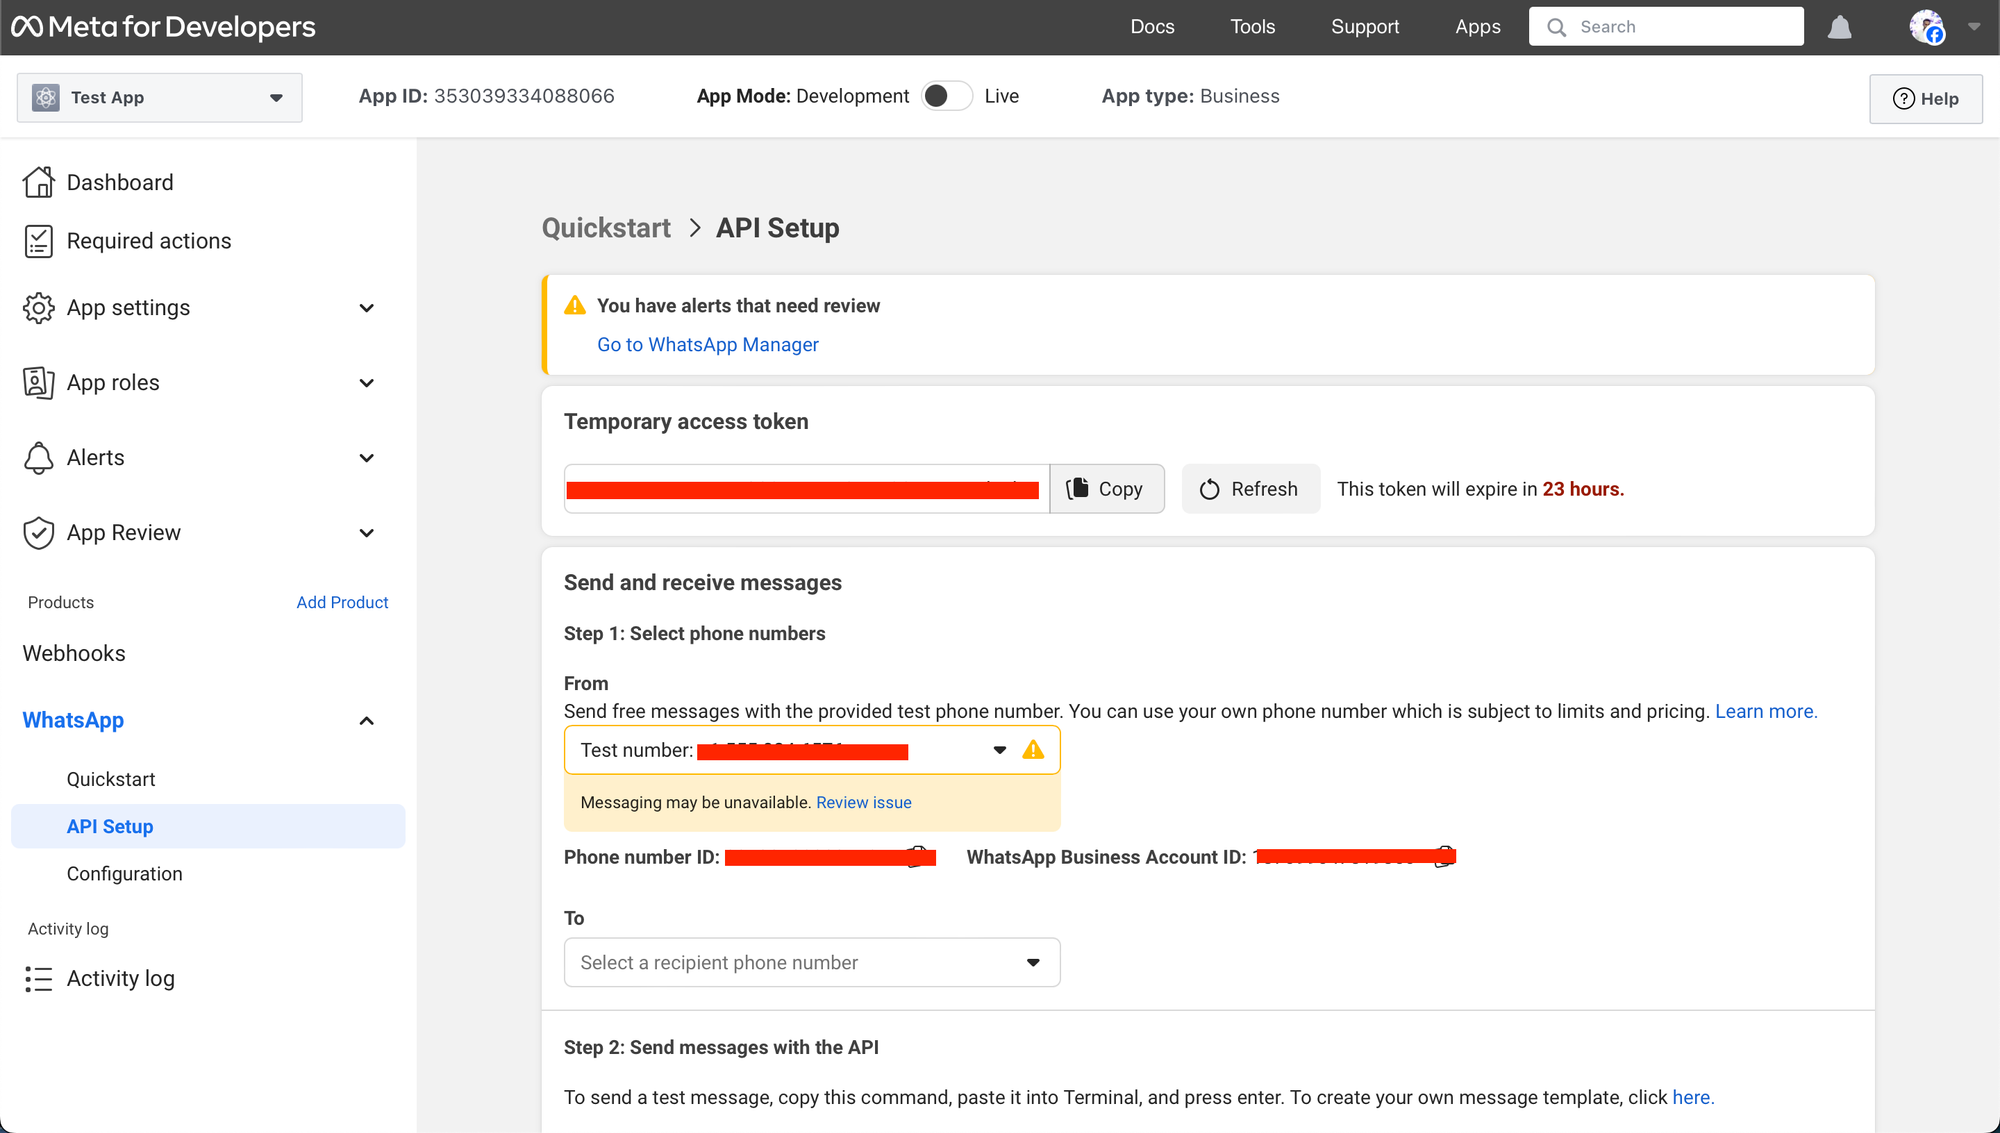
Go to the App Dashboard, navigate to WhatsApp > API Setup, and below the message sending part, search for the ‘To’ area to handle your cellphone quantity record.
You may enter any legitimate WhatsApp quantity to obtain messages. This quantity will get a affirmation code through WhatsApp for verification.
As soon as verified, the recipient quantity might be prepared to be used. You may add as much as 5 numbers following this methodology.
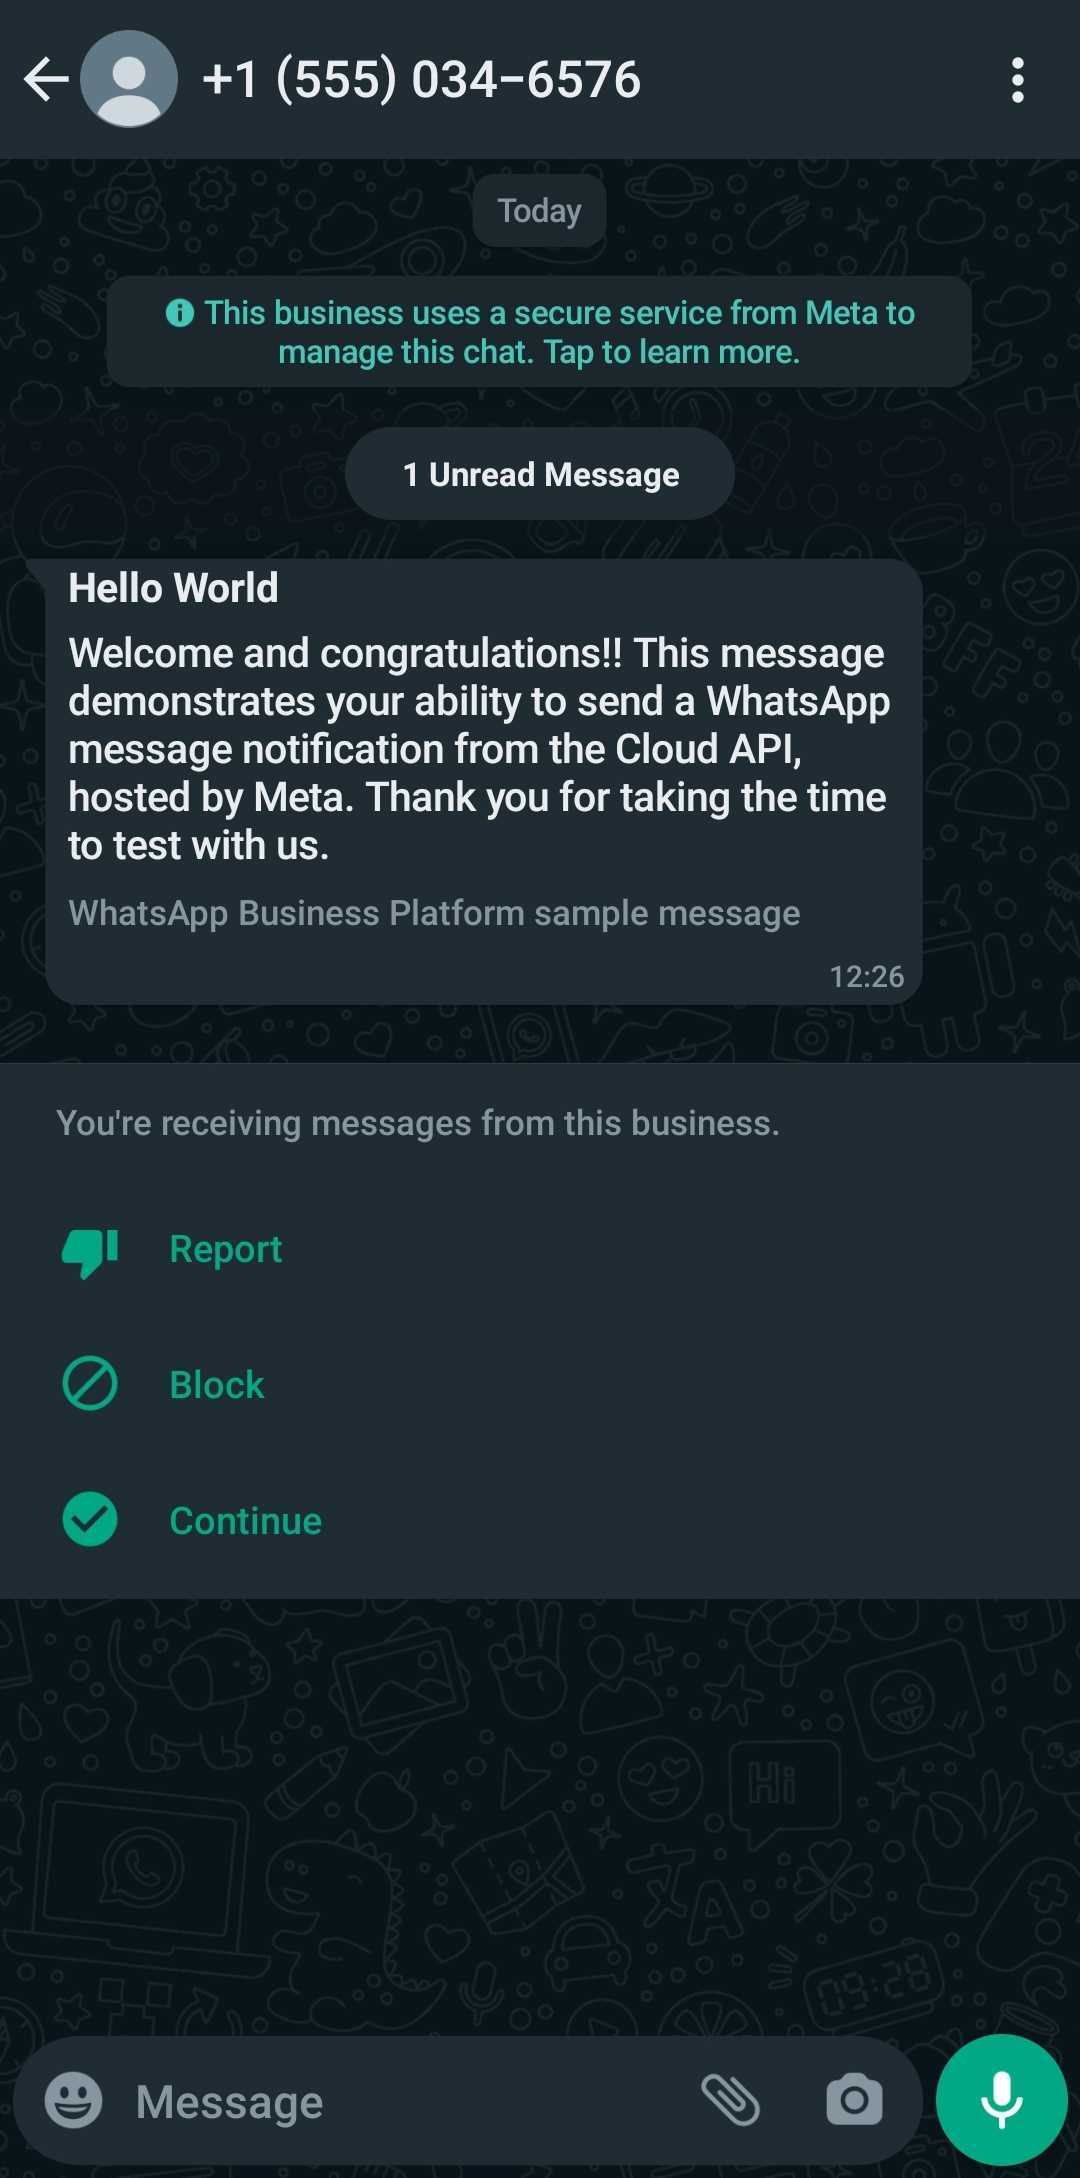
To ship a take a look at message, use the pre-approved ‘hello_world’ template current on the dashboard.
import requests

url = "https://graph.fb.com/v17.0/206324309221106/messages"

headers = {
    'Authorization': 'Bearer YOUR_TEMPORARY_ACCESS_TOKEN',
    'Content material-Kind': 'utility/json'
}

information = {
    "messaging_product": "whatsapp",
    "to": "RECEPIENT_PHONE_NUMBER",
    "sort": "template",
    "template": {
        "title": "hello_world",
        "language": {
            "code": "en_US"
        }
    }
}

response = requests.publish(url, headers=headers, json=information)

print(response.textual content)
Within the API Setup below WhatsApp:
- Ensure your take a look at enterprise quantity is within the ‘From’ area.
- Guarantee the specified recipient’s quantity is chosen within the ‘To’ area. You may ship messages to a number of numbers if added.
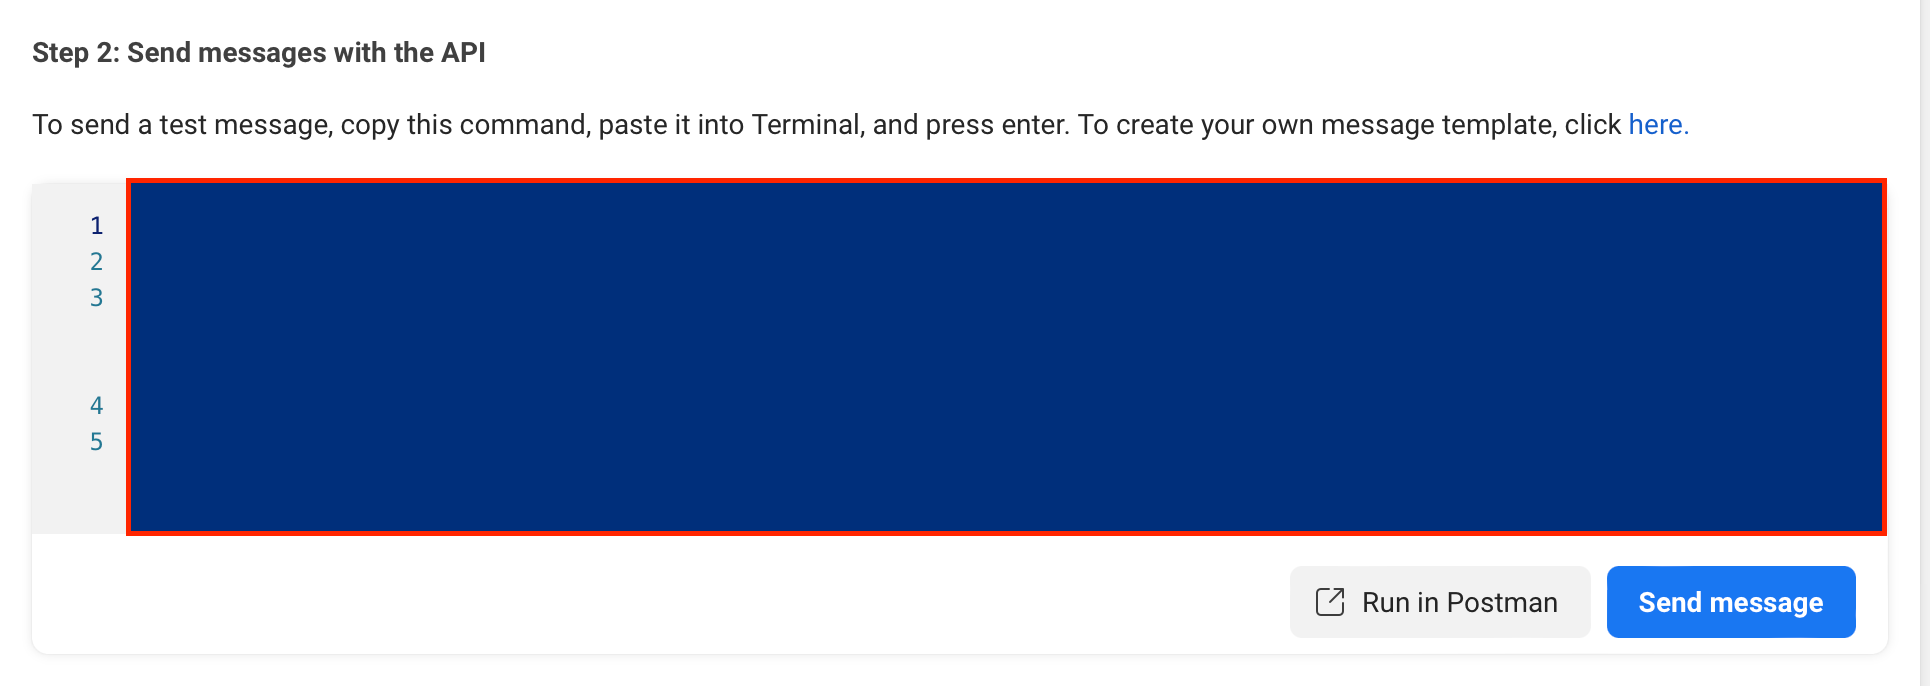
- Use the API panel to ship your message, or alternatively use the supplied python code.
The command you may use signifies that you simply’re sending a template message, specifying the ‘hello_world’ template. A message just like the one under ought to seem on the recipient cellphone quantity.
- Add a Actual Enterprise Quantity (For Later)
Whereas creating your utility, you should use the take a look at enterprise quantity and account with none value for sending messages.
Whenever you’re prepared to interact with prospects, you may add an actual enterprise cellphone quantity (from which messages might be despatched) within the API Setup and create an official WhatsApp Enterprise Account. We’ll talk about this later.
Necessities of Whatsapp Enterprise Administration API
The Enterprise Administration API works together with the first Cloud API (which is used for sending messages and so on). It’s designed for authentication functionalities and managing WhatsApp business-related belongings like WhatsApp Enterprise Accounts and message templates.
Entry Tokens
Several types of entry tokens are supported:
- System Person Entry Tokens: These are non-expiring tokens representing what you are promoting or group and are important for Resolution Companions sharing credit score strains with onboarded prospects.
- Enterprise Integration System Person Entry Tokens: Superb for Tech Suppliers and Resolution Companions, these tokens are particular to onboarded buyer information and help automated actions with out person enter or re-authentication.
- Person Entry Tokens: Typically used for preliminary app testing, they expire rapidly and are much less appropriate for ongoing growth. This token was used within the take a look at message despatched above.
System Person Entry Tokens
System Person tokens are categorized into two varieties:
- Worker System Customers: Want entry to particular person WhatsApp Enterprise Accounts and are appropriate for restricted account entry.
- Admin System Customers: Have default full entry to all WhatsApp Enterprise Accounts and belongings, helpful for broader entry necessities.
Creating System Customers
To create a system person:
- Signal into the Meta Enterprise Suite.
- Find what you are promoting account within the top-left dropdown menu and click on its Settings (gear) icon.
- Click on Enterprise settings.
- Navigate to Customers > System customers.
- Click on the Add button and create both an admin or worker system person.

Producing System Person Entry Tokens
To generate a System Person entry token after making a system person:
- Signal into the Meta Enterprise Suite.
- Find what you are promoting account within the top-left dropdown menu and click on its Settings (gear) icon.
- Click on Enterprise settings.
- Navigate to Person > System customers.
- Choose the suitable system person from the record of system customers.
- Click on the Generate new token button.
- Choose the app that may use the token.
- Choose any permissions the app must operate correctly and generate the token.
Enterprise Integration System Person Entry Tokens
These tokens are generated by Embedded Signup and are scoped to particular person onboarded prospects. They’re essential for apps performing automated actions on buyer WhatsApp Enterprise Accounts. Be taught extra right here.
Charge Limits
The API imposes limits on the variety of calls per hour. These limits range primarily based on the kind of name and the standing of the WhatsApp Enterprise Account.
Automate Whatsapp messaging campaigns with our AI-driven workflows, designed by Nanonets for you and your groups.
Sending Messages utilizing the Whatsapp Cloud API
You may both ship free-form messages or use message templates. Allow us to discover each.
With the WhatsApp Cloud API, you may ship numerous sorts of free-form messages, together with:
- Textual content
- Response
- Media (photos, movies, and so on.)
- Location
- Contacts
- Interactive messages
- Tackle messages
Request Syntax for Sending Messages
To ship messages, use the POST request to the WhatsApp Enterprise Telephone Quantity endpoint:
POST /<WHATSAPP_BUSINESS_PHONE_NUMBER>/messages
Message Payload Construction
The message payload has an ordinary format, with variations relying on the message sort:
{
  "messaging_product": "whatsapp",
  "recipient_type": "particular person",
  "to": "<TO>",
  "sort": "<TYPE>",

  // Particular payload relying on message sort
}
<TO>: WhatsApp ID or cellphone variety of the recipient (e.g., +16315551234).<TYPE>: Kind of message (e.g., ‘textual content’, ‘picture’, and so on.).
The response comprises a message id which is available in helpful for sending replies/reactions, and for checking for unsuccessful requests through the standing code within the response (typical conference the place standing code 200 signifies a profitable name).
{
  "messaging_product": "whatsapp",
  "contacts": [{
      "input": "<PHONE_NUMBER>",
      "wa_id": "<WHATSAPP_ID>",
    }],
  "messages": [{
      "id": "<wamid.ID>",
    }]
}
Textual content Messages
To ship a textual content message:
import requests
import json

url="https://graph.fb.com/v18.0/<FROM_PHONE_NUMBER_ID>/messages"
headers = {
    'Authorization': 'Bearer <ACCESS_TOKEN>',
    'Content material-Kind': 'utility/json'
}
payload = {
    'messaging_product': 'whatsapp',
    'recipient_type': 'particular person',
    'to': '<PHONE_NUMBER>',
    'sort': 'textual content',
    'textual content': {
        'preview_url': False,
        'physique': '<MESSAGE_CONTENT>'
    }
}

response = requests.publish(url, headers=headers, information=json.dumps(payload))
print(response.textual content)
Response Messages
For sending response messages:
import requests
import json

url="https://graph.fb.com/v18.0/<FROM_PHONE_NUMBER_ID>/messages"

headers = {
    'Authorization': 'Bearer <ACCESS_TOKEN>',
    'Content material-Kind': 'utility/json'
}

information = {
    "messaging_product": "whatsapp",
    "recipient_type": "particular person",
    "to": "<PHONE_NUMBER>",
    "sort": "response",
    "response": {
        "message_id": "wamid.HBgLM...",
        "emoji": "uD83DuDE00"
    }
}

response = requests.publish(url, headers=headers, information=json.dumps(information))

print(response.textual content)
Media Messages
Use the sortproperty to point the media asset’s sort (audio, doc, picture, sticker, or video) and both the id or hyperlink property to point its ID (which you should generate) or location in your public server.
If utilizing id, you should first add your media asset to the Whatsapp servers and seize the returned media ID. If utilizing hyperlink, your asset have to be on a publicly accessible server or the message will fail to ship.
Utilizing Hyperlink
import requests

url="https://graph.fb.com/v18.0/<FROM-PHONE-NUMBER-ID>/messages"

headers = {
    'Authorization': 'Bearer <ACCESS_TOKEN>',
    'Content material-Kind': 'utility/json',
}

information = {
  'messaging_product': 'whatsapp',
  'recipient_type': 'particular person',
  'to': '<PHONE-NUMBER>',
  'sort': 'picture',
  'picture': {
    'hyperlink': '<IMAGE_URL>'
  }
}

response = requests.publish(url, headers=headers, json=information)
print(response.textual content)
Utilizing ID
import requests

url="https://graph.fb.com/v18.0/FROM-PHONE-NUMBER-ID/messages"

headers = {
    'Authorization': 'Bearer ACCESS_TOKEN',
    'Content material-Kind': 'utility/json'
}

information = {
  "messaging_product": "whatsapp",
  "recipient_type": "particular person",
  "to": "PHONE-NUMBER",
  "sort": "picture",
  "picture": {
    "id": "MEDIA-OBJECT-ID"
  }
}

response = requests.publish(url, json=information, headers=headers)
print(response.textual content)
Location Messages
To ship location messages, make a POST name to /PHONE_NUMBER_ID/messages and fix a message object with sort=location. Then, add a location object.
import requests

url="https://graph.fb.com/v18.0/<FROM_PHONE_NUMBER_ID>/messages"
headers = {
    'Authorization': 'Bearer <ACCESS_TOKEN>',
    'Content material-Kind': 'utility/json'
}
information = {
    "messaging_product": "whatsapp",
    "to": "<PHONE_NUMBER>",
    "sort": "location",
    "location": {
        "longitude": <LONG_NUMBER>,
        "latitude": <LAT_NUMBER>,
        "title": "<LOCATION_NAME>",
        "deal with": "<LOCATION_ADDRESS>"
    }
}

response = requests.publish(url, headers=headers, json=information)
print(response.textual content)
Contacts Messages
To ship contacts messages:
import requests
import json

url="https://graph.fb.com/v18.0/FROM_PHONE_NUMBER_ID/messages"

headers = {
    'Authorization': 'ACCESS_TOKEN',
    'Content material-Kind': 'utility/json',
}

information = {
    "messaging_product": "whatsapp",
    "to": "PHONE_NUMBER",
    "sort": "contacts",
    "contacts": [{
        "addresses": [{
            "street": "STREET",
            "city": "CITY",
            "state": "STATE",
            "zip": "ZIP",
            "country": "COUNTRY",
            "country_code": "COUNTRY_CODE",
            "type": "HOME"
        },
        {
            "street": "STREET",
            "city": "CITY",
            "state": "STATE",
            "zip": "ZIP",
            "country": "COUNTRY",
            "country_code": "COUNTRY_CODE",
            "type": "WORK"
        }],
        "birthday": "YEAR_MONTH_DAY",
        "emails": [{
            "email": "EMAIL",
            "type": "WORK"
        },
        {
            "email": "EMAIL",
            "type": "HOME"
        }],
        "title": {
            "formatted_name": "NAME",
            "first_name": "FIRST_NAME",
            "last_name": "LAST_NAME",
            "middle_name": "MIDDLE_NAME",
            "suffix": "SUFFIX",
            "prefix": "PREFIX"
        },
        "org": {
            "firm": "COMPANY",
            "division": "DEPARTMENT",
            "title": "TITLE"
        },
        "telephones": [{
            "phone": "PHONE_NUMBER",
            "type": "HOME"
        },
        {
            "phone": "PHONE_NUMBER",
            "type": "WORK",
            "wa_id": "PHONE_OR_WA_ID"
        }],
        "urls": [{
            "url": "URL",
            "type": "WORK"
        },
        {
            "url": "URL",
            "type": "HOME"
        }]
    }]
}

response = requests.publish(url, headers=headers, information=json.dumps(information))
print(response.textual content)
Change <CONTACT_PAYLOAD> with the JSON construction containing contact particulars.
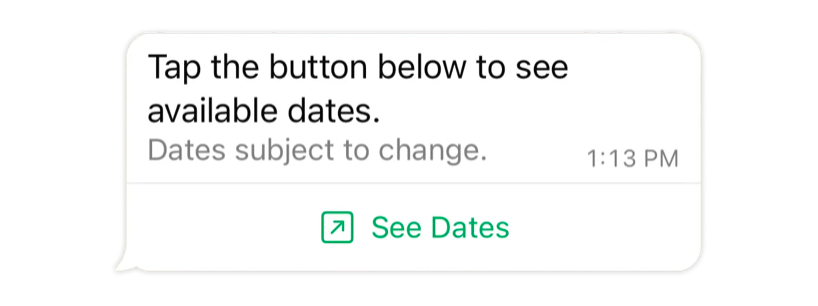
Interactive Messages
Interactive messages embrace record messages, reply buttons, and click-to-action URL buttons. To ship interactive messages, make a POST name to /PHONE_NUMBER_ID/messages and fix a message object with sort=interactive. Then, add an interactive object.
For record messages:
import requests
import json

url="https://graph.fb.com/v18.0/FROM_PHONE_NUMBER_ID/messages"
headers = {
    'Authorization': 'Bearer ACCESS_TOKEN',
    'Content material-Kind': 'utility/json'
}
information = {
    "messaging_product": "whatsapp",
    "recipient_type": "particular person",
    "to": "PHONE_NUMBER",
    "sort": "interactive",
    "interactive": {
        "sort": "record",
        "header": {
            "sort": "textual content",
            "textual content": "HEADER_TEXT"
        },
        "physique": {
            "textual content": "BODY_TEXT"
        },
        "footer": {
            "textual content": "FOOTER_TEXT"
        },
        "motion": {
            "button": "BUTTON_TEXT",
            "sections": [
                {
                    "title": "SECTION_1_TITLE",
                    "rows": [
                        {
                            "id": "SECTION_1_ROW_1_ID",
                            "title": "SECTION_1_ROW_1_TITLE",
                            "description": "SECTION_1_ROW_1_DESCRIPTION"
                        },
                        {
                            "id": "SECTION_1_ROW_2_ID",
                            "title": "SECTION_1_ROW_2_TITLE",
                            "description": "SECTION_1_ROW_2_DESCRIPTION"
                        }
                    ]
                },
                {
                    "title": "SECTION_2_TITLE",
                    "rows": [
                        {
                            "id": "SECTION_2_ROW_1_ID",
                            "title": "SECTION_2_ROW_1_TITLE",
                            "description": "SECTION_2_ROW_1_DESCRIPTION"
                        },
                        {
                            "id": "SECTION_2_ROW_2_ID",
                            "title": "SECTION_2_ROW_2_TITLE",
                            "description": "SECTION_2_ROW_2_DESCRIPTION"
                        }
                    ]
                }
            ]
        }
    }
}

response = requests.publish(url, headers=headers, information=json.dumps(information))
print(response.textual content)
For reply buttons:
import requests

url="https://graph.fb.com/v18.0/FROM_PHONE_NUMBER_ID/messages"
headers = {
    'Authorization': 'Bearer ACCESS_TOKEN',
    'Content material-Kind': 'utility/json'
}
information = {
    "messaging_product": "whatsapp",
    "recipient_type": "particular person",
    "to": "PHONE_NUMBER",
    "sort": "interactive",
    "interactive": {
        "sort": "button",
        "physique": {
            "textual content": "BUTTON_TEXT"
        },
        "motion": {
            "buttons": [
                {
                    "type": "reply",
                    "reply": {
                        "id": "UNIQUE_BUTTON_ID_1",
                        "title": "BUTTON_TITLE_1"
                    }
                },
                {
                    "type": "reply",
                    "reply": {
                        "id": "UNIQUE_BUTTON_ID_2",
                        "title": "BUTTON_TITLE_2"
                    }
                }
            ]
        }
    }
}

response = requests.publish(url, headers=headers, json=information)
print(response.textual content)
For sending messages with CTA URL buttons:
import requests
import json

# Change these variables along with your precise information
access_token = '<ACCESS_TOKEN>'
business_phone_number_id = '<BUSINESS_PHONE_NUMBER_ID>'
customer_phone_number="<CUSTOMER_PHONE_NUMBER>"

url = f'https://graph.fb.com/v18.0/{business_phone_number_id}/messages'
headers = {
    'Authorization': f'Bearer {access_token}',
    'Content material-Kind': 'utility/json'
}
information = {
    "messaging_product": "whatsapp",
    "recipient_type": "particular person",
    "to": customer_phone_number,
    "sort": "interactive",
    "interactive": {
        "sort": "button",
        "physique": {
            "textual content": "BUTTON_TEXT"
        },
        "motion": {
            "buttons": [
                {
                    "type": "reply",
                    "reply": {
                        "id": "UNIQUE_BUTTON_ID_1",
                        "title": "BUTTON_TITLE_1"
                    }
                },
                {
                    "type": "reply",
                    "reply": {
                        "id": "UNIQUE_BUTTON_ID_2",
                        "title": "BUTTON_TITLE_2"
                    }
                }
            ]
        }
    }
}

response = requests.publish(url, headers=headers, information=json.dumps(information))
print(response.textual content)
Sending Replies
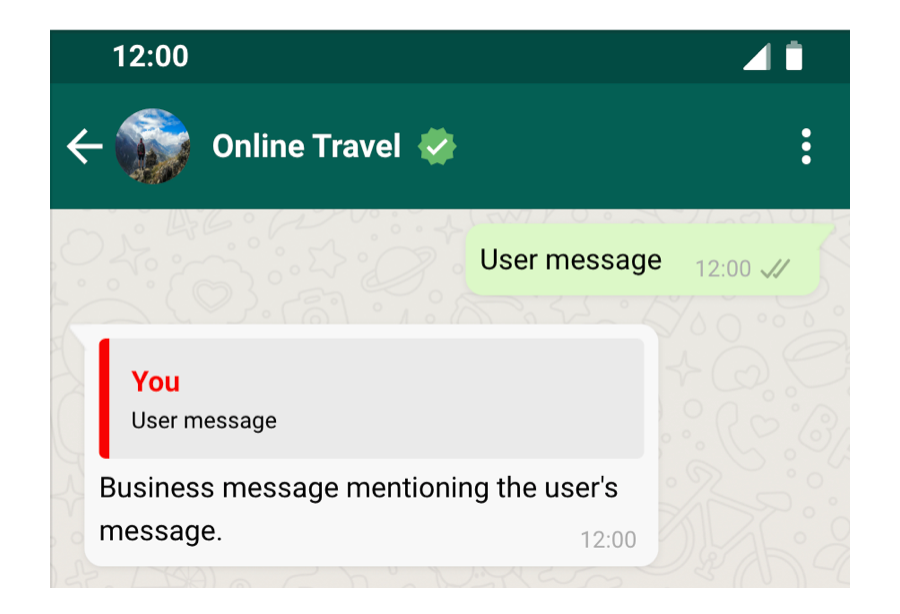
Sending a message as a response to an earlier message in a dialog is feasible by including the ID of the earlier message within the context object. This fashion, the recipient will get the brand new message with a contextual bubble showcasing the content material of the previous message.
import requests

url="https://graph.fb.com/v18.0/<FROM_PHONE_NUMBER_ID>/messages"

headers = {
    'Authorization': 'Bearer <ACCESS_TOKEN>',
    'Content material-Kind': 'utility/json'
}

information = {
    "messaging_product": "whatsapp",
    "context": {
        "message_id": "<MESSAGE_ID>"
    },
    "to": "<PHONE_NUMBER_OR_WA_ID>",
    "sort": "textual content",
    "textual content": {
        "preview_url": False,
        "physique": "<YOUR_TEXT_MESSAGE_CONTENT>"
    }
}

response = requests.publish(url, headers=headers, json=information)

print(response.textual content)
Sending Tackle Messages
Tackle Message varieties are supported in India and Singapore solely. Learn Extra right here.
Sending Message Templates
WhatsApp message templates are pre-created particular message codecs that companies use to ship out notifications or buyer care messages to those that have opted in to notifications. Messages can embrace appointment reminders, transport data, situation decision or fee updates.
Earlier than sending a template message, it is advisable create a template.
- Go to Enterprise Supervisor and choose what you are promoting.
- Open Menu and click on on WhatsApp Supervisor.
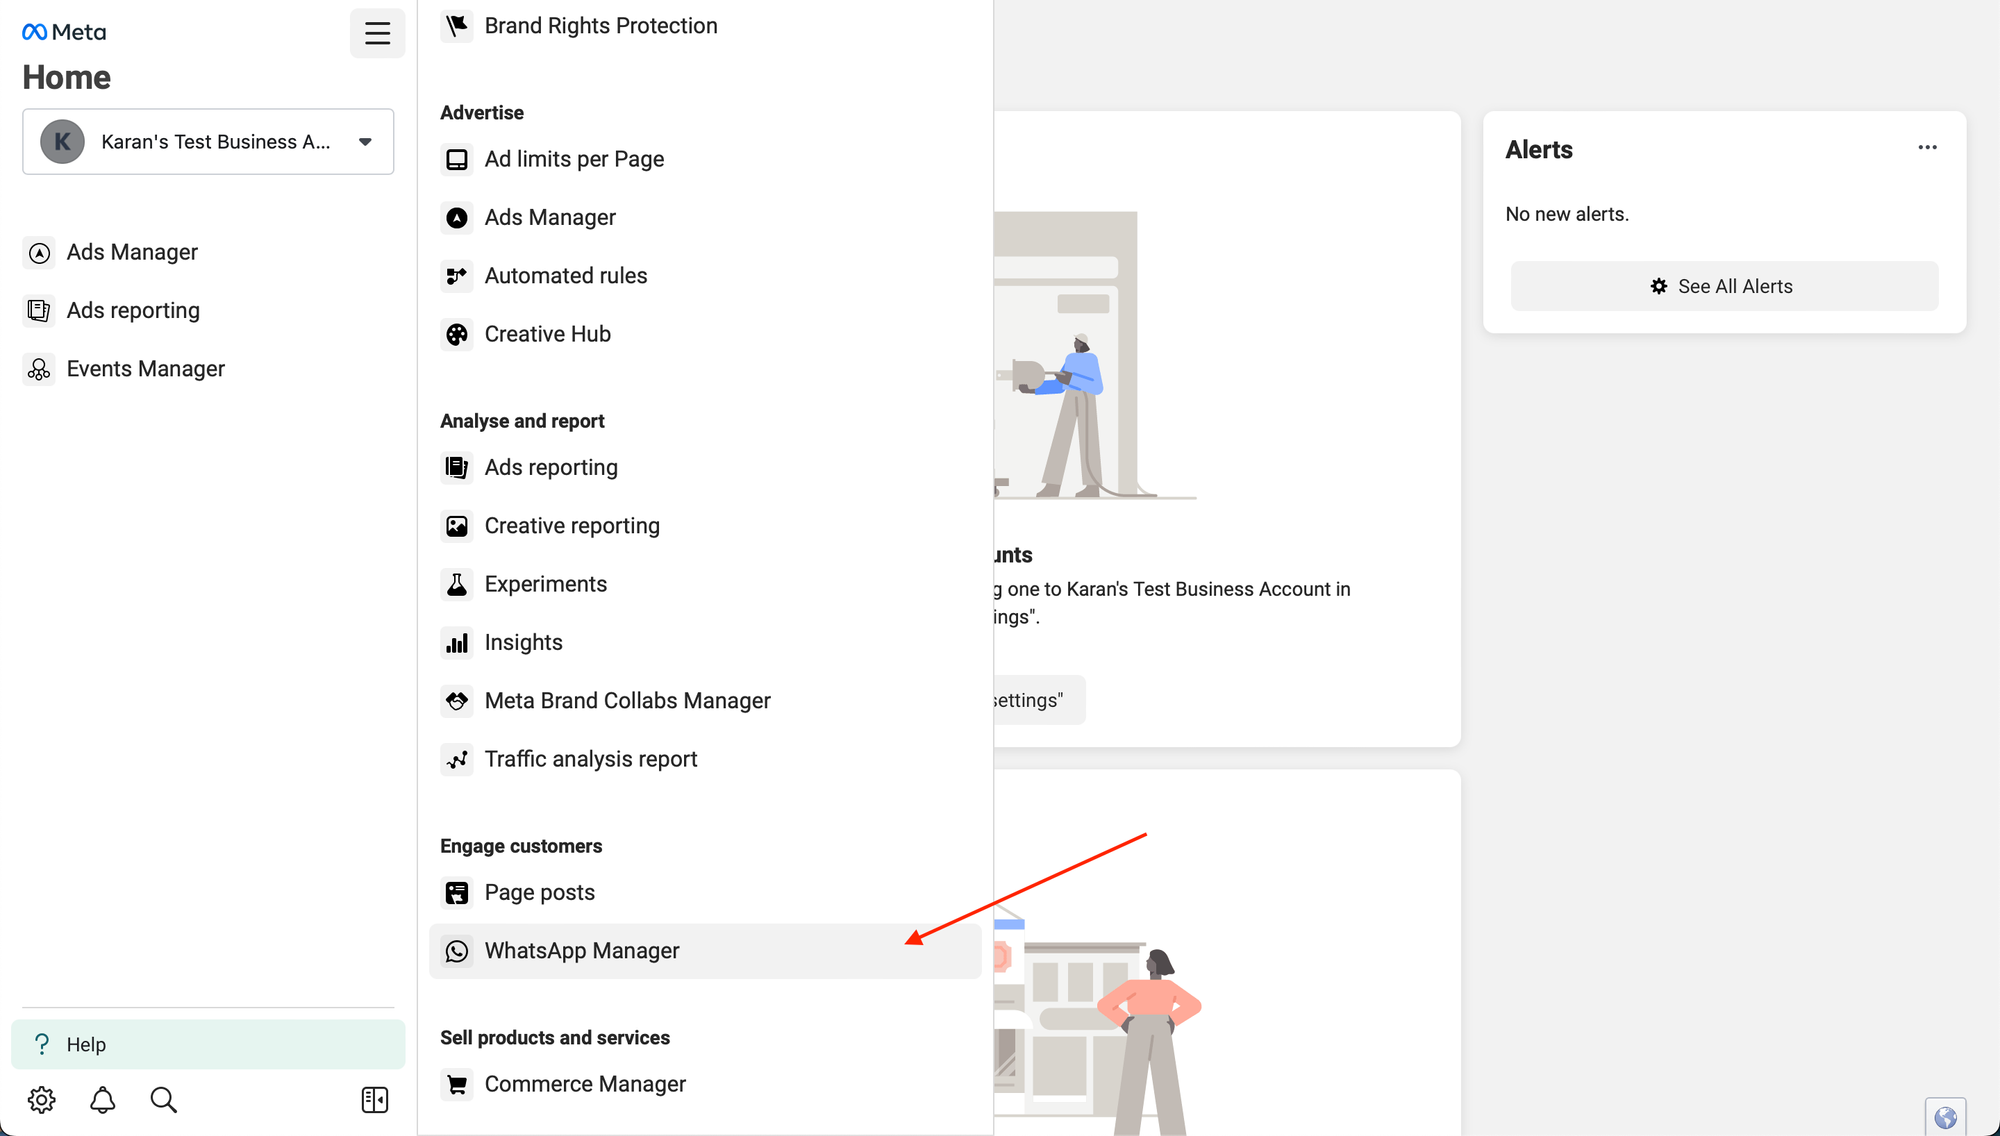
- Click on on “Handle Message Templates”.
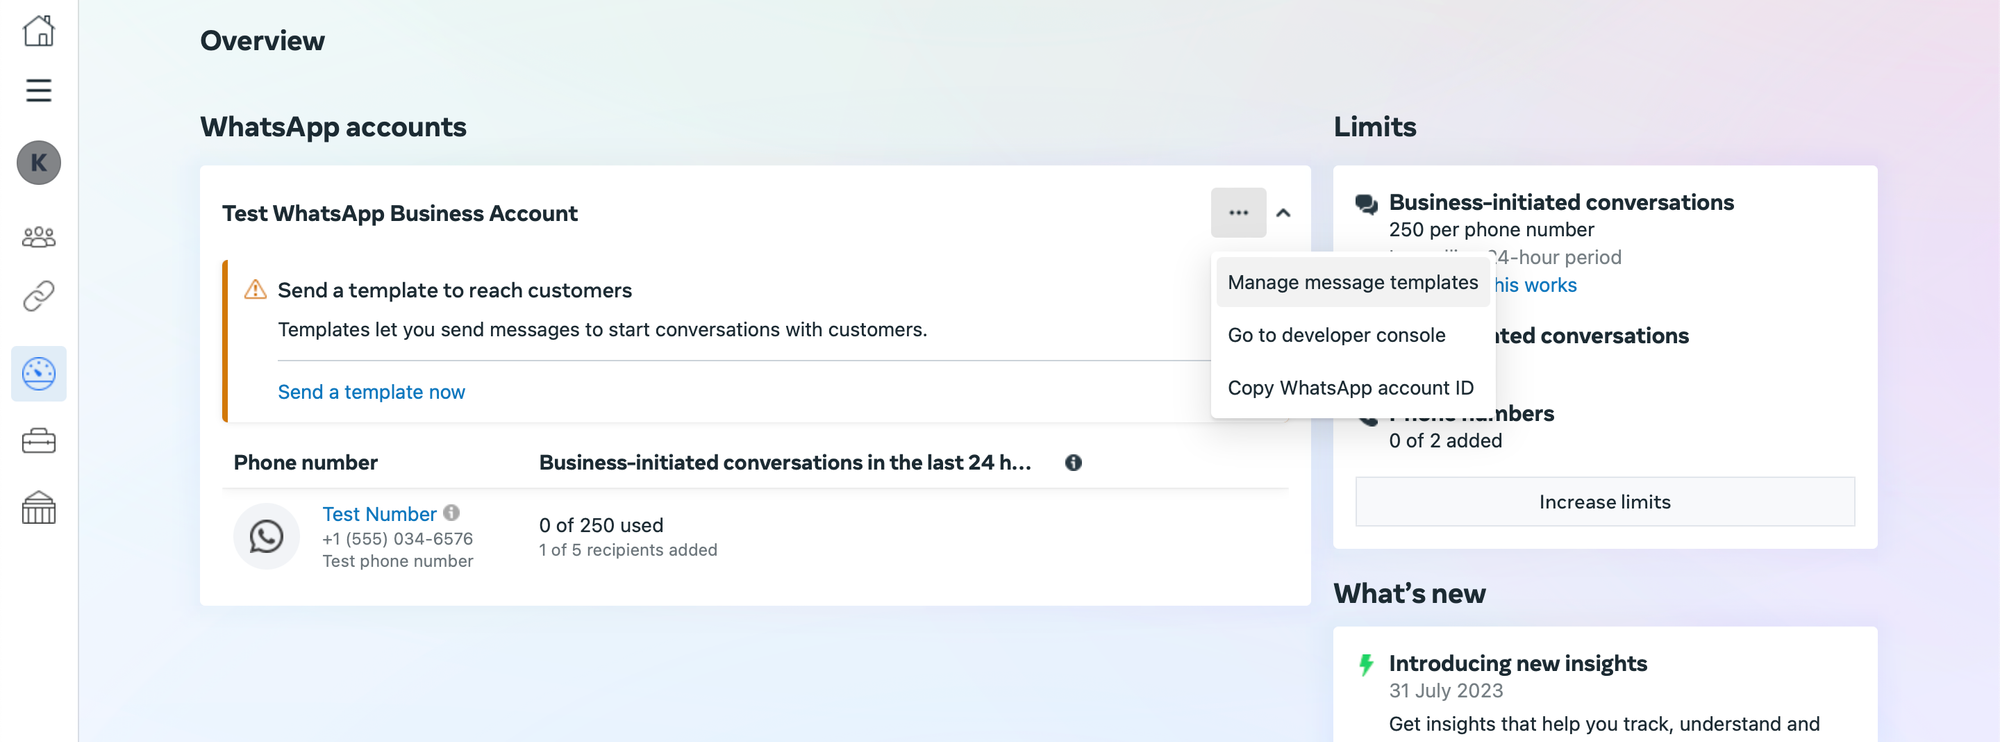
Now, you may both use one of many pre-approved templates, or create your template with required framework and get that accepted from Meta.
Check out the pre accepted templates supplied right here – https://www.fb.com/enterprise/assist/722393685250070
You can begin utilizing them immediately.
For instance –
1. Sending Catalog Template Messages
This part explains easy methods to ship catalog templates in a WhatsApp message, assuming you may have a listing in a Meta ecommerce catalog linked to your WhatsApp Enterprise Account.
Necessities
- Stock uploaded to Meta. You may create it utilizing this information.
- Ecommerce catalog linked to WhatsApp Enterprise Account.
Setup
The following step is to create a catalog template which might be used to ship the messages. Use this information to create a catalog template in minutes.
Request Syntax
Use the WhatsApp Enterprise Telephone Quantity > Messages endpoint.
Instance Request
For example we create a template known as intro_catalog_offer.
import requests

url="https://graph.fb.com/v17.0/<WHATSAPP_BUSINESS_PHONE_NUMBER_ID>/messages"
headers = {
    'Content material-Kind': 'utility/json',
    'Authorization': 'Bearer <YOUR_ACCESS_TOKEN>'
}
information = {
  "messaging_product": "whatsapp",
  "recipient_type": "particular person",
  "to": "+16505551234",
  "sort": "template",
  "template": {
    "title": "intro_catalog_offer",
    "language": {
      "code": "en_US"
    },
    "parts": [
      {
        "type": "body",
        "parameters": [
          {
            "type": "text",
            "text": "100"
          },
          {
            "type": "text",
            "text": "400"
          },
          {
            "type": "text",
            "text": "3"
          }
        ]
      },
      {
        "sort": "button",
        "sub_type": "CATALOG",
        "index": 0,
        "parameters": [
          {
            "type": "action",
            "action": {
              "thumbnail_product_retailer_id": "2lc20305pt"
            }
          }
        ]
      }
    ]
  }
}

response = requests.publish(url, json=information, headers=headers)
print(response.json())
2. Sending Carousel Templates
This part covers the method of sending carousel templates in a WhatsApp message.
Request Syntax
Much like catalog templates, use the WhatsApp Enterprise Telephone Quantity > Messages endpoint.
Under is a pattern request for dispatching a carousel template, incorporating a message bubble which wants enter for 2 distinct variables. It contains two carousel playing cards, every that includes a picture header, and necessitates enter for textual content within the physique and variables related to buttons.
Setup
The following step is to create a carousal template, which might be used to ship messages. You may create one inside seconds utilizing this information.
Instance Request
import requests
import json

url="https://graph.fb.com/v18.0/106540352242922/messages"
headers = {
    'Content material-Kind': 'utility/json',
    'Authorization': 'Bearer EAAJB...'
}
information = {
    "messaging_product": "whatsapp",
    "recipient_type": "particular person",
    "to": "16505555555",
    "sort": "template",
    "template": {
        "title": "summer_carousel_promo_2023",
        "language": {
            "code": "en_US"
        },
        "parts": [
            {
                "type": "BODY",
                "parameters": [
                    {"type": "TEXT", "text": "20OFF"},
                    {"type": "TEXT", "text": "20%"}
                ]
            },
            {
                "sort": "CAROUSEL",
                "playing cards": [
                    {
                        "card_index": 0,
                        "components": [
                            {
                                "type": "HEADER",
                                "parameters": [{"type": "IMAGE", "image": {"id": "24230790383178626"}}]
                            },
                            {
                                "sort": "BODY",
                                "parameters": [
                                    {"type": "TEXT", "text": "10OFF"},
                                    {"type": "TEXT", "text": "10%"}
                                ]
                            },
                            {
                                "sort": "BUTTON",
                                "sub_type": "QUICK_REPLY",
                                "index": "0",
                                "parameters": [{"type": "PAYLOAD", "payload": "59NqSd"}]
                            },
                            {
                                "sort": "button",
                                "sub_type": "URL",
                                "index": "1",
                                "parameters": [{"type": "payload", "payload": "last_chance_2023"}]
                            }
                        ]
                    },
                    {
                        "card_index": 1,
                        "parts": [
                            {
                                "type": "HEADER",
                                "parameters": [{"type": "IMAGE", "image": {"id": "1690627074790615"}}]
                            },
                            {
                                "sort": "BODY",
                                "parameters": [
                                    {"type": "TEXT", "text": "30OFF"},
                                    {"type": "TEXT", "text": "30%"}
                                ]
                            },
                            {
                                "sort": "BUTTON",
                                "sub_type": "QUICK_REPLY",
                                "index": "0",
                                "parameters": [{"type": "PAYLOAD", "payload": "7C4xhY"}]
                            },
                            {
                                "sort": "BUTTON",
                                "sub_type": "URL",
                                "index": "1",
                                "parameters": [{"type": "payload", "payload": "summer_blues_2023"}]
                            }
                        ]
                    }
                ]
            }
        ]
    }
}

response = requests.publish(url, headers=headers, json=information)
print(response.textual content)
Use the under information to get acquainted extra with message templates – https://enterprise.fb.com/enterprise/assist/2055875911147364?id=2129163877102343
Whatsapp Messaging Workflow
On this part, we’ll take an instance of a Whatsapp advertising and marketing marketing campaign and attempt to automate it utilizing the Whatsapp API in python. We’ll delve into easy methods to automate the method of extracting every day leads from HubSpot through its API after which sending automated messages to those leads by WhatsApp’s API. We’ll use HubSpot fields to create dynamic messages primarily based on numerous attributes.
Script to Get Day by day Leads from HubSpot
To start, let’s write a Python script to fetch every day leads from HubSpot. This script will use the HubSpot API to get leads primarily based on a customized area, comparable to Date_Created, to filter leads created within the final 24 hours.
import requests
from datetime import datetime, timedelta

# HubSpot API particulars
HUBSPOT_API_KEY = 'your_hubspot_api_key'
HUBSPOT_CONTACTS_URL = 'https://api.hubapi.com/crm/v3/objects/contacts'

# Calculate yesterday's date
yesterday = (datetime.now() - timedelta(days=1)).strftime('%Y-%m-%d')

# Question parameters for the API name
params = {
    'hapikey': HUBSPOT_API_KEY,
    'restrict': 100,  # Alter the restrict as wanted
    'properties': ['firstname', 'lastname', 'phone', 'email', 'Date_Created'],
    'filters': [{
        'propertyName': 'Date_Created',
        'operator': 'GTE',
        'value': yesterday
    }]
}

# API name to get contacts
response = requests.get(HUBSPOT_CONTACTS_URL, params=params)
leads = response.json()

# Extract related data
daily_leads = [{'name': f"{lead['properties']['firstname']} {lead['properties']['lastname']}",
                'cellphone': lead['properties']['phone'],
                'electronic mail': lead['properties']['email']}
               for lead in leads['results']]

# Print the leads
print(daily_leads)
Sending Automated Messages through WhatsApp API
As soon as now we have the record of every day leads, the subsequent step is to ship them customized messages through WhatsApp. We’ll use the WhatsApp Cloud API and dynamically create messages primarily based on different HubSpot fields, like firstname, lastname, and another related information.
import requests
import json

# WhatsApp API particulars
WHATSAPP_API_URL = 'https://graph.fb.com/v18.0/YOUR_PHONE_NUMBER_ID/messages'
ACCESS_TOKEN = 'your_whatsapp_access_token'

# Perform to ship message
def send_whatsapp_message(phone_number, message):
    headers = {
        'Authorization': f'Bearer {ACCESS_TOKEN}',
        'Content material-Kind': 'utility/json'
    }

    payload = {
        'messaging_product': 'whatsapp',
        'recipient_type': 'particular person',
        'to': phone_number,
        'sort': 'textual content',
        'textual content': {'physique': message}
    }

    response = requests.publish(WHATSAPP_API_URL, headers=headers, json=payload)
    return response.json()

# Loop by the leads and ship messages
for lead in daily_leads:
    # Customized message primarily based on HubSpot fields
    message = f"Good day {lead['name']}, now we have thrilling updates for you! Examine your electronic mail at {lead['email']} for extra particulars."

    # Ship message
    send_response = send_whatsapp_message(lead['phone'], message)
    print(f"Message despatched to {lead['name']}: {send_response}")
On this script, we first outline a operate send_whatsapp_message that takes a cellphone quantity and a message as inputs and sends the message utilizing the WhatsApp API. Then, we loop by every lead, create a customized message, and use the operate to ship the message.
This workflow automates the method of extracting every day leads from HubSpot after which participating with them through customized WhatsApp messages. We tailor the messages in accordance with the lead’s data and preferences to make sure efficient communication.
Automate Whatsapp messaging campaigns with our AI-driven workflows, designed by Nanonets for you and your groups.
Automate the workflow with Nanonets
You may automate the above workflow inside seconds utilizing workflow automation powered by Nanonets.
We offer the necessities of our workflow as a pure language immediate, and the workflow builder spins up the workflow inside seconds.
We authenticate our Hubspot and Whatsapp accounts, after which we’re able to deploy the workflow and make it reside.
There are quite a few helpful workflows that each people and organizations may create to streamline communication, automate duties, and improve productiveness. Listed below are three sensible examples of such workflows:
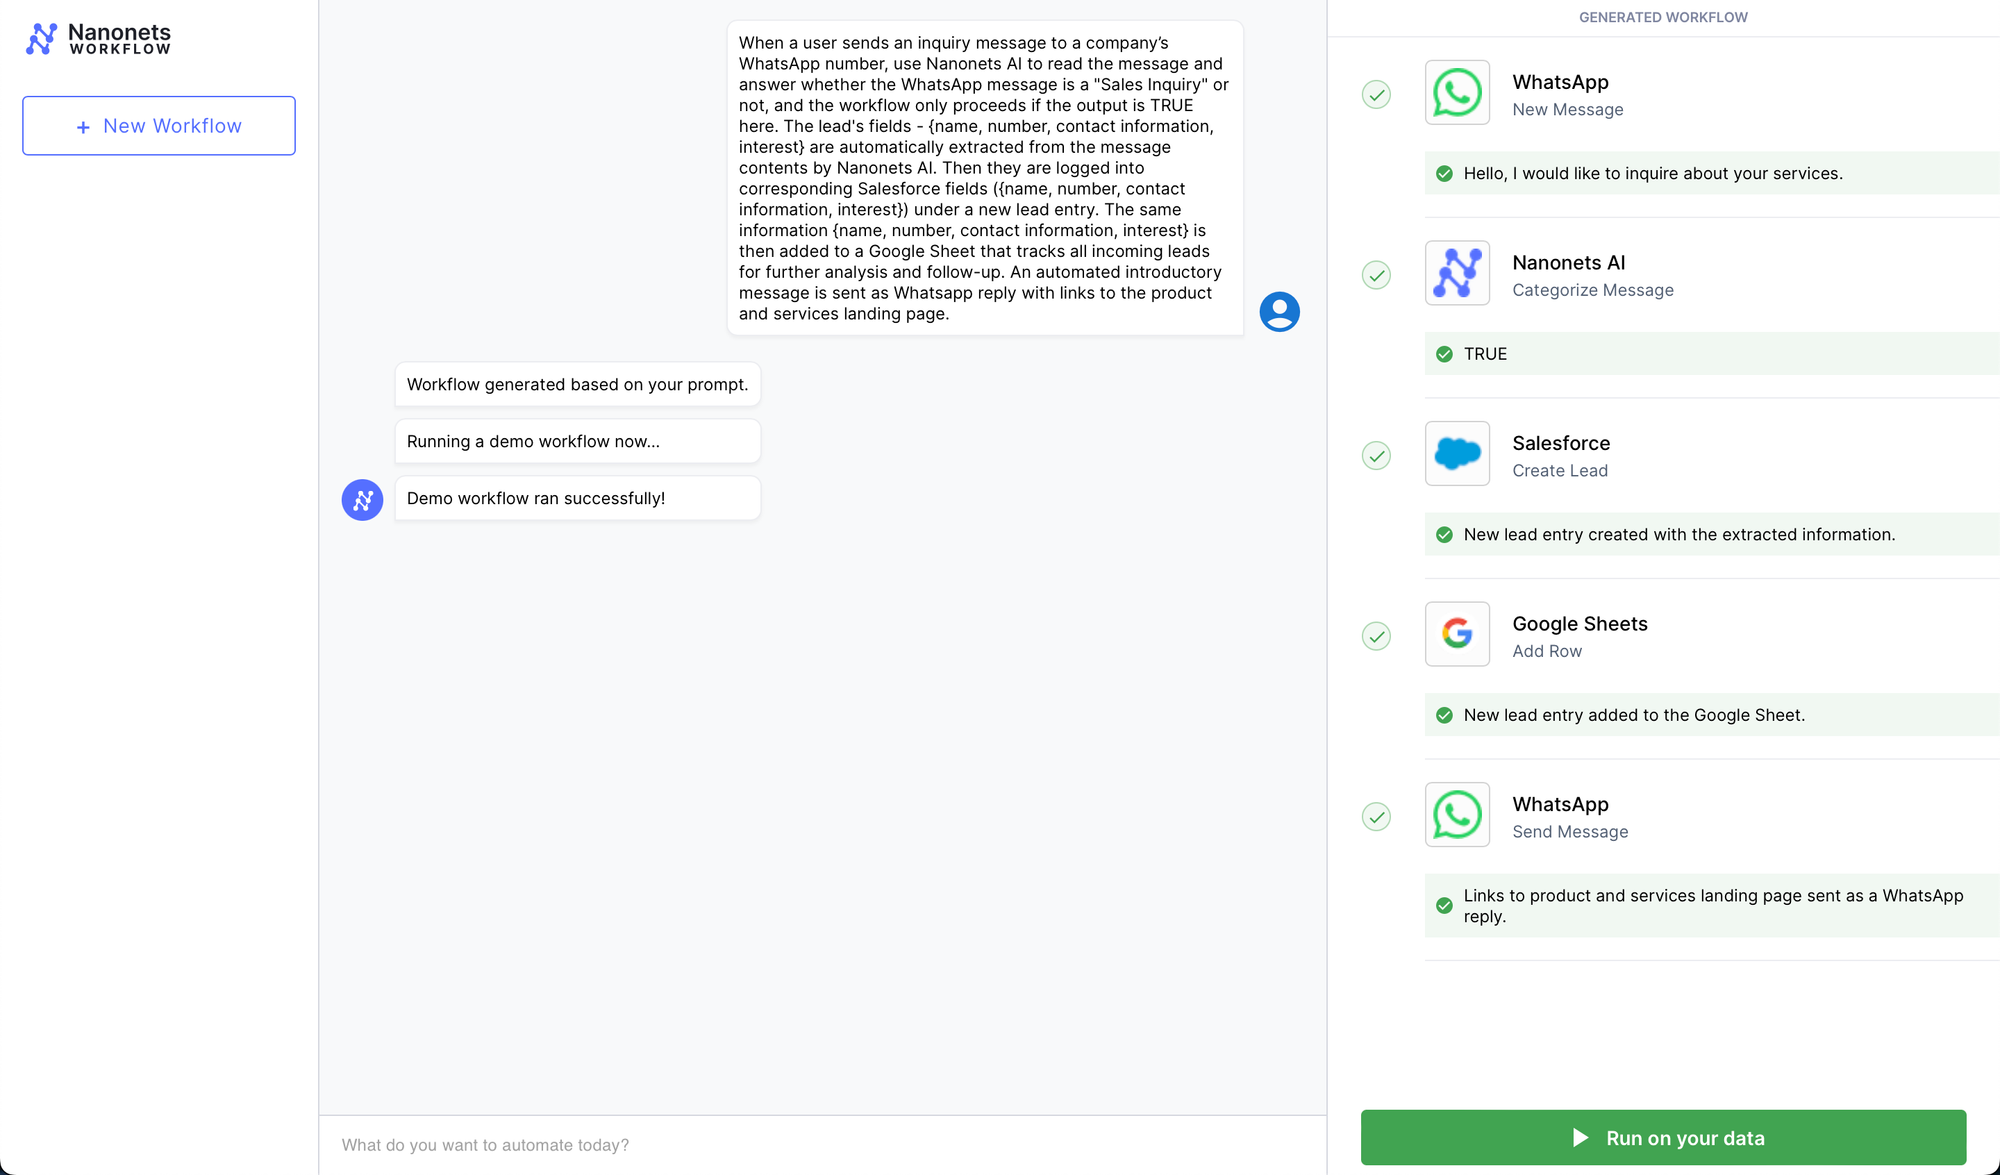
Gross sales Lead Notification Workflow
- Apps Concerned: WhatsApp, Salesforce, Google Sheets
- Workflow:
- Set off: A possible buyer sends a message to an organization’s WhatsApp quantity expressing curiosity in a services or products.
- Motion 1: The lead’s particulars (title, contact data, curiosity) are routinely logged into Salesforce below a brand new lead entry.
- Motion 2: The identical data can also be added to a Google Sheet that tracks all incoming leads for additional evaluation and follow-up.
- Motion 3: An automatic introductory message created utilizing a Whatsapp Catalog Template is shipped as Whatsapp reply.
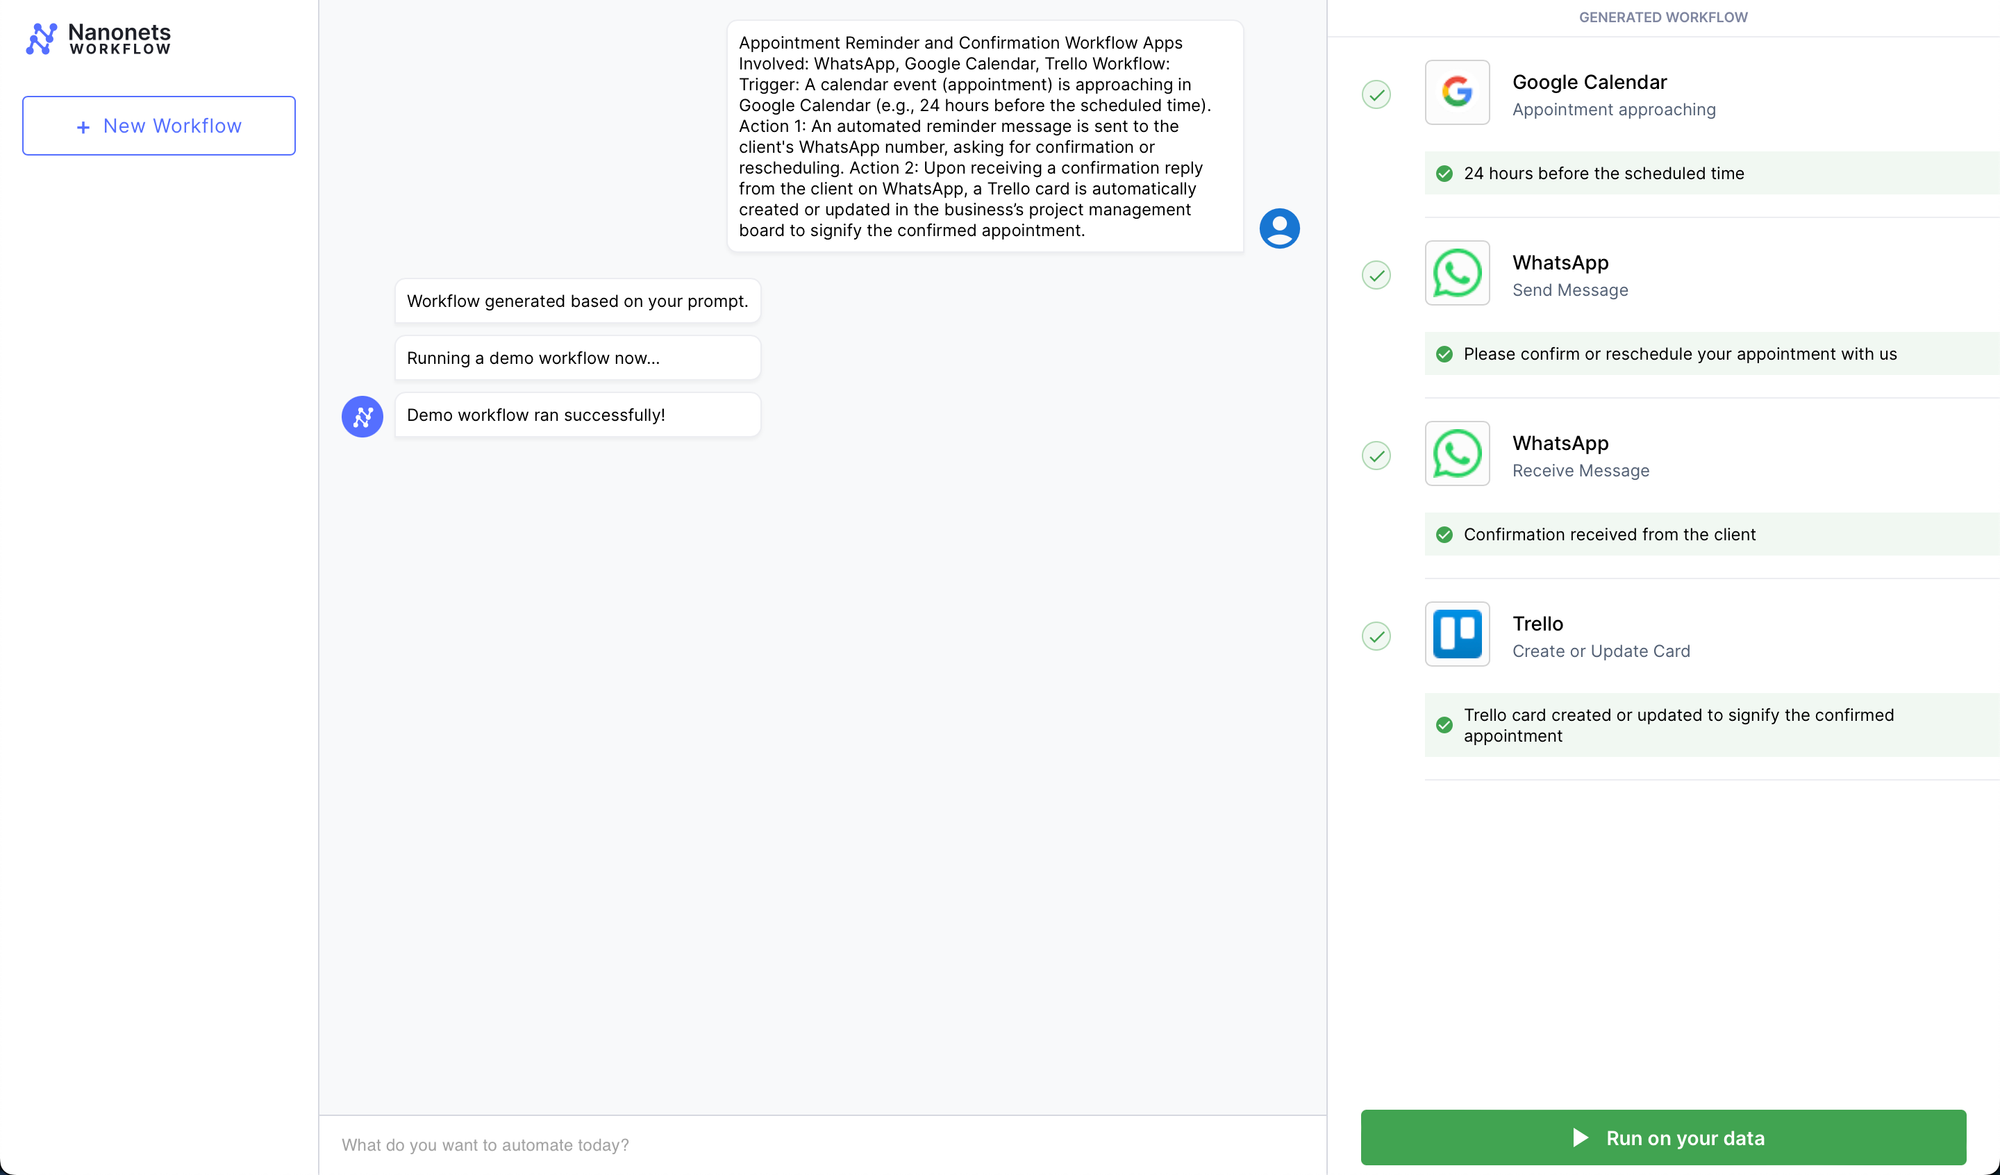
Appointment Reminder and Affirmation Workflow
- Apps Concerned: WhatsApp, Google Calendar, Trello
- Workflow:
- Set off: A calendar occasion (appointment) is approaching in Google Calendar (e.g., 24 hours earlier than the scheduled time).
- Motion 1: An automatic reminder message is shipped to the consumer’s WhatsApp quantity, asking for affirmation or rescheduling.
- Motion 2: Upon receiving a affirmation reply from the consumer on WhatsApp, a Trello card is routinely created or up to date within the enterprise’s undertaking administration board to indicate the confirmed appointment.
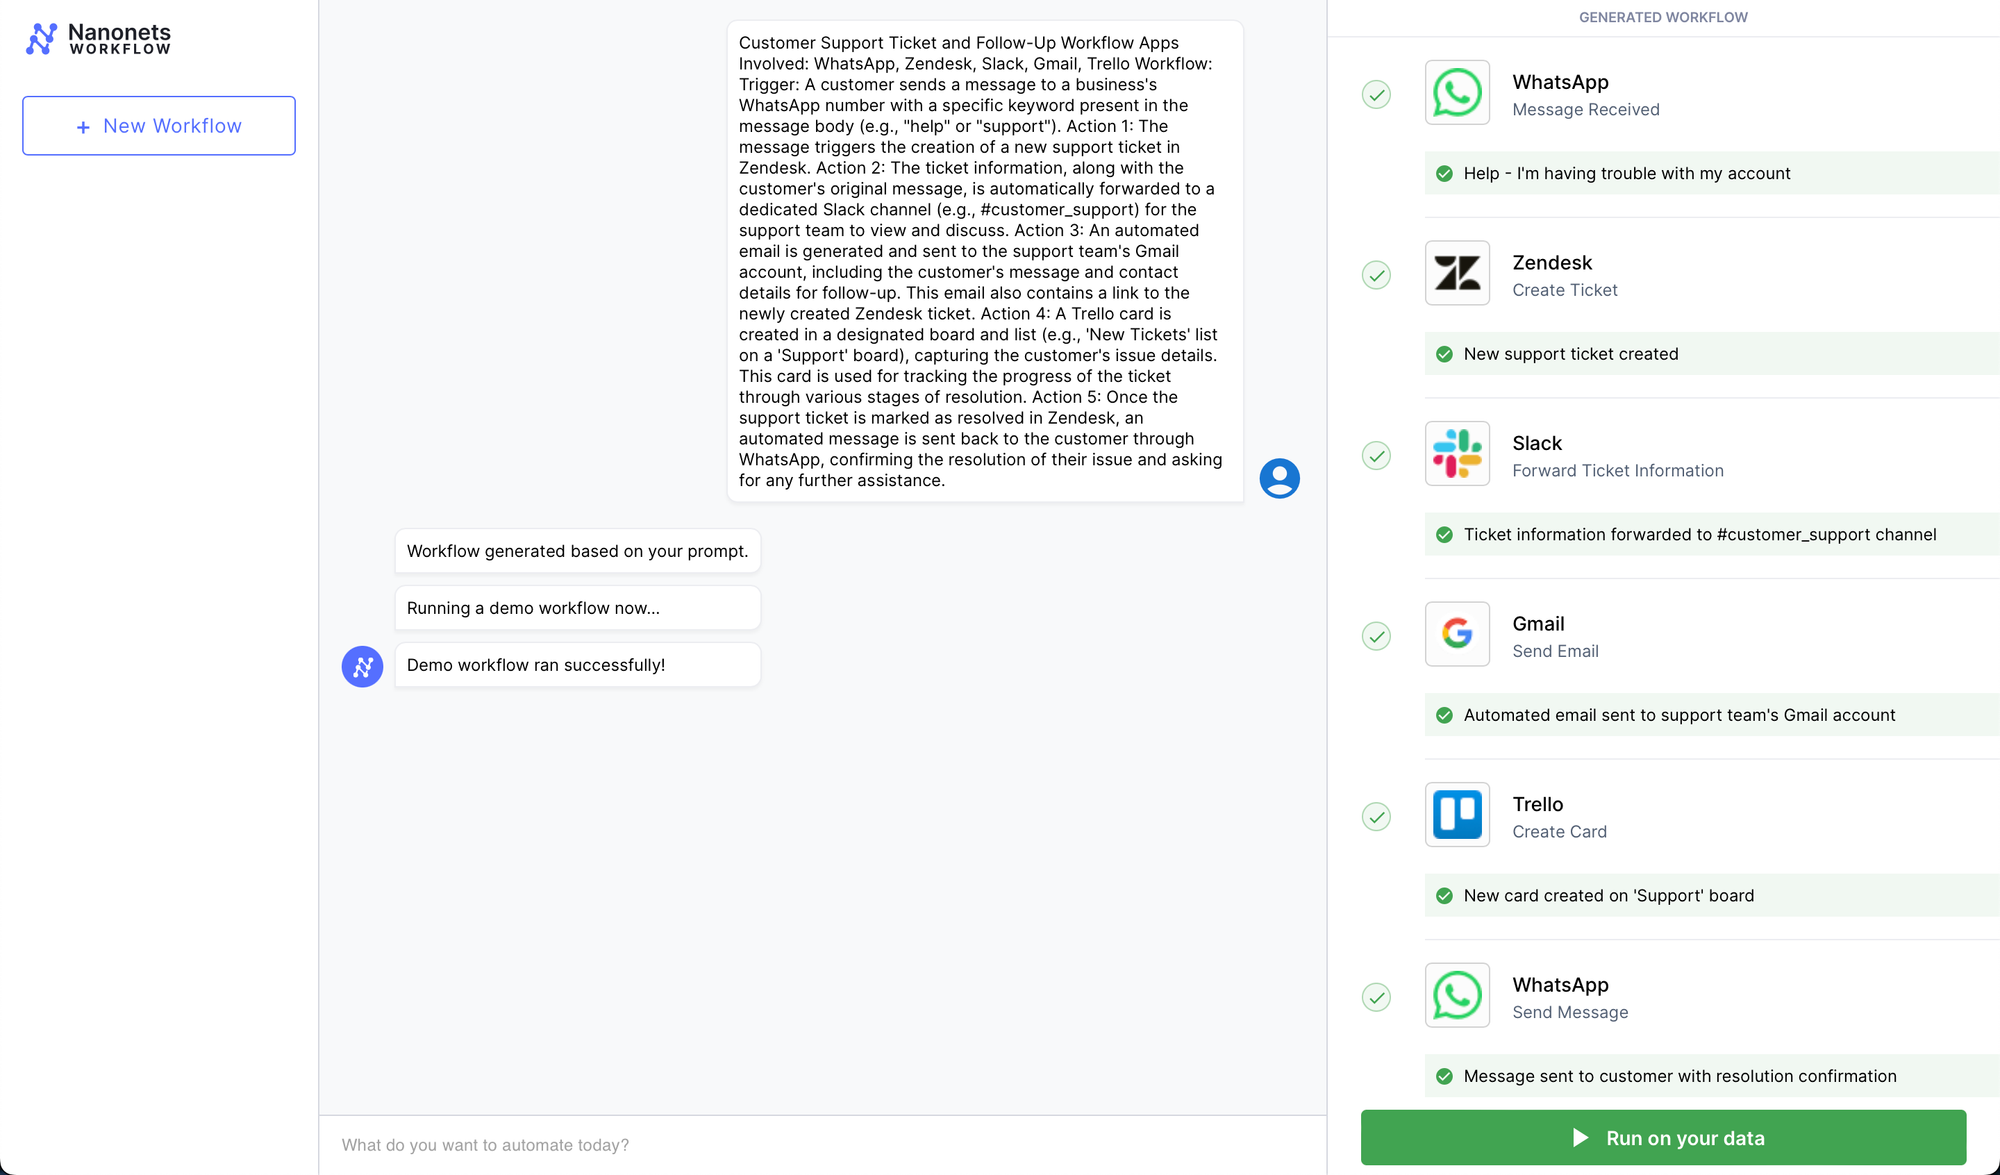
Buyer Help Ticket and Comply with-Up Workflow
- Apps Concerned: WhatsApp, Zendesk, Slack, Gmail, Trello
- Workflow:
- Set off: A buyer sends a message to a enterprise’s WhatsApp quantity with a selected key phrase current within the message physique (e.g., “assist” or “help”).
- Motion 1: The message triggers the creation of a brand new help ticket in Zendesk.
- Motion 2: The ticket data, together with the client’s authentic message, is routinely forwarded to a devoted Slack channel (e.g., #customer_support) for the help staff to view and talk about.
- Motion 3: An automatic electronic mail is generated and despatched to the help staff’s Gmail account, together with the client’s message and speak to particulars for follow-up. This electronic mail additionally comprises a hyperlink to the newly created Zendesk ticket.
- Motion 4: A Trello card is created in a delegated board and record (e.g., ‘New Tickets’ record on a ‘Help’ board), capturing the client’s situation particulars. This card is used for monitoring the progress of the ticket by numerous phases of decision.
- Motion 5: As soon as the help ticket is marked as resolved in Zendesk, an automatic message is shipped again to the client by WhatsApp, confirming the decision of their situation and asking for any additional help.
These workflows are designed to boost communication effectivity, guarantee immediate responses, and preserve observe of essential interactions and duties throughout completely different platforms. They are often tailor-made to particular organizational wants and may considerably streamline numerous enterprise processes.
Workflow Automation with Nanonets
In immediately’s fast-paced enterprise setting, workflow automation stands out as a vital innovation, providing a aggressive edge to firms of all sizes. The mixing of automated workflows into every day enterprise operations is not only a pattern; it is a strategic necessity. Along with this, the appearance of LLMs has opened much more alternatives for automation of handbook duties and processes.
Welcome to Nanonets Workflow Automation, the place AI-driven expertise empowers you and your staff to automate handbook duties and assemble environment friendly workflows in minutes. Make the most of pure language to effortlessly create and handle workflows that seamlessly combine with all of your paperwork, apps, and databases.
Our platform gives not solely seamless app integrations for unified workflows but in addition the power to construct and make the most of customized Massive Language Fashions Apps for classy textual content writing and response posting inside your apps. All of the whereas guaranteeing information safety stays our prime precedence, with strict adherence to GDPR, SOC 2, and HIPAA compliance requirements.
To raised perceive the sensible functions of Nanonets workflow automation, let’s delve into some real-world examples.
- Automated Buyer Help and Engagement Course of
- Ticket Creation – Zendesk: The workflow is triggered when a buyer submits a brand new help ticket in Zendesk, indicating they want help with a services or products.
- Ticket Replace – Zendesk: After the ticket is created, an automatic replace is instantly logged in Zendesk to point that the ticket has been acquired and is being processed, offering the client with a ticket quantity for reference.
- Info Retrieval – Nanonets Searching: Concurrently, the Nanonets Searching characteristic searches by all of the information base pages to search out related data and potential options associated to the client’s situation.
- Buyer Historical past Entry – HubSpot: Concurrently, HubSpot is queried to retrieve the client’s earlier interplay data, buy historical past, and any previous tickets to supply context to the help staff.
- Ticket Processing – Nanonets AI: With the related data and buyer historical past at hand, Nanonets AI processes the ticket, categorizing the problem and suggesting potential options primarily based on comparable previous instances.
- Notification – Slack: Lastly, the accountable help staff or particular person is notified by Slack with a message containing the ticket particulars, buyer historical past, and prompt options, prompting a swift and knowledgeable response.
- Automated Problem Decision Course of
- Preliminary Set off – Slack Message: The workflow begins when a customer support consultant receives a brand new message in a devoted channel on Slack, signaling a buyer situation that must be addressed.
- Classification – Nanonets AI: As soon as the message is detected, Nanonets AI steps in to categorise the message primarily based on its content material and previous classification information (from Airtable data). Utilizing LLMs, it classifies it as a bug together with figuring out urgency.
- Document Creation – Airtable: After classification, the workflow routinely creates a brand new report in Airtable, a cloud collaboration service. This report contains all related particulars from the client’s message, comparable to buyer ID, situation class, and urgency degree.
- Workforce Project – Airtable: With the report created, the Airtable system then assigns a staff to deal with the problem. Based mostly on the classification completed by Nanonets AI, the system selects probably the most acceptable staff – tech help, billing, buyer success, and so on. – to take over the problem.
- Notification – Slack: Lastly, the assigned staff is notified by Slack. An automatic message is shipped to the staff’s channel, alerting them of the brand new situation, offering a direct hyperlink to the Airtable report, and prompting a well timed response.
- Automated Assembly Scheduling Course of
- Preliminary Contact – LinkedIn: The workflow is initiated when an expert connection sends a brand new message on LinkedIn expressing curiosity in scheduling a gathering. An LLM parses incoming messages and triggers the workflow if it deems the message as a request for a gathering from a possible job candidate.
- Doc Retrieval – Google Drive: Following the preliminary contact, the workflow automation system retrieves a pre-prepared doc from Google Drive that comprises details about the assembly agenda, firm overview, or any related briefing supplies.
- Scheduling – Google Calendar: Subsequent, the system interacts with Google Calendar to get out there occasions for the assembly. It checks the calendar for open slots that align with enterprise hours (primarily based on the placement parsed from LinkedIn profile) and beforehand set preferences for conferences.
- Affirmation Message as Reply – LinkedIn: As soon as an appropriate time slot is discovered, the workflow automation system sends a message again by LinkedIn. This message contains the proposed time for the assembly, entry to the doc retrieved from Google Drive, and a request for affirmation or different ideas.
- Bill Processing in Accounts Payable
- Receipt of Bill – Gmail: An bill is acquired through electronic mail or uploaded to the system.
- Information Extraction – Nanonets OCR: The system routinely extracts related information (like vendor particulars, quantities, due dates).
- Information Verification – Quickbooks: The Nanonets workflow verifies the extracted information towards buy orders and receipts.
- Approval Routing – Slack: The bill is routed to the suitable supervisor for approval primarily based on predefined thresholds and guidelines.
- Cost Processing – Brex: As soon as accepted, the system schedules the fee in accordance with the seller’s phrases and updates the finance data.
- Archiving – Quickbooks: The finished transaction is archived for future reference and audit trails.
- Inner Data Base Help

- Preliminary Inquiry – Slack: A staff member, Smith, inquires within the #chat-with-data Slack channel about prospects experiencing points with QuickBooks integration.
- Automated Information Aggregation – Nanonets Data Base:
- Ticket Lookup – Zendesk: The Zendesk app in Slack routinely supplies a abstract of immediately’s tickets, indicating that there are points with exporting bill information to QuickBooks for some prospects.
- Slack Search – Slack: Concurrently, the Slack app notifies the channel that staff members Patrick and Rachel are actively discussing the decision of the QuickBooks export bug in one other channel, with a repair scheduled to go reside at 4 PM.
- Ticket Monitoring – JIRA: The JIRA app updates the channel a couple of ticket created by Emily titled “QuickBooks export failing for QB Desktop integrations,” which helps observe the standing and determination progress of the problem.
- Reference Documentation – Google Drive: The Drive app mentions the existence of a runbook for fixing bugs associated to QuickBooks integrations, which may be referenced to grasp the steps for troubleshooting and determination.
- Ongoing Communication and Decision Affirmation – Slack: Because the dialog progresses, the Slack channel serves as a real-time discussion board for discussing updates, sharing findings from the runbook, and confirming the deployment of the bug repair. Workforce members use the channel to collaborate, share insights, and ask follow-up questions to make sure a complete understanding of the problem and its decision.
- Decision Documentation and Data Sharing: After the repair is applied, staff members replace the inner documentation in Google Drive with new findings and any further steps taken to resolve the problem. A abstract of the incident, decision, and any classes discovered are already shared within the Slack channel. Thus, the staff’s inside information base is routinely enhanced for future use.
The Way forward for Enterprise Effectivity
Nanonets Workflows is a safe, multi-purpose workflow automation platform that automates your handbook duties and workflows. It gives an easy-to-use person interface, making it accessible for each people and organizations.
To get began, you may schedule a name with certainly one of our AI consultants, who can present a customized demo and trial of Nanonets Workflows tailor-made to your particular use case.
As soon as arrange, you should use pure language to design and execute complicated functions and workflows powered by LLMs, integrating seamlessly along with your apps and information.

Supercharge your groups with Nanonets Workflows permitting them to deal with what actually issues.
Automate Whatsapp messaging campaigns with our AI-driven workflows, designed by Nanonets for you and your groups.

iQOO Z7 Pro 5G (Blue Lagoon, 8GB RAM, 256GB Storage) | 3D Curved AMOLED Display | 4nm MediaTek Dimesity 7200 5G Processor | 64MP Aura Light OIS Camera | Segment's Slimmest & Lightest Smartphone
₹24,999.00 (as of December 17, 2023 21:38 GMT +00:00 - More infoProduct prices and availability are accurate as of the date/time indicated and are subject to change. Any price and availability information displayed on [relevant Amazon Site(s), as applicable] at the time of purchase will apply to the purchase of this product.)
Redmi 12 5G Jade Black 6GB RAM 128GB ROM
₹13,499.00 (as of December 17, 2023 21:38 GMT +00:00 - More infoProduct prices and availability are accurate as of the date/time indicated and are subject to change. Any price and availability information displayed on [relevant Amazon Site(s), as applicable] at the time of purchase will apply to the purchase of this product.)
Redmi 13C (Stardust Black, 8GB RAM, 256GB Storage) | 90Hz Display | 50MP AI Triple Camera
₹11,499.00 (as of December 17, 2023 21:38 GMT +00:00 - More infoProduct prices and availability are accurate as of the date/time indicated and are subject to change. Any price and availability information displayed on [relevant Amazon Site(s), as applicable] at the time of purchase will apply to the purchase of this product.)
Samsung Original 25W Single Port, Type-C Fast Charger, (Cable not Included), White
₹1,299.00 (as of December 17, 2023 21:38 GMT +00:00 - More infoProduct prices and availability are accurate as of the date/time indicated and are subject to change. Any price and availability information displayed on [relevant Amazon Site(s), as applicable] at the time of purchase will apply to the purchase of this product.)
Redmi 12 5G Pastel Blue 4GB RAM 128GB ROM
₹11,999.00 (as of December 17, 2023 21:38 GMT +00:00 - More infoProduct prices and availability are accurate as of the date/time indicated and are subject to change. Any price and availability information displayed on [relevant Amazon Site(s), as applicable] at the time of purchase will apply to the purchase of this product.)
HP v236w USB 2.0 64GB Pen Drive, Metal, Silver
₹377.00 (as of December 17, 2023 21:38 GMT +00:00 - More infoProduct prices and availability are accurate as of the date/time indicated and are subject to change. Any price and availability information displayed on [relevant Amazon Site(s), as applicable] at the time of purchase will apply to the purchase of this product.)
Sounce Cleaning Soft Brush Keyboard Cleaner 5-in-1 Multi-Function Computer Cleaning Tools Kit Corner Gap Duster Keycap Puller for Bluetooth Earphones Lego Laptop AirPods Pro Camera Lens (Red)
₹99.00 (as of December 17, 2023 21:38 GMT +00:00 - More infoProduct prices and availability are accurate as of the date/time indicated and are subject to change. Any price and availability information displayed on [relevant Amazon Site(s), as applicable] at the time of purchase will apply to the purchase of this product.)
American Tourister Valex 28 Ltrs Large Laptop Backpack with Bottle Pocket and Front Organizer- Blue
₹1,037.36 (as of December 17, 2023 21:38 GMT +00:00 - More infoProduct prices and availability are accurate as of the date/time indicated and are subject to change. Any price and availability information displayed on [relevant Amazon Site(s), as applicable] at the time of purchase will apply to the purchase of this product.)
Wayona Nylon Braided USB to Lightning Fast Charging and Data Sync Cable Compatible for iPhone 13, 12,11, X, 8, 7, 6, 5, iPad Air, Pro, Mini (3 FT Pack of 1, Grey)
₹389.00 (as of December 17, 2023 21:38 GMT +00:00 - More infoProduct prices and availability are accurate as of the date/time indicated and are subject to change. Any price and availability information displayed on [relevant Amazon Site(s), as applicable] at the time of purchase will apply to the purchase of this product.)
Portronics My Buddy K Portable Laptop Stand with Adjustable Height, Foldable, OverHeating Protection for Laptops & MacBooks (Grey)
₹499.00 (as of December 17, 2023 21:38 GMT +00:00 - More infoProduct prices and availability are accurate as of the date/time indicated and are subject to change. Any price and availability information displayed on [relevant Amazon Site(s), as applicable] at the time of purchase will apply to the purchase of this product.)
Graphics Card GPU Brace Support, Video Card Sag Holder Bracket, GPU Stand, L
$9.99 (as of December 17, 2023 21:38 GMT +00:00 - More infoProduct prices and availability are accurate as of the date/time indicated and are subject to change. Any price and availability information displayed on [relevant Amazon Site(s), as applicable] at the time of purchase will apply to the purchase of this product.)
UnionSine 1TB Ultra Slim Portable External Hard Drive HDD-USB 3.0 for PC, Mac, Laptop, PS4, Xbox one,Xbox 360-Super Fast Transmission-HD-2510(Black)
$51.79 (as of December 17, 2023 21:38 GMT +00:00 - More infoProduct prices and availability are accurate as of the date/time indicated and are subject to change. Any price and availability information displayed on [relevant Amazon Site(s), as applicable] at the time of purchase will apply to the purchase of this product.)
AMD Ryzen™ 7 5700X 8-Core, 16-Thread Unlocked Desktop Processor
$177.60 (as of December 17, 2023 21:38 GMT +00:00 - More infoProduct prices and availability are accurate as of the date/time indicated and are subject to change. Any price and availability information displayed on [relevant Amazon Site(s), as applicable] at the time of purchase will apply to the purchase of this product.)
Gotega External DVD Drive, USB 3.0 Portable +/-RW , DVD Player for CD ROM Burner Compatible with Laptop Desktop PC Windows Linux OS Apple Mac Black
$19.99 (as of December 17, 2023 21:38 GMT +00:00 - More infoProduct prices and availability are accurate as of the date/time indicated and are subject to change. Any price and availability information displayed on [relevant Amazon Site(s), as applicable] at the time of purchase will apply to the purchase of this product.)