

Introduction
Apache Airflow is a strong platform that revolutionizes the administration and execution of Extracting, Reworking, and Loading (ETL) knowledge processes. It presents a scalable and extensible answer for automating complicated workflows, automating repetitive duties, and monitoring knowledge pipelines. This text explores the intricacies of automating ETL pipelines utilizing Apache Airflow on AWS EC2. It demonstrates how Airflow can be utilized to design, deploy, and handle end-to-end knowledge pipelines effectively. The article makes use of a sensible instance of integrating a Climate API into an ETL pipeline, showcasing how Airflow orchestrates the retrieval, transformation, and loading of information from numerous sources.
Studying Outcomes
- Understanding the pivotal position of environment friendly ETL processes in fashionable knowledge infrastructure.
- Exploring the capabilities of Apache Airflow in automating complicated workflow administration.
- Harnessing the pliability and scalability of AWS EC2 for streamlined pipeline deployment.
- Demonstrating the applying of Airflow in automating knowledge extraction, transformation, and loading.
- Actual-world integration of a Climate API, showcasing Airflow’s position in driving data-driven choices.
What’s Apache Airflow?
Apache Airflow is an open-source platform that manages and displays Directed Acyclic Graphs (DAGs) workflows. It consists of a Scheduler, Executor, Metadata Database, and Internet Interface. The Scheduler manages duties, the Executor executes them on employees, and the Metadata Database shops metadata. The Internet Interface supplies a user-friendly dashboard for monitoring pipeline standing and managing workflows. Apache Airflow’s modular structure permits knowledge engineers to construct, automate, and scale knowledge pipelines with flexibility and management.
What are DAGs?
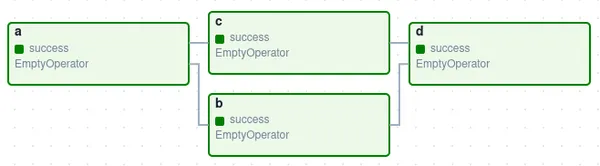
Directed Acyclic Graphs or DAGs outline the sequence of duties and their dependencies. They signify the logical stream of information by way of the pipeline. Every node within the DAG represents a process, whereas the sides denote the dependencies between duties. DAGs are acyclic, which implies they don’t have any cycles or loops, guaranteeing a transparent and deterministic execution path. Airflow’s DAGs allow knowledge engineers to mannequin complicated workflows with ease, orchestrating the execution of duties in parallel or sequentially based mostly on their dependencies and schedule. By leveraging DAGs, customers can design sturdy and scalable knowledge pipelines that automate the extraction, transformation, and loading of information with precision and effectivity.
What are Operators ?
Operators are elementary constructing blocks inside Apache Airflow that outline the person items of labor to be executed inside a DAG. Every operator represents a single process within the workflow and encapsulates the logic required to carry out that process. Airflow supplies a variety of built-in operators, every tailor-made to particular use instances resembling transferring knowledge between techniques, executing SQL queries, operating Python scripts, sending emails, and extra. Moreover, Airflow permits customers to create customized operators to accommodate distinctive necessities not coated by the built-in choices. Operators play an important position in defining the performance and habits of duties inside a DAG, enabling customers to assemble complicated workflows by orchestrating a sequence of operations seamlessly.
Launching EC2
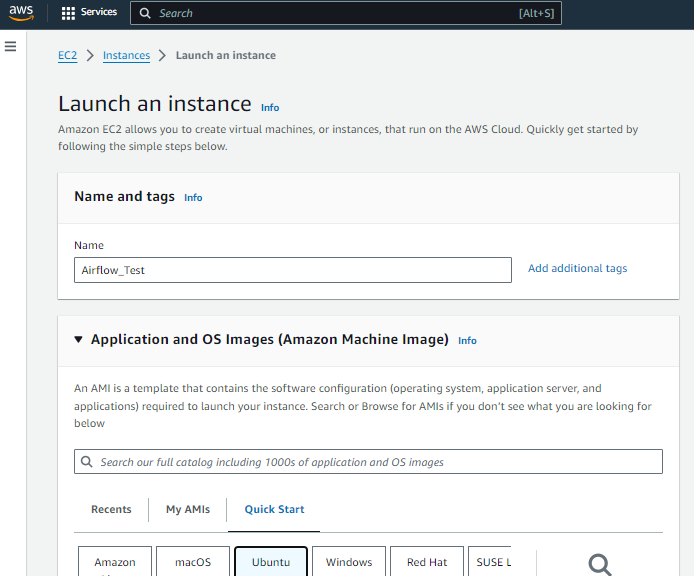
Launching an EC2 occasion on AWS is a straightforward course of. It’s sometimes finished by way of the AWS Administration Console or command-line interfaces. To make sure Apache Airflow’s clean operation, configure inbound guidelines to permit visitors on port 8080, the default port utilized by Airflow’s net server. This enables safe entry to the Airflow net interface for monitoring and managing workflows. This streamlined setup balances useful resource allocation and performance, laying the groundwork for environment friendly workflow orchestration with Apache Airflow on AWS EC2.
Putting in Apache Airflow on EC2
To put in Apache Airflow on a operating EC2 occasion, observe these steps:
Step1: Replace Package deal Lists
Replace bundle lists to make sure you have the most recent info on out there packages:
sudo apt replaceStep2: Set up Python 3 pip Package deal Supervisor
Set up Python 3 pip bundle supervisor to facilitate the set up of Python packages:
sudo apt set up python3-pipStep3: Set up Python 3 Digital Surroundings Package deal
Set up Python 3 digital atmosphere bundle to isolate the Airflow atmosphere from the system Python set up:
sudo apt set up python3-venvStep4. Create Digital Surroundings for Airflow
python3 -m venv airflow_venvStep5. Activate the Digital Surroundings
supply airflow_venv/bin/activateStep6. Set up Required Python Packages for Airflow
pip set up pandas s3fs apache-airflowStep7. Begin Airflow Internet Server in Standalone Mode
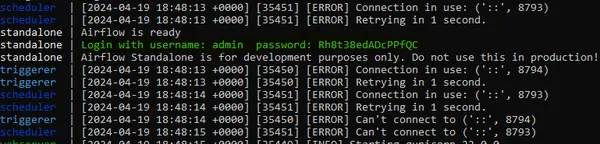
airflow webserver --port 8080With these instructions, you’ll have Apache Airflow put in and operating in your EC2 occasion. You possibly can then entry the Airflow net interface by navigating to the occasion’s public IP handle adopted by port 8080 in an online browser.
After navigating to port 8080 in your EC2 occasion’s public IP handle, you’ll be directed to the Apache Airflow net interface. Upon your first go to, you’ll be prompted to enter the admin password. This password is generated and displayed in your terminal after operating the `airflow standalone` command. Merely copy the password out of your terminal and paste it into the password subject on the Airflow net interface to authenticate because the admin person. As soon as logged in, you’ll have entry to the complete performance of Apache Airflow, the place you’ll be able to handle and monitor your workflows with ease.
Linking EC2 THrough SSH Extension
Let’s discover a brand new strategy by linking our EC2 occasion with VS Code by way of the SSH extension.
Step1. Set up Visible Studio Code on Your Native Machine
For those who haven’t already, obtain and set up Visible Studio Code in your native machine from the official web site: [Visual Studio Code](https://code.visualstudio.com/).
Step2. Set up Distant – SSH Extension in VSCode
Open Visible Studio Code and set up the Distant – SSH extension. This extension means that you can hook up with distant machines over SSH instantly from inside VSCode.
Step3. Configure SSH on EC2 Occasion
Make sure that SSH is enabled in your EC2 occasion. You are able to do this throughout the occasion creation course of or by modifying the safety group settings within the AWS Administration Console. Be sure you have the important thing pair (.pem file) that corresponds to your EC2 occasion.
Step4. Retrieve EC2 Occasion’s Public IP Tackle
Log in to your AWS Administration Console and navigate to the EC2 dashboard. Discover your occasion and word down its public IP handle. You’ll want this to ascertain the SSH connection.
Step5. Hook up with EC2 Occasion from VSCode
In VSCode, press `Ctrl+Shift+P` (Home windows/Linux) or `Cmd+Shift+P` (Mac) to open the command palette. Sort “Distant-SSH: Hook up with Host” and choose it. Then, select “Add New SSH Host” and enter the next info:
- Hostname: Your EC2 occasion’s public IP handle
- Person: The username used to SSH into your EC2 occasion (sometimes “ubuntu” for Amazon Linux or “ec2-user” for Amazon Linux 2)
- IdentityFile: The trail to the .pem file similar to your EC2 occasion’s key pair
Step6. Join and Authenticate
After coming into the required info, VSCode will try to hook up with your EC2 occasion over SSH. If prompted, select “Proceed” to belief the host. As soon as linked, VSCode will open a brand new window with entry to your EC2 occasion’s file system.
Step7. Confirm Connection
You possibly can confirm that you just’re linked to your EC2 occasion by checking the bottom-left nook of the VSCode window. It ought to show the identify of your EC2 occasion, indicating a profitable connection.
Writing DAG File
Now that you just’ve linked your EC2 occasion to VSCode, you’re prepared to begin writing the code on your ETL pipeline utilizing Apache Airflow. You possibly can edit information instantly in your EC2 occasion utilizing VSCode’s acquainted interface, making improvement and debugging a breeze.
Now we are going to enroll on the Climate API web site for API https://openweathermap.org/api and use it to get the climate knowledge.As soon as we entry our EC2 occasion in VS Code, we’ll discover the Airflow folder the place we beforehand put in the software program. Inside this listing, we’ll create a brand new folder named “DAG” to prepare our Directed Acyclic Graph (DAG) information. Right here, we’ll start writing our Python script for the DAG, laying the inspiration for our workflow orchestration.
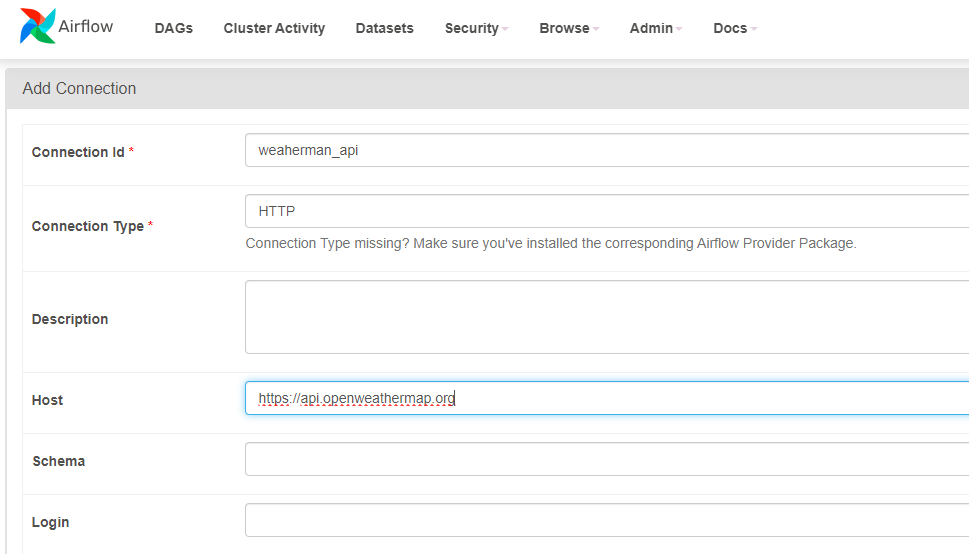
Making a Connection
To confirm the provision of the API, we’ll first navigate to the Airflow UI and entry the admin part. From there, we’ll proceed so as to add a brand new connection by clicking on the “Connections” tab. Right here, we’ll specify the connection ID as “weathermap_api” and set the kind to “HTTP”. Within the “Host” subject, we’ll enter “https://api.openweathermap.org”. With these settings configured, we’ll set up the connection, guaranteeing that our API is prepared to be used in our ETL pipeline.
So now we’re finished with step one of checking if API is accessible we are going to extract climate knowledge from the API and retailer it in a S3 Bucket. So for Storing the information in S3 bucket we are going to want some permissions so as to add with ec2-instance for that we are going to go to our occasion click on on Actions after which choose “Safety” from the dropdown menu. Right here, you’ll discover the choice to change the safety settings of your occasion. Click on on “Modify IAM Position” to connect an IAM position.
Attaching S3 Bucket to EC2
Within the IAM position administration web page, choose “Create new IAM position” should you haven’t already created a task for EC2 situations. Select the “EC2” service as the kind of trusted entity, then click on “Subsequent: Permissions”.
Within the permissions step, choose “Connect insurance policies instantly”. Seek for and choose the insurance policies “AmazonS3FullAccess” to grant full entry to S3, and “AmazonEC2FullAccess” to supply full entry to EC2 assets.
You should use this JSON additionally so as to add permission:
{
    "Model": "2012-10-17",
    "Assertion": [
        {
            "Effect": "Allow",
            "Action": "s3:*",
            "Resource": "*"
        },
        {
            "Effect": "Allow",
            "Action": "ec2:*",
            "Resource": "*"
        }
    ]
}
Proceed to the following steps to evaluation and identify your IAM position. As soon as created, return to the EC2 occasion’s safety settings. Within the IAM position dropdown, choose the position you simply created and click on “Save”.
With the IAM position connected, your EC2 occasion now has the required permissions to work together with S3 buckets and different AWS assets, enabling seamless knowledge storage and retrieval as a part of your ETL pipeline.
After granting the required permissions, you’ll be able to proceed to create an S3 bucket to retailer the extracted climate knowledge from the API.
As soon as the bucket is created, you should utilize it in your DAG to retailer the extracted climate knowledge from the API. In your DAG script, you’ll have to specify the S3 bucket identify in addition to the vacation spot path the place the climate knowledge shall be saved. With the bucket configured, your DAG can seamlessly work together with the S3 bucket to retailer and retrieve knowledge as wanted.
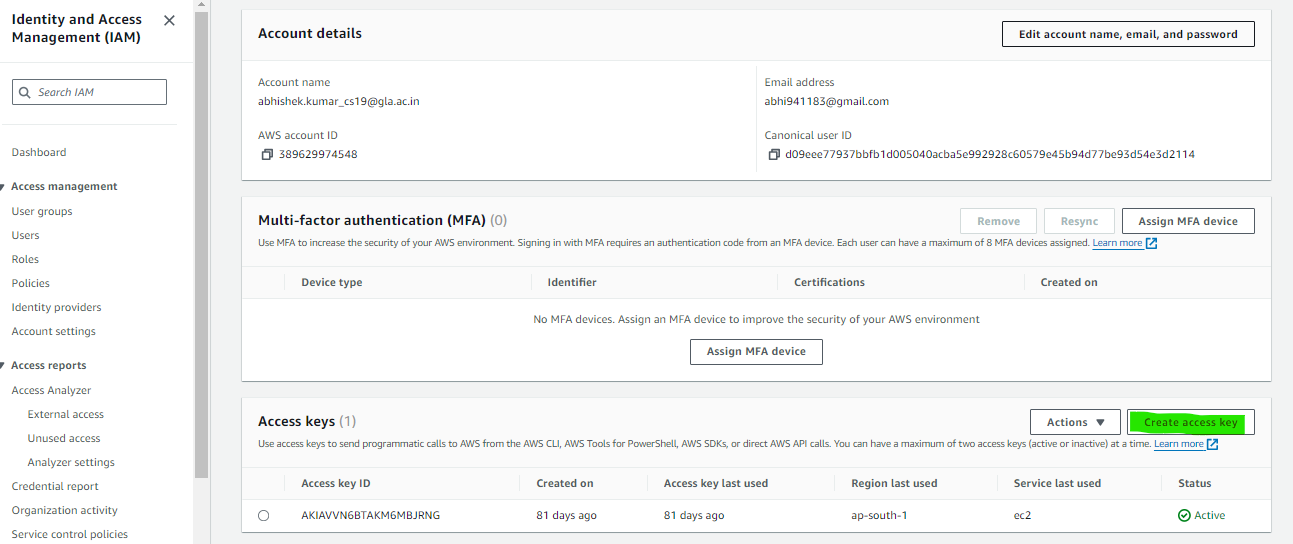
Entry Token Technology
To acquire the required entry token from AWS, navigate to the AWS Administration Console and click on in your account identify or profile icon within the top-right nook. From the dropdown menu, choose “My Safety Credentials”. Within the “Entry keys” part, both generate a brand new entry key or retrieve an present one. Copy each the Entry Key ID and Secret Entry Key offered. These credentials will authenticate your requests to AWS providers. Guarantee to securely retailer the Secret Entry Key because it is not going to be displayed once more. With these credentials, you’ll be able to seamlessly combine AWS providers, resembling S3, into your Apache Airflow DAGs in your EC2 occasion.
And now lastly that is the DAG file with all 3 steps mixed.
from airflow import DAG
from datetime import timedelta, datetime
from airflow.suppliers.http.sensors.http import HttpSensor
import json
from airflow.suppliers.http.operators.http import SimpleHttpOperator
from airflow.operators.python import PythonOperator
import pandas as pd


# Perform to transform temperature from Kelvin to Fahrenheit
def kelvin_to_fahrenheit(temp_in_kelvin):
    temp_in_fahrenheit = (temp_in_kelvin - 273.15) * (9/5) + 32
    return temp_in_fahrenheit


# Perform to remodel and cargo climate knowledge to S3 bucket
def transform_load_data(task_instance):
    # Extract climate knowledge from XCom
    knowledge = task_instance.xcom_pull(task_ids="extract_weather_data")

    # Extract related climate parameters
    metropolis = knowledge["name"]
    weather_description = knowledge["weather"][0]['description']
    temp_farenheit = kelvin_to_fahrenheit(knowledge["main"]["temp"])
    feels_like_farenheit = kelvin_to_fahrenheit(knowledge["main"]["feels_like"])
    min_temp_farenheit = kelvin_to_fahrenheit(knowledge["main"]["temp_min"])
    max_temp_farenheit = kelvin_to_fahrenheit(knowledge["main"]["temp_max"])
    stress = knowledge["main"]["pressure"]
    humidity = knowledge["main"]["humidity"]
    wind_speed = knowledge["wind"]["speed"]
    time_of_record = datetime.utcfromtimestamp(knowledge['dt'] + knowledge['timezone'])
    sunrise_time = datetime.utcfromtimestamp(knowledge['sys']['sunrise'] + knowledge['timezone'])
    sunset_time = datetime.utcfromtimestamp(knowledge['sys']['sunset'] + knowledge['timezone'])

    # Rework knowledge into DataFrame
    transformed_data = {"Metropolis": metropolis,
                        "Description": weather_description,
                        "Temperature (F)": temp_farenheit,
                        "Feels Like (F)": feels_like_farenheit,
                        "Minimal Temp (F)": min_temp_farenheit,
                        "Most Temp (F)": max_temp_farenheit,
                        "Strain": stress,
                        "Humidity": humidity,
                        "Wind Velocity": wind_speed,
                        "Time of Report": time_of_record,
                        "Dawn (Native Time)": sunrise_time,
                        "Sundown (Native Time)": sunset_time
                        }
    transformed_data_list = [transformed_data]
    df_data = pd.DataFrame(transformed_data_list)

    # Retailer knowledge in S3 bucket
    aws_credentials = {"key": "xxxxxxxxx", "secret": "xxxxxxxxxx"}
    now = datetime.now()
    dt_string = now.strftime("%dpercentmpercentYpercentHpercentMpercentS")
    dt_string = 'current_weather_data_portland_' + dt_string
    df_data.to_csv(f"s3://YOUR_S3_NAME/{dt_string}.csv", index=False,
    storage_options=aws_credentials)


# Outline default arguments for the DAG
default_args = {
    'proprietor': 'airflow',
    'depends_on_past': False,
    'start_date': datetime(2023, 1, 8),
    'e-mail': ['[email protected]'],
    'email_on_failure': False,
    'email_on_retry': False,
    'retries': 2,
    'retry_delay': timedelta(minutes=2)
}


# Outline the DAG
with DAG('weather_dag',
         default_args=default_args,
         schedule_interval="@day by day",
         catchup=False) as dag:

    # Verify if climate API is prepared
    is_weather_api_ready = HttpSensor(
        task_id='is_weather_api_ready',
        http_conn_id='weathermap_api',
        endpoint="/knowledge/2.5/climate?q=Portland&APPID=**********************"
    )

    # Extract climate knowledge from API
    extract_weather_data = SimpleHttpOperator(
        task_id='extract_weather_data',
        http_conn_id='weathermap_api',
        endpoint="/knowledge/2.5/climate?q=Portland&APPID=**********************",
        technique='GET',
        response_filter=lambda r: json.masses(r.textual content),
        log_response=True
    )

    # Rework and cargo climate knowledge to S3 bucket
    transform_load_weather_data = PythonOperator(
        task_id='transform_load_weather_data',
        python_callable=transform_load_data
    )

    # Set process dependencies
    is_weather_api_ready >> extract_weather_data >> transform_load_weather_data
Clarification
- kelvin_to_fahrenheit: This operate converts temperature from Kelvin to Fahrenheit.
- transform_load_data: This operate extracts climate knowledge from the API response, transforms it, and masses it into an S3 bucket.
- default_args: These are the default arguments for the DAG, together with proprietor, begin date, and e-mail settings.
- weather_dag: That is the DAG definition with the identify “weather_dag” and the desired schedule interval of day by day execution.
- is_weather_api_ready: This process checks if the climate API is prepared by making an HTTP request to the API endpoint.
- extract_weather_data: This process extracts climate knowledge from the API response utilizing an HTTP GET request.
- transform_load_weather_data: This process transforms the extracted knowledge and masses it into an S3 bucket.
- Process Dependencies: The >> operator defines the duty dependencies, guaranteeing that duties execute within the specified order.
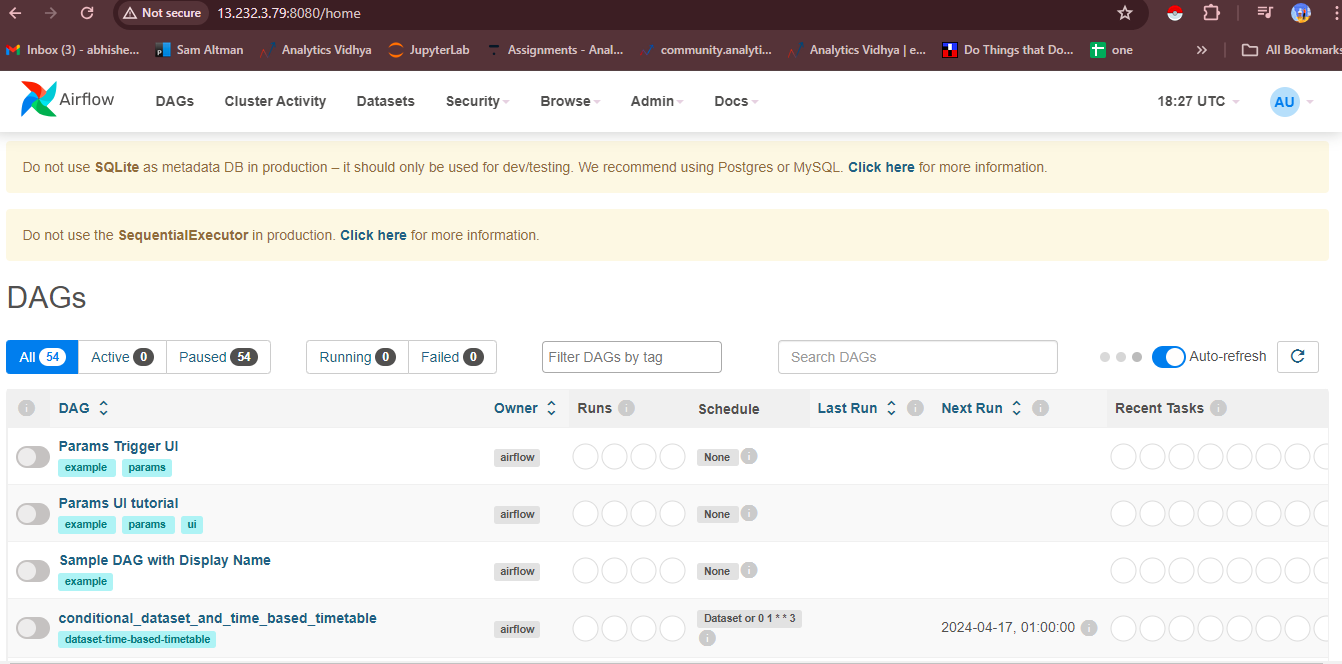
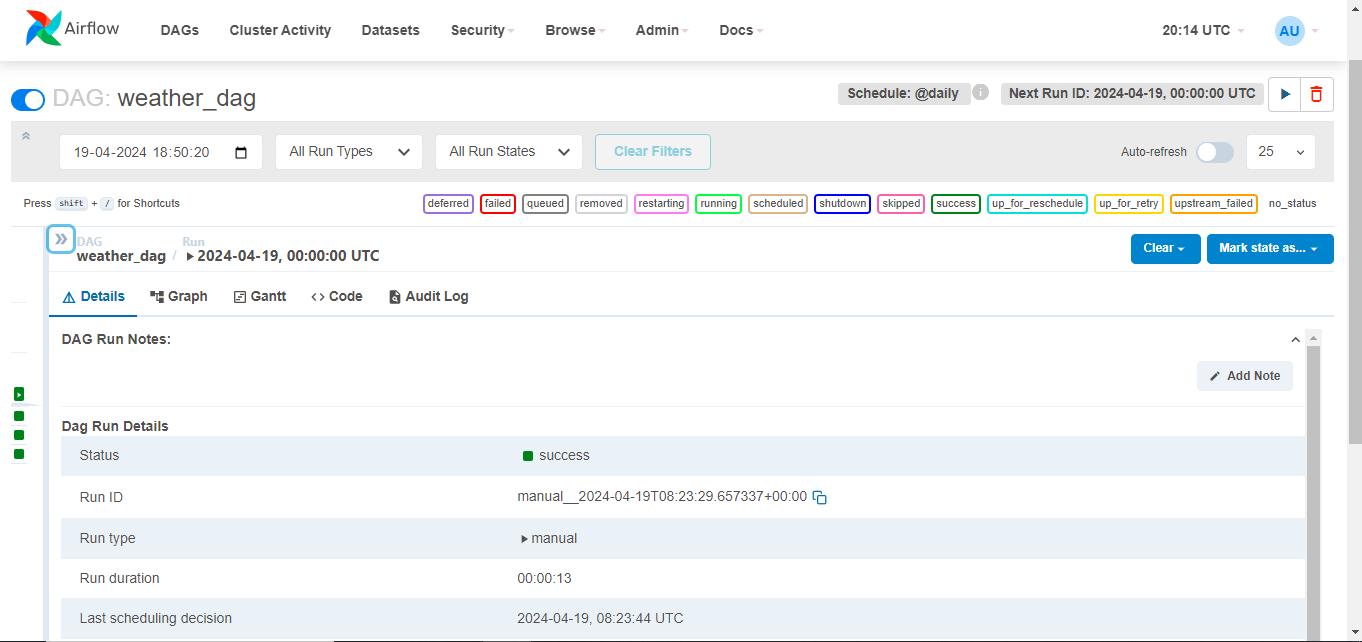
The DAG file is a device that automates the extraction, transformation, and loading of climate knowledge from the API into an S3 bucket utilizing Apache Airflow. It’s displayed within the Airflow UI, permitting customers to watch its standing, set off guide runs, and look at process logs. To check the DAG, customers can set off a guide run, broaden its particulars, and click on the “Set off DAG” button. Process logs may be seen to trace particular person duties and diagnose points. The Airflow UI simplifies the workflow orchestration course of.
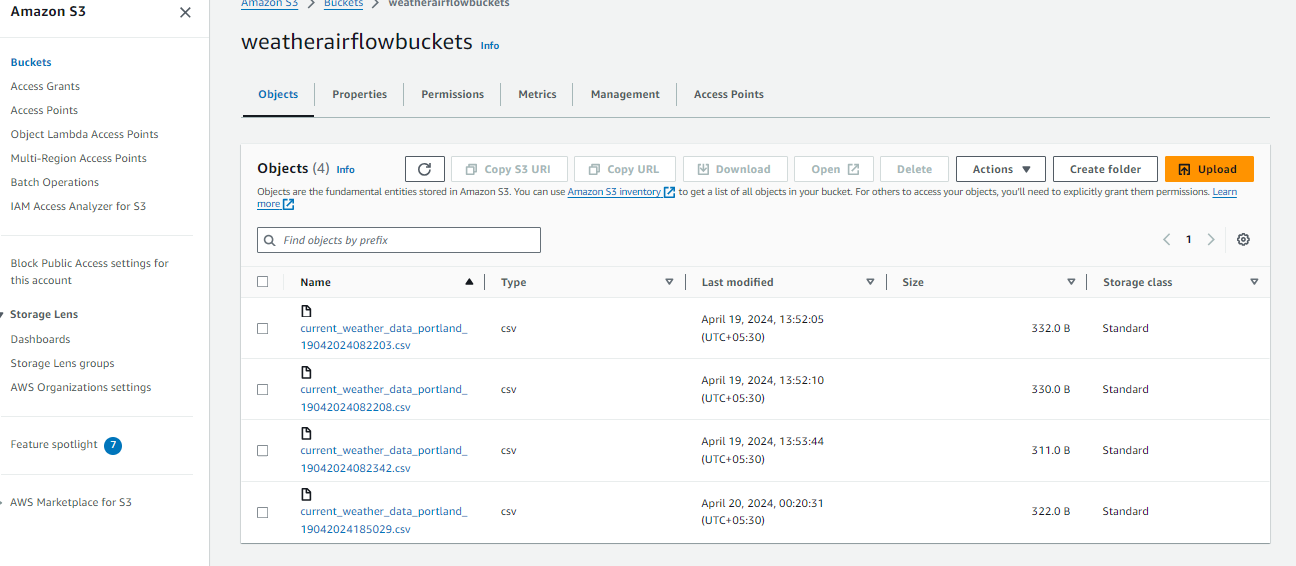
After finishing the automated ETL pipeline, it’s essential to confirm the saved knowledge within the S3 bucket. Navigate to the AWS Administration Console and find the bucket the place the climate knowledge was configured. Confirm the information’s appropriate storage by exploring its contents, which ought to comprise information organized in keeping with the desired vacation spot path. This confirms the automated ETL pipeline’s performance and safe storage within the designated S3 bucket, guaranteeing the reliability and effectiveness of the automated knowledge processing workflow.
Conclusion
The combination of Apache Airflow with AWS EC2 presents a strong answer for automating ETL pipelines, facilitating environment friendly knowledge processing and evaluation. By means of our exploration of automating ETL processes with Airflow and leveraging AWS assets, we’ve highlighted the transformative potential of those applied sciences in driving data-driven decision-making. By orchestrating complicated workflows and seamlessly integrating with exterior providers just like the Climate API, Airflow empowers organizations to streamline knowledge administration and extract beneficial insights with ease.
Key Takeaways
- Effectivity in ETL processes is crucial for organizations to derive actionable insights from their knowledge.
- Apache Airflow supplies a strong platform for automating ETL pipelines, providing flexibility and scalability.
- Leveraging AWS EC2 enhances the capabilities of Airflow, enabling seamless deployment and administration of information workflows.
- Integration of exterior providers, such because the Climate API, demonstrates the flexibility of Airflow in orchestrating numerous knowledge sources.
- Automated ETL pipelines allow organizations to drive data-driven decision-making, fostering innovation and aggressive benefit in at the moment’s data-driven world.

Lapster 24pcs Mix Spiral Charger Spiral Charger Cable Protectors for Wires Data Cable Saver Charging Cord Protective Cable Cover
₹99.00 (as of April 22, 2024 16:02 GMT +00:00 - More infoProduct prices and availability are accurate as of the date/time indicated and are subject to change. Any price and availability information displayed on [relevant Amazon Site(s), as applicable] at the time of purchase will apply to the purchase of this product.)
Portronics iKonnect C Pro Type C to 3.5 mm Audio Jack Connector with DAC Headphone Converter Adapter Compatible with iPhone 15 Pro Max/15 Pro/15 Plus, Galaxy S23/S22/S21/S208 & Other Type C Phones
₹219.00 (as of April 22, 2024 16:02 GMT +00:00 - More infoProduct prices and availability are accurate as of the date/time indicated and are subject to change. Any price and availability information displayed on [relevant Amazon Site(s), as applicable] at the time of purchase will apply to the purchase of this product.)
Apple iPhone 13 (128GB) - Midnight
₹49,299.00 (as of April 22, 2024 16:02 GMT +00:00 - More infoProduct prices and availability are accurate as of the date/time indicated and are subject to change. Any price and availability information displayed on [relevant Amazon Site(s), as applicable] at the time of purchase will apply to the purchase of this product.)
Fire-Boltt Phoenix Ultra Luxury Stainless Steel, Bluetooth Calling Smartwatch, AI Voice Assistant, Metal Body with 120+ Sports Modes, SpO2, Heart Rate Monitoring (Gold)
₹1,749.00 (as of April 22, 2024 16:02 GMT +00:00 - More infoProduct prices and availability are accurate as of the date/time indicated and are subject to change. Any price and availability information displayed on [relevant Amazon Site(s), as applicable] at the time of purchase will apply to the purchase of this product.)
realme narzo 60X 5G (Stellar Green,6GB,128GB Storage) Up to 2TB External Memory | 50 MP AI Primary Camera | Segments only 33W Supervooc Charge
₹11,499.00 (as of April 22, 2024 16:02 GMT +00:00 - More infoProduct prices and availability are accurate as of the date/time indicated and are subject to change. Any price and availability information displayed on [relevant Amazon Site(s), as applicable] at the time of purchase will apply to the purchase of this product.)
SanDisk Ultra Dual Drive Go USB Type C Pendrive for Mobile (Black, 128 GB, 5Y - SDDDC3-128G-I35)
₹929.00 (as of April 22, 2024 16:02 GMT +00:00 - More infoProduct prices and availability are accurate as of the date/time indicated and are subject to change. Any price and availability information displayed on [relevant Amazon Site(s), as applicable] at the time of purchase will apply to the purchase of this product.)
Wayona Nylon Braided USB to Lightning Fast Charging and Data Sync Cable Compatible for iPhone 13, 12,11, X, 8, 7, 6, 5, iPad Air, Pro, Mini (3 FT Pack of 1, Grey)
₹399.00 (as of April 22, 2024 16:02 GMT +00:00 - More infoProduct prices and availability are accurate as of the date/time indicated and are subject to change. Any price and availability information displayed on [relevant Amazon Site(s), as applicable] at the time of purchase will apply to the purchase of this product.)
Portronics My Buddy K Portable Laptop Stand with Adjustable Height, Foldable, OverHeating Protection for Laptops & MacBooks (Grey)
₹498.00 (as of April 22, 2024 16:02 GMT +00:00 - More infoProduct prices and availability are accurate as of the date/time indicated and are subject to change. Any price and availability information displayed on [relevant Amazon Site(s), as applicable] at the time of purchase will apply to the purchase of this product.)
Rellon Industries Study Table for Students Bed Table for Study Foldable Laptop Table Portable & Lightweight Mini Table Bed Reading Table,Laptop Stands, Laptop Desk (A1)
₹599.00 (as of April 22, 2024 16:02 GMT +00:00 - More infoProduct prices and availability are accurate as of the date/time indicated and are subject to change. Any price and availability information displayed on [relevant Amazon Site(s), as applicable] at the time of purchase will apply to the purchase of this product.)
Ambrane Unbreakable 60W Fast Charging 1.5M Braided Type C to Type C Cable for Smartphones, Tablets, Laptops & other Type C devices, PD Technology, 480Mbps Data Sync (RCTT15, Black)
₹199.00 (as of April 22, 2024 16:02 GMT +00:00 - More infoProduct prices and availability are accurate as of the date/time indicated and are subject to change. Any price and availability information displayed on [relevant Amazon Site(s), as applicable] at the time of purchase will apply to the purchase of this product.)
Thermal Grizzly Kryonaut, High Performance Thermal Paste for Cooling All Processors, Graphics Cards and Heat Sinks in Computers and Consoles -1.0 Gram
$8.98 (as of April 22, 2024 16:02 GMT +00:00 - More infoProduct prices and availability are accurate as of the date/time indicated and are subject to change. Any price and availability information displayed on [relevant Amazon Site(s), as applicable] at the time of purchase will apply to the purchase of this product.)
Seagate BarraCuda 8TB Internal Hard Drive HDD – 3.5 Inch Sata 6 Gb/s 5400 RPM 256MB Cache for Computer Desktop PC (ST8000DMZ04/004)
$129.99 (as of April 22, 2024 16:02 GMT +00:00 - More infoProduct prices and availability are accurate as of the date/time indicated and are subject to change. Any price and availability information displayed on [relevant Amazon Site(s), as applicable] at the time of purchase will apply to the purchase of this product.)
Seagate Portable 2TB External Hard Drive HDD — USB 3.0 for PC, Mac, PlayStation, & Xbox -1-Year Rescue Service (STGX2000400)
$69.99 (as of April 22, 2024 16:02 GMT +00:00 - More infoProduct prices and availability are accurate as of the date/time indicated and are subject to change. Any price and availability information displayed on [relevant Amazon Site(s), as applicable] at the time of purchase will apply to the purchase of this product.)
CORSAIR 4000D AIRFLOW Tempered Glass Mid-Tower ATX Case - High-Airflow - Cable Management System - Spacious Interior - Two Included 120 mm Fans - Black
$89.99 (as of April 22, 2024 16:02 GMT +00:00 - More infoProduct prices and availability are accurate as of the date/time indicated and are subject to change. Any price and availability information displayed on [relevant Amazon Site(s), as applicable] at the time of purchase will apply to the purchase of this product.)