

On the upcoming WWDC, Apple is predicted to announce an on-device giant language mannequin (LLM). The following model of the iOS SDK will possible make it simpler for builders to combine AI options into their apps. Whereas we await Apple’s debut of its personal Generative AI fashions, corporations like OpenAI and Google already present SDKs for iOS builders to include AI options into cell apps. On this tutorial, we’ll discover Google Gemini, previously generally known as Bard, and show tips on how to use its API to construct a easy SwiftUI app.
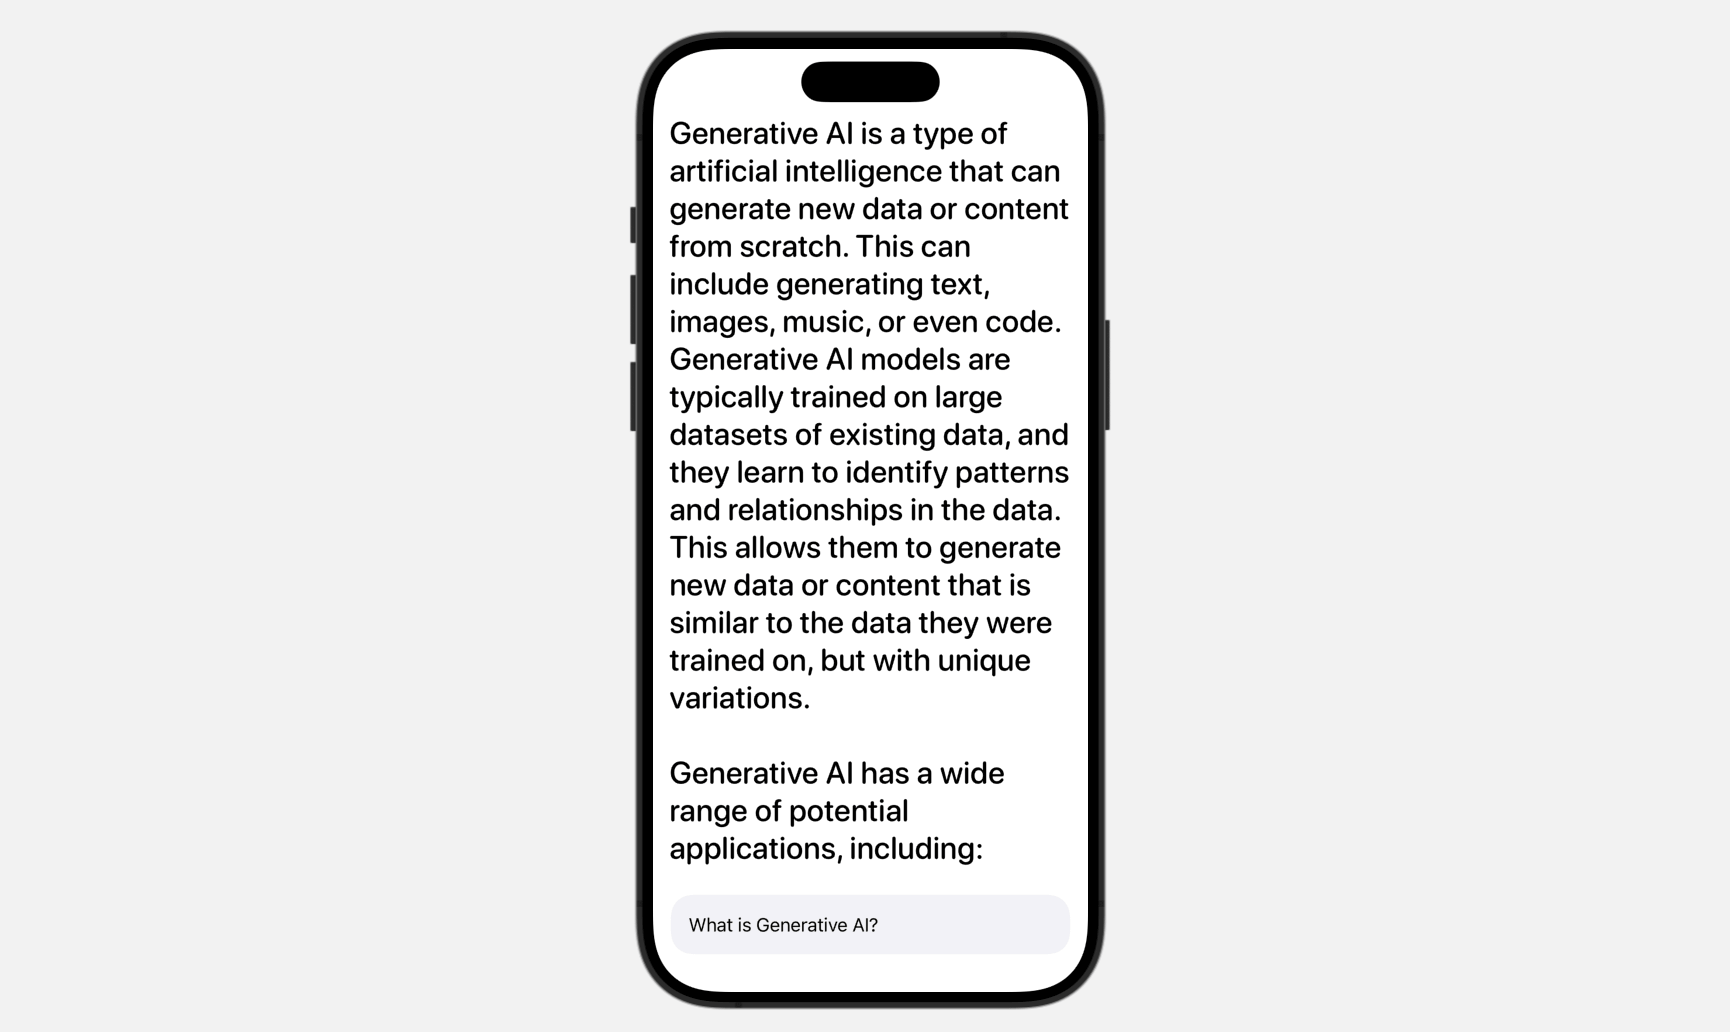
We’re set to construct a Q&A app that makes use of the Gemini API. The app contains a simple UI with a textual content subject for customers to enter their questions. Behind the scenes, we’ll ship the consumer’s query to Google Gemini to retrieve the reply.
Please word that it’s important to use Xcode 15 (or up) to comply with this tutorial.
Getting Began with Google Gemini APIs
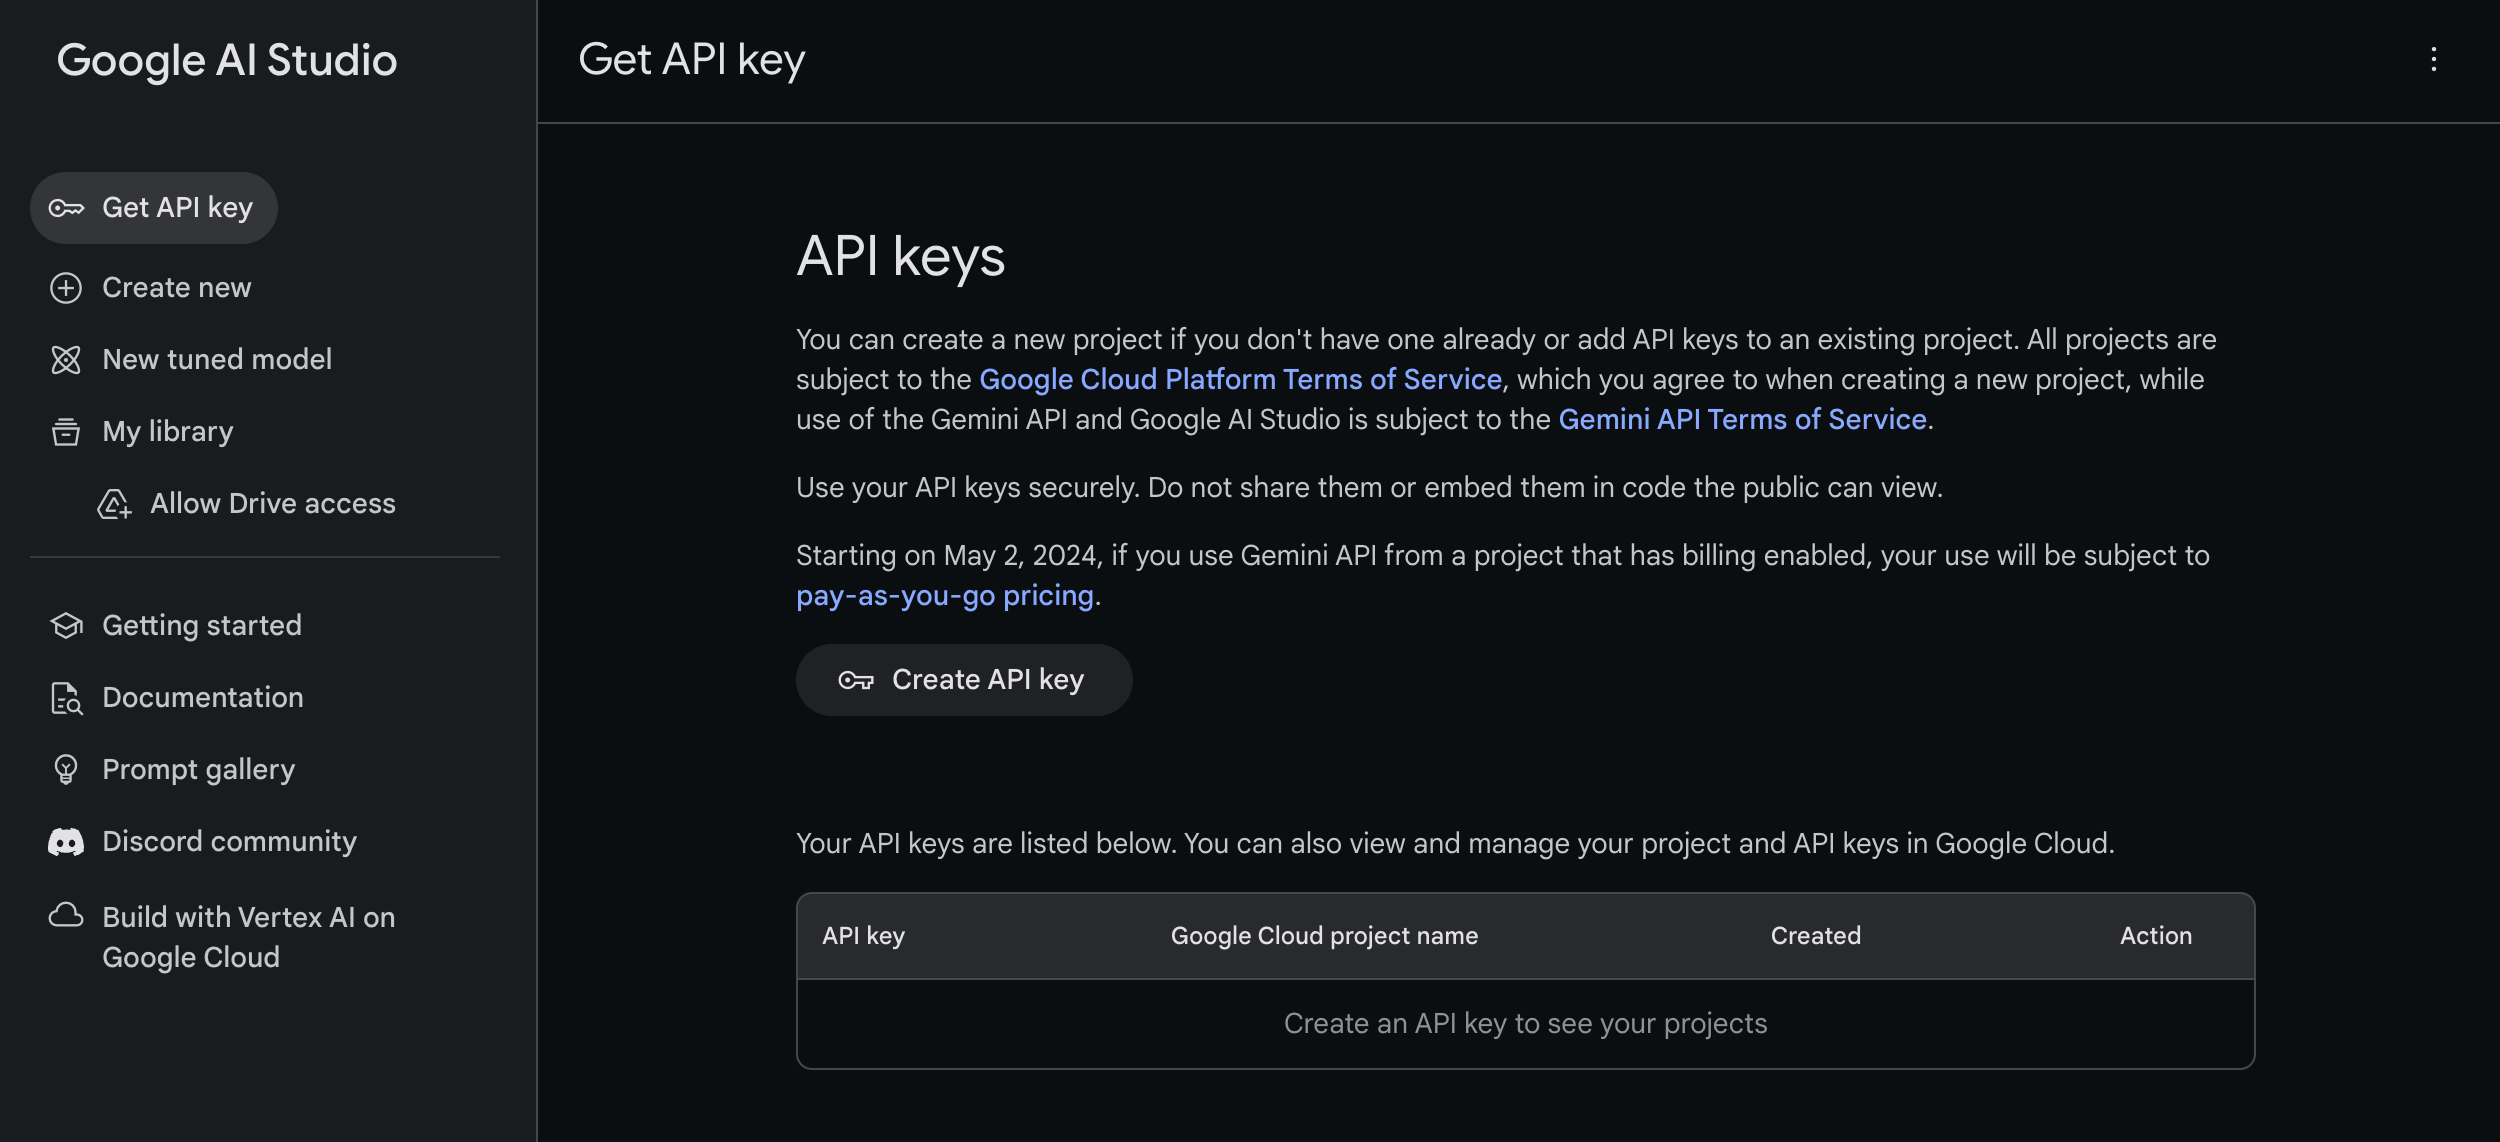
Assuming that you just haven’t labored with Gemini, the very very first thing is to go as much as get an API key for utilizing the Gemini APIs. To create one, you possibly can go as much as Google AI Studio and click on the Create API key button.
Utilizing Gemini APIs in Swift Apps
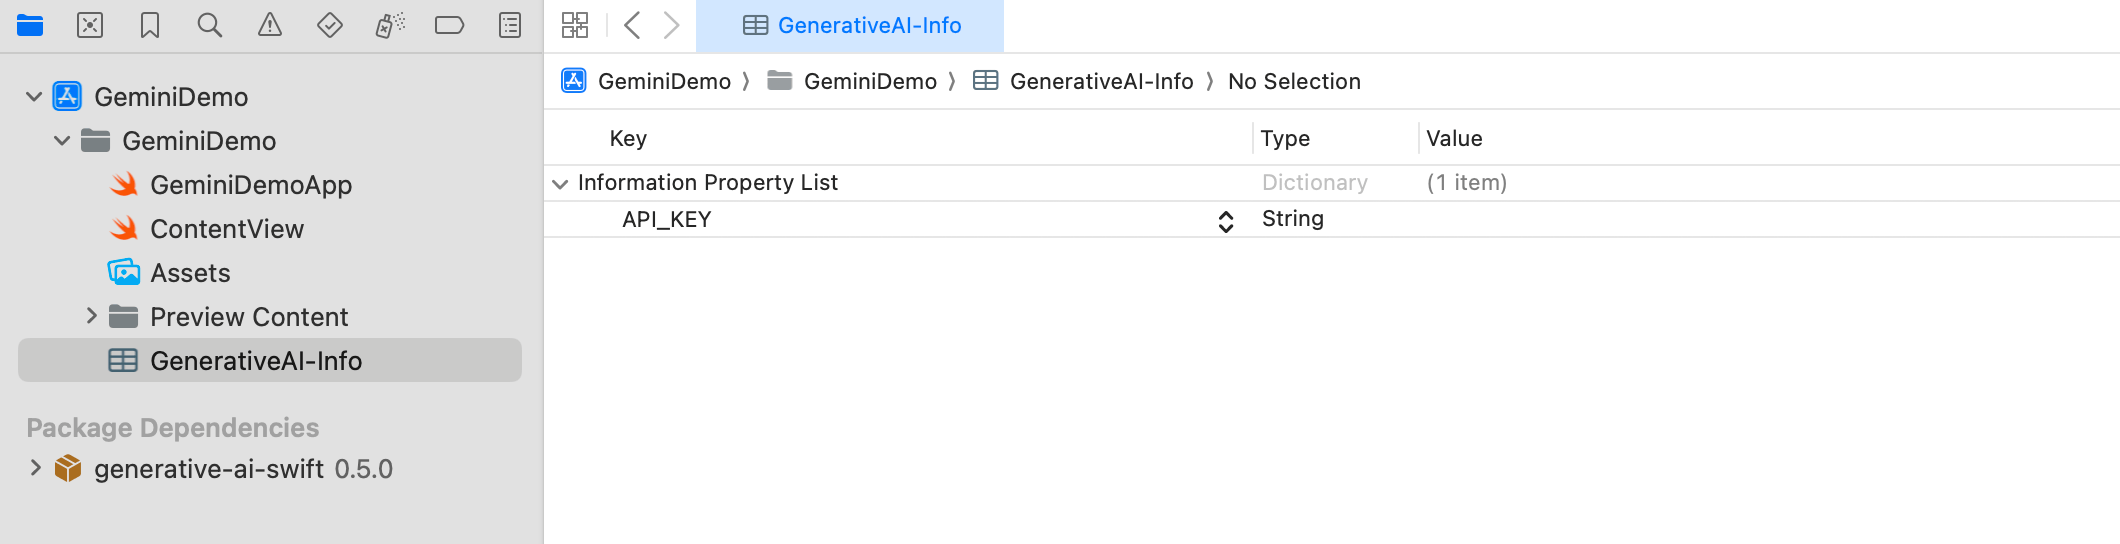
You need to now have created the API key. We’ll use this in our Xcode mission. Open Xcode and create a brand new SwiftUI mission, which I’ll name GeminiDemo. To retailer the API key, create a property file named GeneratedAI-Information.plist. On this file, create a key named API_KEY and enter your API key as the worth.
To learn the API key from the property file, create one other Swift file named APIKey.swift. Add the next code to this file:
|
1 2 3 4 5 6 7 8 9 10 11 12 13 14 15 16 17 18 19 20 21 22 23 24 |
enum APIKey { // Fetch the API key from `GenerativeAI-Information.plist` static var `default`: String {
guard let filePath = Bundle.major.path(forResource: “GenerativeAI-Information”, ofType: “plist”) else { fatalError(“Could not discover file ‘GenerativeAI-Information.plist’.”) }
let plist = NSDictionary(contentsOfFile: filePath)
guard let worth = plist?.object(forKey: “API_KEY”) as? String else { fatalError(“Could not discover key ‘API_KEY’ in ‘GenerativeAI-Information.plist’.”) }
if worth.begins(with: “_”) { fatalError( “Observe the directions at https://ai.google.dev/tutorials/setup to get an API key.” ) }
return worth } } |
In case you resolve to make use of a special title for the property file as a substitute of the unique ‘GenerativeAI-Information.plist’, you have to to change the code in your ‘APIKey.swift’ file. This modification is important as a result of the code references the particular filename when fetching the API key. So, any change within the property file title ought to be mirrored within the code to make sure the profitable retrieval of the API key.
Including the SDK Utilizing Swift Package deal
The Google Gemini SDK is well accessible as a Swift Package deal, making it easy so as to add to your Xcode mission. To do that, right-click the mission folder within the mission navigator and choose Add Package deal Dependencies. Within the dialog, enter the next bundle URL:
|
https://github.com/google/generative-ai-swift |
You may then click on on the Add Package deal button to obtain and incorporate the GoogleGenerativeAI bundle into the mission.
Constructing the App UI
Let’s begin with the UI. It’s simple, with solely a textual content subject for consumer enter and a label to show responses from Google Gemini.
Open ContentView.swift and declare the next properties:
|
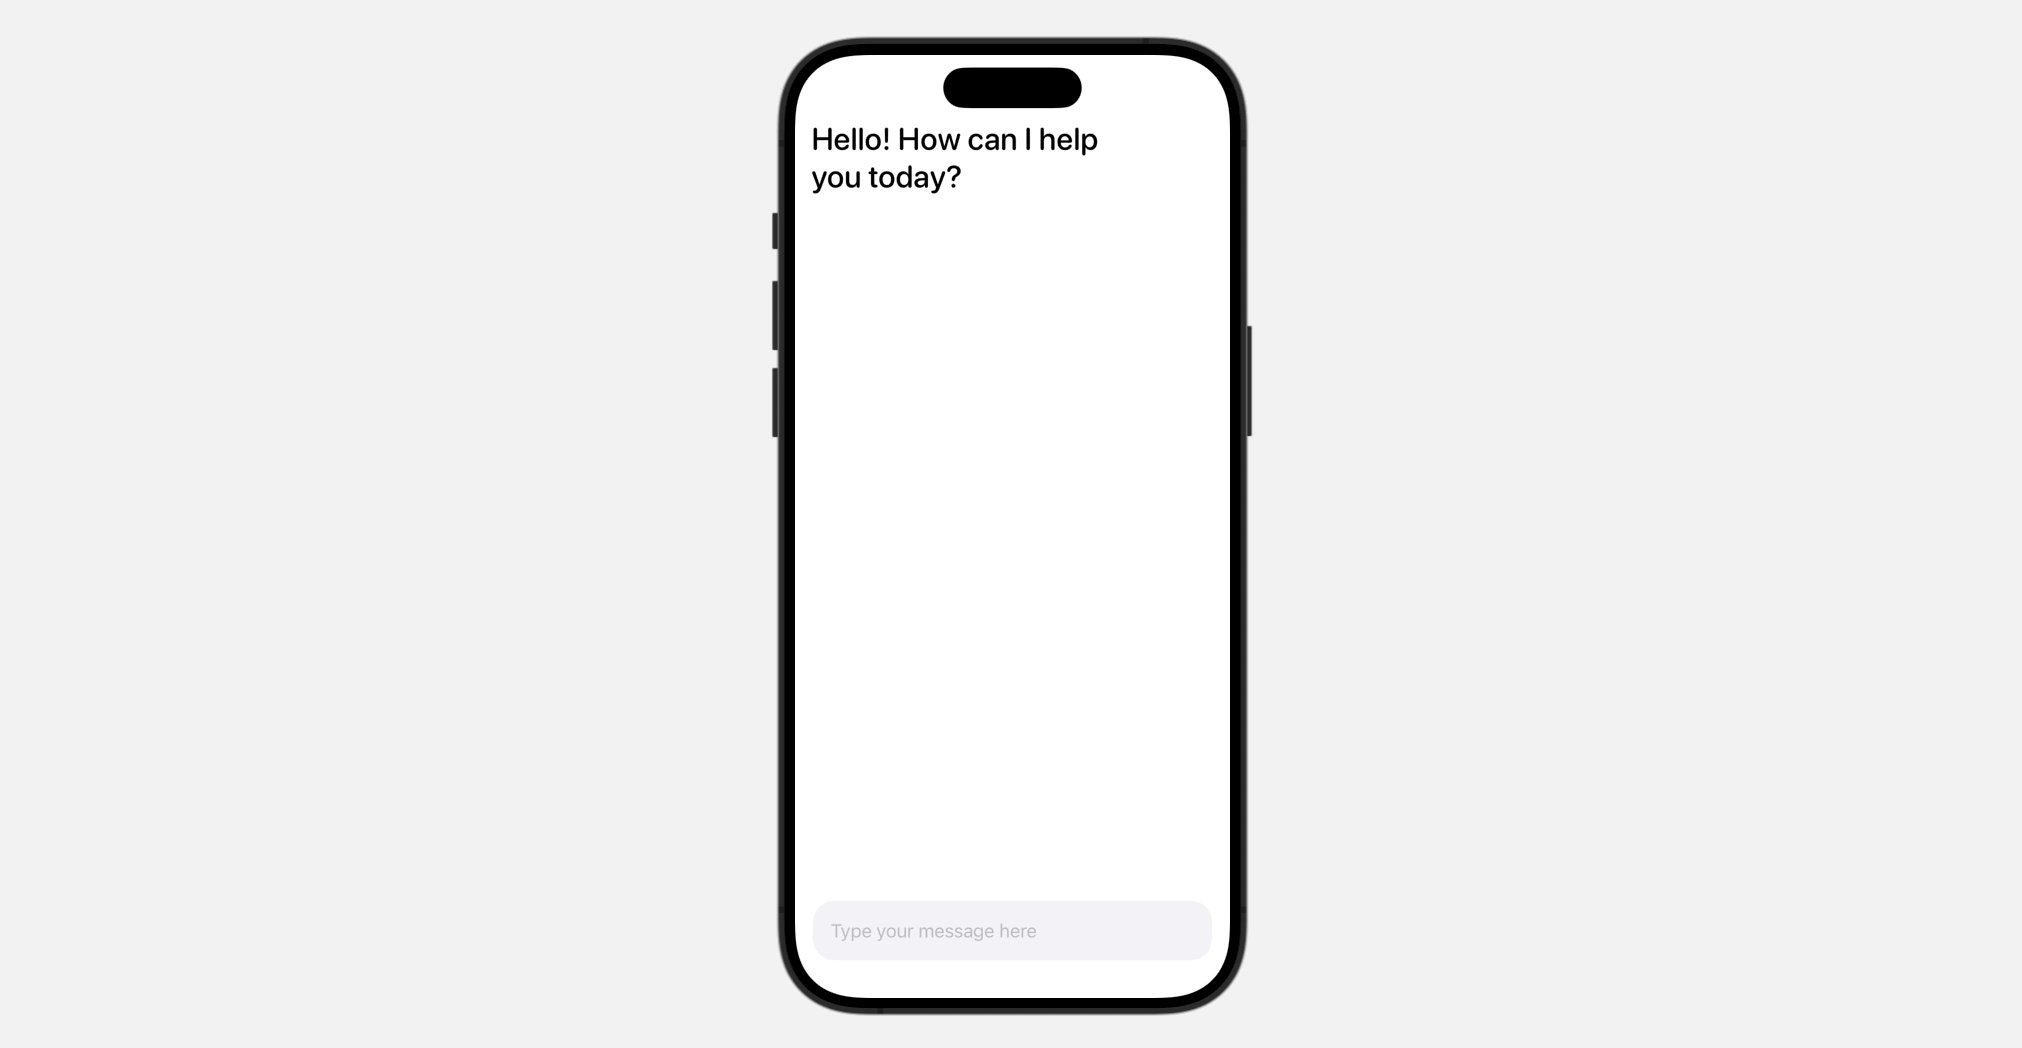
@State non-public var textInput = “” @State non-public var response: LocalizedStringKey = “Howdy! How can I aid you at present?”
@State non-public var isThinking = false |
The textInput variable is used to seize consumer enter from the textual content subject. The response variable shows the API’s returned response. Given the API’s response time, we embody an isThinking variable to watch the standing and present animated results.
For the physique variable, substitute it with the next code to create the consumer interface:
|
1 2 3 4 5 6 7 8 9 10 11 12 13 14 15 16 17 18 19 20 21 22 23 24 |
VStack(alignment: .main) {
ScrollView { VStack { Textual content(response) .font(.system(.title, design: .rounded, weight: .medium)) .opacity(isThinking ? 0.2 : 1.0) } } .contentMargins(.horizontal, 15, for: .scrollContent)
Spacer()
HStack {
TextField(“Sort your message right here”, textual content: $textInput) .textFieldStyle(.plain) .padding() .background(Colour(.systemGray6)) .clipShape(RoundedRectangle(cornerRadius: 20))
} .padding(.horizontal) } |
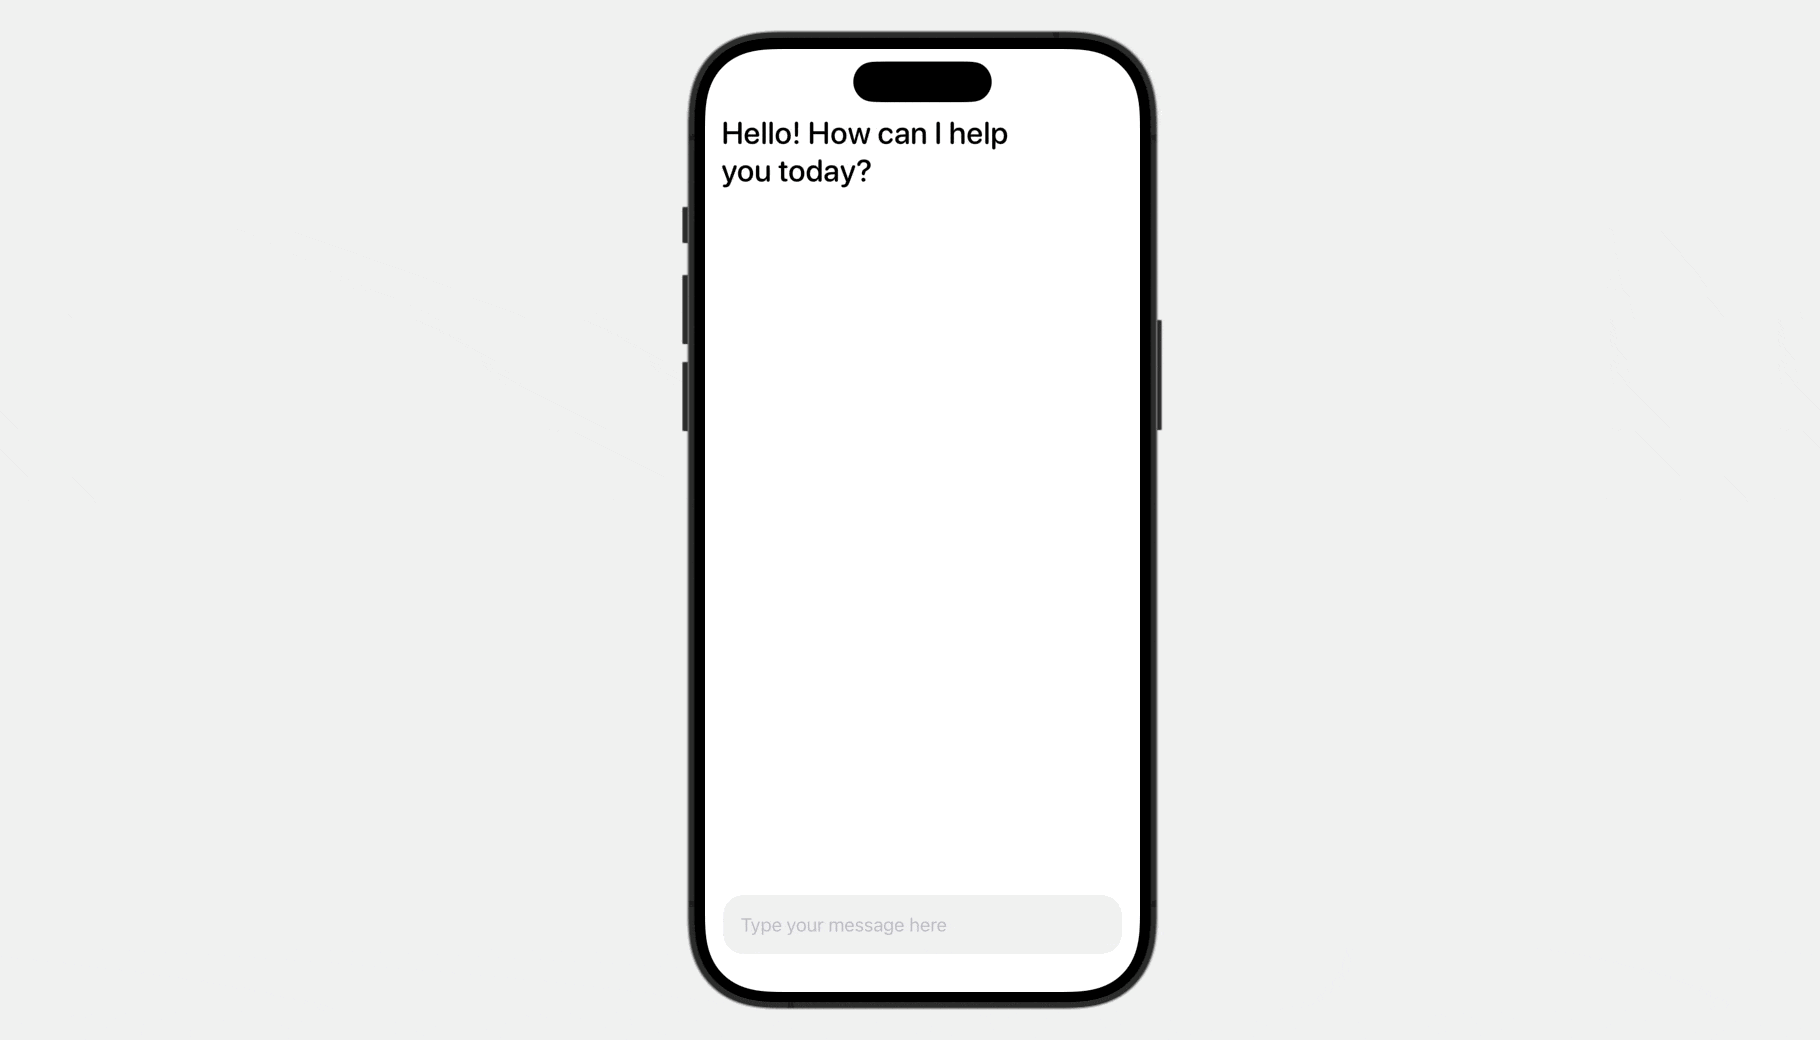
The code is kind of simple, particularly you probably have some expertise with SwiftUI. After making the adjustments, you need to see the next consumer interface within the preview.
Integrating with Google Gemini
Earlier than you should use the Google Gemini APIs, you first have to import the GoogleGenerativeAI module:
|
import GoogleGenerativeAI |
Subsequent, declare a mannequin variable and initialize the Generative mannequin like this:
|
let mannequin = GenerativeModel(title: “gemini-pro”, apiKey: APIKey.default) |
Right here, we make the most of the gemini-pro mannequin, which is particularly designed to generate textual content from textual content enter.
To ship the textual content to Google Gemini, let’s create a brand new operate known as sendMessage():
|
1 2 3 4 5 6 7 8 9 10 11 12 13 14 15 16 17 18 19 20 21 22 23 24 25 |
func sendMessage() { response = “Considering…”
withAnimation(.easeInOut(period: 0.6).repeatForever(autoreverses: true)) { isThinking.toggle() }
Activity { do { let generatedResponse = strive await mannequin.generateContent(textInput)
guard let textual content = generatedResponse.textual content else { textInput = “Sorry, Gemini received some issues.nPlease strive once more later.” return }
textInput = “” response = LocalizedStringKey(textual content)
isThinking.toggle() } catch { response = “One thing went fallacious!n(error.localizedDescription)“ } } } |
As you possibly can see from the code above, you solely have to name the generateContent technique of the mannequin to enter textual content and obtain the generated response. The result’s in Markdown format, so we use LocalizedStringKey to wrap the returned textual content.
To name the sendMessage() operate, replace the TextField view and connect the onSubmit modifier to it:
|
TextField(“Sort your message right here”, textual content: $textInput) .textFieldStyle(.plain) .padding() .background(Colour(.systemGray6)) .clipShape(RoundedRectangle(cornerRadius: 20)) .onSubmit { sendMessage() } |
On this scenario, when the consumer finishes inputting the textual content and presses the return key, the sendMessage() operate known as to submit the textual content to Google Gemini.
That’s it! Now you can run the app in a simulator or execute it straight within the preview to check the AI function.
Abstract
This tutorial exhibits tips on how to combine Google Gemini AI right into a SwiftUI app. It solely requires just a few traces of code to allow your app with Generative AI options. On this demo, we use the gemini-pro mannequin to generate textual content from text-only enter.
Nevertheless, the capabilities of Gemini AI are usually not simply restricted to text-based enter. Gemini additionally provides a multimodal mannequin named gemini-pro-vision that enables builders to enter each textual content and pictures. We encourage you to take full benefit of this tutorial by modifying the supplied code and experimenting with it.
In case you have any questions in regards to the tutorial, please let me know by leaving a remark beneath.

Oneplus Bullets Z2 Bluetooth Wireless in Ear Earphones with Mic, Bombastic Bass - 12.4 mm Drivers, 10 Mins Charge - 20 Hrs Music, 30 Hrs Battery Life, IP55 Dust and Water Resistant (Magico Black)
₹1,799.00 (as of April 24, 2024 16:03 GMT +00:00 - More infoProduct prices and availability are accurate as of the date/time indicated and are subject to change. Any price and availability information displayed on [relevant Amazon Site(s), as applicable] at the time of purchase will apply to the purchase of this product.)
Apple iPhone 13 (128GB) - Starlight
₹49,299.00 (as of April 24, 2024 16:03 GMT +00:00 - More infoProduct prices and availability are accurate as of the date/time indicated and are subject to change. Any price and availability information displayed on [relevant Amazon Site(s), as applicable] at the time of purchase will apply to the purchase of this product.)
boAt BassHeads 100 in-Ear Wired Headphones with Mic (Black)
₹369.00 (as of April 24, 2024 16:03 GMT +00:00 - More infoProduct prices and availability are accurate as of the date/time indicated and are subject to change. Any price and availability information displayed on [relevant Amazon Site(s), as applicable] at the time of purchase will apply to the purchase of this product.)
realme narzo N53 (Feather Black, 4GB+64GB) 33W Segment Fastest Charging | Slim Smartphone | 90 Hz Smooth Display
₹7,499.00 (as of April 24, 2024 16:03 GMT +00:00 - More infoProduct prices and availability are accurate as of the date/time indicated and are subject to change. Any price and availability information displayed on [relevant Amazon Site(s), as applicable] at the time of purchase will apply to the purchase of this product.)
SAMSUNG EVO Plus 128GB Micro SDXC w/SD Adaptor, Up-to 160MB/s, Expanded Storage for Gaming Devices, Android Tablets and Smart Phones, Memory Card, MB-MC128SA/IN
₹1,109.00 (as of April 24, 2024 16:03 GMT +00:00 - More infoProduct prices and availability are accurate as of the date/time indicated and are subject to change. Any price and availability information displayed on [relevant Amazon Site(s), as applicable] at the time of purchase will apply to the purchase of this product.)
Lapster 24pcs Mix Spiral Charger Spiral Charger Cable Protectors for Wires Data Cable Saver Charging Cord Protective Cable Cover
₹126.00 (as of April 24, 2024 16:03 GMT +00:00 - More infoProduct prices and availability are accurate as of the date/time indicated and are subject to change. Any price and availability information displayed on [relevant Amazon Site(s), as applicable] at the time of purchase will apply to the purchase of this product.)
HP 680 Original Ink Advantage Cartridge (Black)
₹789.00 (as of April 24, 2024 16:03 GMT +00:00 - More infoProduct prices and availability are accurate as of the date/time indicated and are subject to change. Any price and availability information displayed on [relevant Amazon Site(s), as applicable] at the time of purchase will apply to the purchase of this product.)
TP-Link TL-WA850RE Single_Band 300Mbps RJ45 Wireless Range Extender, Broadband/Wi-Fi Extender, Wi-Fi Booster/Hotspot with 1 Ethernet Port, Plug and Play, Built-in Access Point Mode, White
₹1,299.00 (as of April 24, 2024 16:03 GMT +00:00 - More infoProduct prices and availability are accurate as of the date/time indicated and are subject to change. Any price and availability information displayed on [relevant Amazon Site(s), as applicable] at the time of purchase will apply to the purchase of this product.)
Portronics Konnect L POR-1403 Fast Charging 3A Type-C Cable 1.2 Meter with Charge & Sync Function for All Type-C Devices (White)
₹119.00 (as of April 24, 2024 16:03 GMT +00:00 - More infoProduct prices and availability are accurate as of the date/time indicated and are subject to change. Any price and availability information displayed on [relevant Amazon Site(s), as applicable] at the time of purchase will apply to the purchase of this product.)
Ambrane Unbreakable 60W / 3A Fast Charging 1.5m Braided Micro USB Cable for Smartphones, Tablets, Laptops & other Micro USB devices, 480Mbps Data Sync, Quick Charge 3.0 (RCM15, Black)
₹149.00 (as of April 24, 2024 16:03 GMT +00:00 - More infoProduct prices and availability are accurate as of the date/time indicated and are subject to change. Any price and availability information displayed on [relevant Amazon Site(s), as applicable] at the time of purchase will apply to the purchase of this product.)
ELEGOO 120pcs Multicolored Dupont Wire 40pin Male to Female, 40pin Male to Male, 40pin Female to Female Breadboard Jumper Ribbon Cables Kit Compatible with Arduino Projects
$6.98 (as of April 23, 2024 16:02 GMT +00:00 - More infoProduct prices and availability are accurate as of the date/time indicated and are subject to change. Any price and availability information displayed on [relevant Amazon Site(s), as applicable] at the time of purchase will apply to the purchase of this product.)
Seagate Portable 4TB External Hard Drive HDD – USB 3.0 for PC, Mac, Xbox, & PlayStation - 1-Year Rescue Service (STGX4000400)
$99.99 (as of April 23, 2024 16:02 GMT +00:00 - More infoProduct prices and availability are accurate as of the date/time indicated and are subject to change. Any price and availability information displayed on [relevant Amazon Site(s), as applicable] at the time of purchase will apply to the purchase of this product.)
Crucial RAM 32GB Kit (2x16GB) DDR4 3200MHz CL22 (or 2933MHz or 2666MHz) Laptop Memory CT2K16G4SFRA32A
$68.93 (as of April 23, 2024 16:02 GMT +00:00 - More infoProduct prices and availability are accurate as of the date/time indicated and are subject to change. Any price and availability information displayed on [relevant Amazon Site(s), as applicable] at the time of purchase will apply to the purchase of this product.)
Corsair VENGEANCE LPX DDR4 RAM 32GB (2x16GB) 3600MHz CL18 Intel XMP 2.0 Computer Memory - Black (CMK32GX4M2D3600C18)
$81.99 (as of April 23, 2024 16:02 GMT +00:00 - More infoProduct prices and availability are accurate as of the date/time indicated and are subject to change. Any price and availability information displayed on [relevant Amazon Site(s), as applicable] at the time of purchase will apply to the purchase of this product.)